[Archives] Deprecated documentation
We are moving the documentation of the Gazelle tools to this website: https://gazelle.ihe.net/gazelle-documentation/
[Deprecated] General considerations - JBoss 5
Warning: This documentation is out-dated, newest version of the documentation is available at https://gazelle.ihe.net/gazelle-documentation/General/jboss5.html
This page describes the prerequisite to the installation of Gazelle applications. All the tools developed in the context of the Gazelle testbed project are developed for JBoss (5.0.1-GA or 7.2.0.final) and use a postgreSQL database.
We recommand to install the Gazelle tools in a Debian-like environment, it's the environment running on IHE Europe servers so we know that it is correctly working. Moreover, most of the installation and configuration procedures are described for such an environment.
PostgreSQL
We are currenlty using posgreSQL 9.1 on most of our servers.
Jboss 5.0.1-GA application server
Install a JVM and Jboss AS
We usually use the Java virtual machine provided by Oracle. If you are using Ubuntu, you can process as follows:
- Add this ppa to your sources list: deb http://ppa.launchpad.net/webupd8team/java/ubuntu precise main
- Install oracle-java6-installer and oracle-java6-set-default
echo "deb http://ppa.launchpad.net/webupd8team/java/ubuntu precise main" | tee -a /etc/apt/sources.list
echo oracle-java6-installer shared/accepted-oracle-license-v1-1 boolean true | /usr/bin/debconf-set-selections
apt-key adv --keyserver keyserver.ubuntu.com --recv-keys EEA14886
apt-get update
apt-get install oracle-java6-installer oracle-java6-set-default
Then, install JBoss-5.0.1.GA, you will find a ZIP file at http://freefr.dl.sourceforge.net/project/jboss/JBoss/JBoss-5.1.0.GA/jboss-5.1.0.GA-jdk6.zip; unzip this file.
Configure the server
Create a server to host Gazelle tools: copy ${YOUR_JBOSS}/server/default directory to ${YOUR_JBOSS}/server/gazelle. Make sure to correctly set the owner and the rights of this new directory.
To secure your server, remove admin-console.war, jmx-console.war and ROOT.war from your ${YOUR_JBOSS}/server/gazelle/deploy directory.
Database driver
JBoss WS native
Two of the actors specified in the HPD integration profile are SOAP clients. The implementation of these actors uses the web service framework of Jboss named JBoss WS native. By default, when you install JBoss 5.1.0, Jboss WS native 3.1.2 is embedded. Unfortunately, this version of the module contains some bugs and we have been forced to update this framework to a more recent version: jbossws-native-3.4.0.GA. This is the most recent version of this module which is compatible with JBoss 5.1.0.GA. To upgrade JBoss WS native in your JBoss, please refer to the documentation available on Jboss’s web site:https://community.jboss.org/wiki/JBossWS-Installation
[Deprecated] General considerations - JBoss 7
Warning: This documentation is out-dated, newest version of the documentation is available at https://gazelle.ihe.net/gazelle-documentation/General/jboss7.html
This page describes the prerequisite to the installation of Gazelle applications. All the tools developed in the context of the Gazelle testbed project are developed for JBoss (5.0.1-GA or 7.2.0.final) and use a postgreSQL database.
We recommand to install the Gazelle tools in a Debian-like environment, it's the environment running on IHE Europe servers so we know that it is correctly working. Moreover, most of the installation and configuration procedures are described for such an environment.
PostgreSQL
We are currenlty using PostgreSQL 9.1 on most of our servers.
Install a JVM
Most of our applications running on JBoss7 are using java 7. Consider installing openJDK.
sudo apt-get install openjdk-7-jre
Install JBoss 7 application server
- Get package from: http://gazelle.ihe.net/jboss/jboss-as-7.2.0.Final.zip
wget -nv -O /tmp/jboss-as-7.2.0.Final.zip https://gazelle.ihe.net/jboss7/jboss-as-7.2.0.Final.zip
Be sure to use this packaged version, we provide the postgresql driver, and use different versions for modules hibernate and javassist.
- Get init script from: http://gazelle.ihe.net/jboss/init.d_jboss7
wget -nv -O /tmp/init.d_jboss7 https://gazelle.ihe.net/jboss7/init.d_jboss7
- Install jboss in the /usr/local folder
cd /usr/local
sudo mv /tmp/jboss-as-7.2.0.Final.zip .
sudo unzip ./jboss-as-7.2.0.Final.zip
sudo ln -s jboss-as-7.2.0.Final jboss7
sudo chown -R jboss:jboss-admin /usr/local/jboss7
sudo chmod -R 755 /usr/local/jboss-as-7.2.0.Final
sudo chown -R jboss:jboss-admin /var/log/jboss7/
sudo chmod -R g+w /var/log/jboss7/
- Install the init script and make it start at system startup
sudo mv /tmp/init.d_jboss7 /etc/init.d/jboss7
sudo chmod +x /etc/init.d/jboss7
sudo update-rc.d jboss7 defaults
Install JBoss 7 application server - Automated script
wget https://gazelle.ihe.net/jenkins/job/Installer_script/ws/jboss7/setup7.sh
wget https://gazelle.ihe.net/jenkins/job/Installer_script/ws/jboss7/common.sh
wget https://gazelle.ihe.net/jenkins/job/Installer_script/ws/jboss7/jboss7
sudo chmod +x setup7.sh
sudo chmod +x common.sh
sudo chmod +x jboss7
./setup7.sh
[Deprecated] DDS - Demographic Data Server
Warning: This documentation is out-dated, newest version of the documentation is available at https://gazelle.ihe.net/gazelle-documentation
Click to here to enter the Demographic Data Server
The demographic Data Server is a tool that generates random demographic informations, and make them available for tools to use for testing purpose.
Gazelle DDS use cases
The Demographic Data Server tries to respond to the following use cases :
- Generate realistic data set to fill out a database with data for testing purpose.
- Request data on the demand through web services
- Transfert data through HL7 V2 or HL7 V3 messages (using multibyte character encoding when necessary)
- Support for different kind of character encoding.
- Support for many languages and countries
- Usage through web interface (for humans) or web services (for machines)
For more details about the various functionnalities of the DDS Tool, visit the following links.
- Log in to post comments
[Deprecated] DDS - User Manual for user interface
Warning: This documentation is out-dated, newest version of the documentation is available at https://gazelle.ihe.net/gazelle-documentation
Overview of the Demographic Data Server (DDS) project
When running a test we often need to inject demographic data. The aim of the tool is to generate the necessary data. Generated data are fictious (not real) but looks like real data. Demographic characteristics consist of
-
a name, last name, mother maiden name ...
-
date of birth,
-
sex,
-
religion,
-
race,
-
address
- etc ...
The address consists of the street, town, state, zip code and country. Addresses are randomly generated. We use the geonames database and googlemaps geocoding webservices in order to generate random addresses or more specific research. Generated addresses contains zip code information, matching the city name. Currently generated demographic information can be generated for the United-States, France, Germany and Japan. We are working on including data for more countries. Demographic Dataserver is taking into account information about the frequency of firstname, lastname, race and religion. The Demographic Data Server provides a Web User interface as well as a Web Service interface.
The java documentation of this project is available here.
DDS Web User interface
User can access to DDS using the DDS web page. The GUI offers the possibility to generate patient data, see all generated patient data and shre this patient data with other systems in HL7 v2 or v3.
How to create a new patient data ?
To create a new patient, go to the ![]() menu. In the create patient page, user will have the choice between to tabs : "Patient's generation" and "Advances Patient's generation".
menu. In the create patient page, user will have the choice between to tabs : "Patient's generation" and "Advances Patient's generation".
- In the first tab, "Patient's generation", the user will be allow to create patient information by selecting the country
 . Once the country has been selected, hit the "Generate Demographic Data" button. The generated patient will have basic information (last name, first name, other firstname, mother maiden name, gender, data of birth, patient identifier in DDS, National Patient Identifier and one address). It is possible that some of this information are missing. At the bottom of the Patient Information panel, the
  button can be used to send patient (with HL7 v2 or v3 messages) to the user system. Go to the next part below to send a patient with DDS. See below, one example of a generated patient :

- In the second tab, "Advances Patient's generation", the user will be allow to create advanced patient information by using a lot of criteria. Criteria are all in the "Generation Options" panel. Once the user has set option, just hit the
 button to generate patient information. DDS offers to the user to Preset the generation option according to the selected patient preset(s). For that, select the preset in the left panel, and hit the
  button. Once you have selected all desire presets (selected preset are in the right panel), hit the
  button to preset the option according to the selected preset(s). Then, hit the button. (You can select more than one preset at the same time). For example, if user choose the "Dead Patient" preset, the "Dead Patient" option will be set to "Yes". This functionnality allows the user to quickly set the generation option. See below the result of a generated patient information.


How to consult existing patient data ?
To see all patient data generated by DDS, go to the ![]() menu. This page show to the use, in a table, all patient data generated by DDS. User can use the FirstName and the LastName filters to search a specific patient. It is also possible to sort the patient data by Id (Id in DDS), FirstName, LastName, Gender, Race, Religion ... by hiting the
menu. This page show to the use, in a table, all patient data generated by DDS. User can use the FirstName and the LastName filters to search a specific patient. It is also possible to sort the patient data by Id (Id in DDS), FirstName, LastName, Gender, Race, Religion ... by hiting the ![]() button.
button.

In the action column :
- The
 button allows user to see the patient data in a pop-up.
 - The
 button allows user to add the selected patient in the selected patient list. This list can be used to share patient. User can add to this list many patients as he wants.
Finally, just below the patient data table, the user could find all patients of the selected patient list :
- The
 button can be used to share all patient data of the selected patient list.
 - The
 button can be used to reset the selected patient list.
The ![]() button (over the patient table) can be used to refresh the patients list of the patient data table.
button (over the patient table) can be used to refresh the patients list of the patient data table.
How to share patient data ?
The GUI allows the user to send the selected patients through an HL7 V2 or V3 messages. Once user has selected the patients to send to his system (see the section over), it is necessary to configure the sending option :
- User must select the HL7 message type and version. Four options are available, see the screenshot below.

- Once the message typas has been seleted, the user must choose the character set encoding to use (only available for the HL7 version 2). The list of character set encoding depends on the country of the patients to send.

- Then, the user must fill the Targets Selected fields. This information are relative to the user system which will receive the patient data. It is possible to send the patient data to several system at the same time. See the example below, for HL7 v2. Hit the Add button to add the configuration to the list of configuration. Be careful, your target must have a port open on the internet. Before sending messages to your system, ensure that your firewall options give to DDS the access to your system.

- Finally, hit the
 button to send all selected patient data to the configuration(s). A summury of exchanges will appear just below the configuration panel. For each message, you can hit the
  button to see the full sent message content or the full acknowlegdment message content. See the example below.

Web Services Interface
The WSDL file describing the web service is here. You can also download an example of a project soapUI that use these methods from here.
Functionalities
Functionalities of DDS can be used by web services methods. In fact, DDS implement 7 methods on web service :
- returnAddress : generate random address from the country code
- returnAddressByCoordinates : generate a specific address from country code and coordinates
- returnAddressBtTown : generate a specific address from a town
- returnHL7Message : generate HL7 message on format XML from a country code
- returnPatient : generate a patient from a country code. We can restrict generation on same persons by specifying attributes like the gender, or on specifying a nearby name or a part of the name
- returnPatientWithAllOptions : generate a patient from a country code. All options to generate a patient are available here.
- returnPerson : generate a person without address, using the same attributes of generation of a patient
- sendHL7Message : generate and send a HL7 message to a target host and port.
The documentation of classes on this jar is there.
Web Services Limitation
We do not have limited ressources to offer for this service. Thus the access to the webservice is limited to a "reasonnable" number of request per days/minute. We'd like to avoid DoS on the gazelle tools because someone is requesting fake patients every second.
Thus our limitation are :
- No more than 30 requests per IP address per minute
- No more than 3000 requests per period of 24 hours per IP address
If you'd like to generate large random data, please get in contact with Eric Poiseau and we will try to help you and generate data to fill your needs.
[Deprecated] DDS - User Manual for Web Services
Web Services Interface
The WSDL file describing the web service is here. You can also download an example of a project soapUI that use these methods from here.
Functionalities
Functionalities of DDS can be used by web services methods. In fact, DDS implement 12 methods on web service. See the table below to have further information :
|
Method Name |
Description |
Parameter Name |
Possible Values |
|
getListCountryCode |
Return all available country code. |
No parameter. | |
|
returnAddress |
Generate a specific address from country code. |
countryCode : The code of the country used to generate the Patient. |
For example : JP, FR, DE, US, ... (To know all possible values, see the ISO code of each country. Use the getListCountryCode method.) |
|
returnAddressByCoordinates |
Generate a specific address from country code and coordinates. |
countryCode : The code of the country used to generate the Patient. |
For example : JP, FR, DE, US, ... (To know all possible values, see the ISO code of each country. Use the getListCountryCode method.) |
|
lat : The lattitude of the place from which we extract the address. |
For example : 53.5459481506 |
||
|
lng : the longitude of the place from which we extract the address. |
For example : 10.204494639 |
||
|
returnAddressByTown |
Generate a specific address from a Town. |
townName : The name of the town. |
For example : Paris, London, Toronto, Roma, ... |
|
returnPerson |
Return a Person from some parameters. |
countryCode : The code of the country used to generate the Patient. |
For example : JP, FR, DE, US, ... (To know all possible values, see the ISO code of each country. Use the getListCountryCode method.) |
|
lastNameOption : Specify if you want to generate the last name or not. |
true or false |
||
|
firstNameOption : Specify if you want to generate the first name or not. |
true or false |
||
|
motherMaidenNameOption : Specify if you want to generate the mother maiden name or not. |
true or false |
||
|
religionOption : Specify if you want to generate the religion of the person or not. |
true or false |
||
|
raceOption : Specify if you want to generate the race of the person or not. |
true or false |
||
|
birthDayOption : Specify if you want to generate the birth day of the person or not. |
true or false |
||
|
genderDescription : Specify the gender of the person. |
Male, Female, male, female, m, M, f, F or Random. For other value, the gender will be generate randomly. |
||
|
firstNameLike : Specify it if you want to get a first name approaching the specified first name.(Attention, you have to choose between the firstNameLike and the firstNameIs.) |
For example : Nico, Dav, ... |
||
|
lastNameLike : Specify it if you want to get a last name approaching the specified last name. (Attention, you have to choose between the lastNameLike and the lastNameIs.) |
For example : Jam, lef, ... |
||
|
firstNameIs : Specify it if you want to get a person with this exact first name. (Attention, you have to choose between the firstNameLike and the firstNameIs.) |
For example : Nicolas |
||
|
lastNameIs : Specify it if you want to get a person with this exact first name. (Attention, you have to choose between the lastNameLike and the lastNameIs.) |
For example : James |
||
|
returnSimplePatient |
Return a simpl patient from a specific country. |
countryCode : The code of the country used to generate the Patient. |
For example : JP, FR, DE, US, ... (To know all possible values, see the ISO code of each country. Use the getListCountryCode method.) |
|
returnPatient |
Return a Patient from some parameters. |
countryCode : The code of the country used to generate the Patient. |
For example : JP, FR, DE, US, ... (To know all possible values, see the ISO code of each country. Use the getListCountryCode method.) |
|
lastNameOption : Specify if you want to generate the last name or not. |
true or false |
||
|
firstNameOption : Specify if you want to generate the first name or not. |
true or false |
||
|
motherMaidenNameOption : Specify if you want to generate the mother maiden name or not. |
true or false |
||
|
religionOption : Specify if you want to generate the religion of the person or not. |
true or false |
||
|
raceOption : Specify if you want to generate the race of the person or not. |
true or false |
||
|
birthDayOption : Specify if you want to generate the birth day of the person or not. |
true or false |
||
|
genderDescription : Specify the gender of the person. |
Male, Female, male, female, m, M, f, F or Random. For other value, the gender will be generate randomly. |
||
|
firstNameLike : Specify it if you want to get a first name approaching the specified first name.(Attention, you have to choose between the firstNameLike and the firstNameIs.) |
For example : Nico, Dav, ... |
||
|
lastNameLike : Specify it if you want to get a last name approaching the specified last name. (Attention, you have to choose between the lastNameLike and the lastNameIs.) |
For example : Jam, lef, ... |
||
|
firstNameIs : Specify it if you want to get a person with this exact first name. (Attention, you have to choose between the firstNameLike and the firstNameIs.) |
For example : Nicolas |
||
|
lastNameIs : Specify it if you want to get a person with this exact first name. (Attention, you have to choose between the lastNameLike and the lastNameIs.) |
For example : James |
||
|
returnPatientWithAllOptions |
The most complete method to return a patient. A lot of parameters are available. |
countryCode : The code of the country used to generate the Patient. |
For example : JP, FR, DE, US, ... (To know all possible values, see the ISO code of each country. Use the getListCountryCode method.) |
|
lastNameOption : Specify if you want to generate the last name or not. |
true or false |
||
|
firstNameOption : Specify if you want to generate the first name or not. |
true or false |
||
|
motherMaidenNameOption : Specify if you want to generate the mother maiden name or not. |
true or false |
||
|
religionOption : Specify if you want to generate the religion of the person or not. |
true or false |
||
|
raceOption : Specify if you want to generate the race of the person or not. |
true or false |
||
|
birthDayOption : Specify if you want to generate the birth day of the person or not. |
true or false |
||
|
addressOption : Specify if you want to generate the address of the patient or not. |
true or false |
||
|
genderDescription : Specify the gender of the person. |
Male, Female, male, female, m, M, f, F or Random. For other value, the gender will be generate randomly. |
||
|
firstNameLike : Specify it if you want to get a first name approaching the specified first name.(Attention, you have to choose between the firstNameLike and the firstNameIs.) |
For example : Nico, Dav, ... |
||
|
lastNameLike : Specify it if you want to get a last name approaching the specified last name. (Attention, you have to choose between the lastNameLike and the lastNameIs.) |
For example : Jam, lef, ... |
||
|
firstNameIs : Specify it if you want to get a person with this exact first name. (Attention, you have to choose between the firstNameLike and the firstNameIs.) |
For example : Nicolas |
||
|
lastNameIs : Specify it if you want to get a person with this exact first name. (Attention, you have to choose between the lastNameLike and the lastNameIs.) |
For example : James |
||
|
maritalSatusOption : Specify the marital status of the patient. |
Possible values are : Married or M, Single or S, Divorced or D, Unknown or U, Random or R. |
||
|
deadPatientOption : Specify if you want to generate a dead patient or not. If yes, the date of patient death will be randomly find. |
true or false |
||
|
maidenNameOption : Specify if you want to generate a maiden name for the patient or not. Attention, the maiden name can't be generate if the patient gender is not female. |
true or false |
||
|
aliasNameOption : Specify if you want to generate an alias name for the patient or not. |
true or false |
||
|
displayNameOption : Specify if you want to generate a display name for the patient or not. |
true or false |
||
|
newBornOption : Specify if you want to generate a new born patient or not. If yes, the patient will have a mother and the patient's age will be between 1 and 2 days. If the new born option is true, the marital status must be set to 'Unknown' or 'U', because a new born can't be married or divorced. |
true or false |
||
|
returnHl7Message |
Return HL7 v2 Message containing description of a patient from a specific country. |
||
|
countryCode : The code of the country used to generate the Patient. |
For example : JP, FR, DE, US, ... (To know all possible values, see the ISO code of each country. Use the getListCountryCode method.) |
||
|
receivingApplication : The Application of your system. (MSH-5) |
See the IHE Technical Framework for more information about this field. |
||
|
receivingFacility : The Facility of your system. (MSH-6) |
See the IHE Technical Framework for more information about this field. |
||
|
characterSet : The character set encoding of the HL7 message. (MSH-18) |
Possible values : It depends of each country. For example, for France, all available characters set are : UTF-8 and ISO-8859-1. If you ask for a character set which is not supported by DDS, DDS will return a SOAPException with a message to show you all possible characters set. |
||
|
hl7Version : The HL7 version of the message. (MSH-12) |
Possible values : 2.3.1 or 2.5 |
||
|
messageType : The message type of the HL7 message. (MSH-9) |
Possible values : ADT^A01^ADT_A01, ADT^A04^ADT_A01 or ADT^A28^ADT_A05. The ADT^A28^ADT_A05 is only available with the HL7 v2.5 version and the ADT^A01^ADT_A01 and ADT^A04^ADT_A01 with the HL7 v2.3.1 version. |
||
|
sendHl7Message |
Send HL7 v2 Message containing description of a patient from a specific country to a target host and port. This method return the message response.
|
||
|
countryCode : The code of the country used to generate the Patient. |
For example : JP, FR, DE, US, ... (To know all possible values, see the ISO code of each country get with the getListCountryCode method.) |
||
|
targetHost : The IP Address of your system, which will receive the HL7 message. |
Example : 137.114.220.XXX |
||
|
targetPort : The port on which your system will receive the HL7 message. |
Example : 1030 |
||
|
receivingApplication : The Application of your system. (MSH-5) |
See the IHE Technical Framework for more information about this field. |
||
|
receivingFacility : The Facility of your system. (MSH-6) |
See the IHE Technical Framework for more information about this field. |
||
|
characterSet : The character set encoding of the HL7 message. (MSH-18) |
Possible values : It depends of each country. For example, for France, all available characters set are : UTF-8 and ISO-8859-1. If you ask for a character set which is not supported by DDS, DDS will return a SOAPException with a message to show you all possible characters set. |
||
|
hl7Version : The HL7 version of the message. (MSH-12) |
Possible values : 2.3.1 or 2.5 |
||
|
messageType : The message type of the HL7 message. (MSH-9) |
Possible values : ADT^A01^ADT_A01, ADT^A04^ADT_A01 or ADT^A28^ADT_A05. The ADT^A28^ADT_A05 is only available with the HL7 v2.5 version and the ADT^A01^ADT_A01 and ADT^A04^ADT_A01 with the HL7 v2.3.1 version. |
||
|
returnHl7v3Message |
Return HL7 v3 Message containing description of a patient from a specific country. |
countryCode1 : The code of the country used to generate the Patient. |
For example : JP, FR, DE, US, ... (To know all possible values, see the ISO code of each country. Use the getListCountryCode method.) |
|
sendHl7v3Message |
Send HL7 v3 Message containing description of a patient from a specific country to URL. |
countryCode : The code of the country used to generate the Patient. |
For example : JP, FR, DE, US, ... (To know all possible values, see the ISO code of each country. Use the getListCountryCode method.) |
|
systemName : The name of your system. |
The name of your system. |
||
|
url : The URL of your system. |
The URL of your system. |
||
|
receivingApplication : The Application of your system. |
See the IHE Technical Framework for more information about this field. |
||
|
receivingFacility : The Facility of your system. |
See the IHE Technical Framework for more information about this field. |
Static WS Client for DDS
We have implemented a Static WSClient for DDS. This related jar is easy to use. You have only to add the jar file to the project, and use it. The jar file is downloadable here (on the Gazelle Maven repository).
Web Services Limitation
We do not have limited ressources to offer for this service. Thus the access to the webservice is limited to a "reasonnable" number of request per days/minute. We'd like to avoid DoS on the gazelle tools because someone is requesting fake patients every second.
Thus our limitation are :
- No more than 30 requests per IP address per minute
- No more than 3000 requests per period of 24 hours per IP address
If you'd like to generate large random data, please get in contact with Eric Poiseau and we will try to help you and generate data to fill your needs.
You can allow specific IPs to do not have limited ressources.
To do this you need to update database with this kind of request :
UPDATE dds_user_request_historic SET unlimited=true WHERE ip_address='62.212.122.29';
[Deprecated] EVSClient - Installation & Configuration
Warning: This documentation is out-dated, newest version of the documentation is available at https://gazelle.ihe.net/gazelle-documentation
External Validation Service Front-end is a maven project which calls several the web services exposed by the Gazelle tools to validate messages and documents. It may also be plugged to other validation services.
Sources
Sources of this project are available on the INRIA Forge; sources are managed using SVN. An anonymous access is available if you only want to checkout the sources (read-only access). If you intent to build the tool and to install it on your own server, we recommand to use a tagged version; not the trunk which is the development branch.
svn co https://scm.gforge.inria.fr/svn/gazelle/Maven/EVSClient/tags/EVSClient-version
To retrieve the current version of the tool, consult the release notes of the project in Jira.
Before compiling the application for the first time, you might want have to update the pom.xml file of the parent project (EVSClient) in order to configure the database connection.
Maven artifact
Each version of the tool is published in our Nexus repository, download the latest release from here. Be carreful, this released artifact is configured to connect to a database named evs-client-prod and owned by user gazelle.
Installation
Read general considerations section of the installation guides to learn about JBoss application server and postgreSQL database.
Once you have retrieved the archive, copy it to your JBoss server in the deploy directory. Be carreful, the file copied in this folder shall be exactly named EVSClient.ear.
cp EVSClient-ear-3.1.0.ear /usr/local/jboss/server/${YOUR_SERVER}/deploy/EVSClient.ear
Users of the EVSClient tool will upload files to be validated on the server, those files are stored in the file system in specific directories. Only the root of the main directory and be configured in the database. Under debian-like systems, we usually store those files at /opt/EVSClient_prod. A ZIP file is available on the Forge that you can unzip in order to easily create all the required directories, starting at /opt.
wget -nv -O /tmp/EVSClient-dist.zip "http://gazelle.ihe.net/jenkins/job/EVSClient-RELEASE/ws/EVSClient-ear/target/EVSClient-dist.zip"
unzip /tmp/EVSClient-dist.zip -d /
To finalize the installation, you must run the script which initialize the application preferences. A SQL script is available here, edit it and check its content before running it.
In order to take into account the new preferences, the application SHALL be restarted:
touch /usr/local/jboss/server/${YOUR_SERVER}/deploy/EVSClient.ear
Configuration
The application databse is : evs-client-prod.
The application uses its database to store:
- The application preferences
- The references to the standard/integration profiles that the user will be able to validate against
- The validation services which are available in the tool
- The topbar menu
- The link to the tools which forwards messages/documents to the EVSClient for validation and might query the EVSClient for the result
The following sections explain how to configure the tool.
Application preferences
Users with admin_role role can access the application preference section through the menu Administration --> Manage application preferences.
The table below summarizes the preferences which are used by the tool along with their description and default value.
| Variable | Default value | Description |
| application_database_initialization_flag | database_successfully_initialized | Indicates that the DB has been initialized |
| application_url | http://localhost:8080/EVSClient | URL to reach the tool |
| cas_enabled | false | Indicates authentication mechanism to use |
| ip_login | true | Indicates authentication mechanism to use |
| ip_login_admin | .* | Pattern to grant users as admin based on their IP address |
| cas_url | Not defined | URL of the CAS service |
| time_zone | Europe/Paris | Time zone to display time to users |
| atna_repository | /opt/EVSClient_prod/validatedObjects/ATNA | Where to store ATNA messages |
| cda_repository | /opt/EVSClient_prod/validatedObjects/CDA | Where to store CDA documents |
| dicom_repository | /opt/EVSClient_prod/validatedObjects/DICOM | Where to store DICOM files |
| dicom_scp_screener_xsl | dicom/TestDicomResults.xsl | XSL used to display Dicom SCP Screener results |
| display_SCHEMATRON_menu | false | Indicates if we need a link to the list of schematrons for download |
| dsub_repository | /opt/EVSClient_prod/validatedObjects/DSUB | Where to store DSUB files |
| epsos_repository_codes | /opt/EVSClient_prod/bin/EpsosRepository | path to epsos codes for epsos-cda-display-tool |
| gazelle_hl7v2_validator_url | http://gazelle.ihe.net/GazelleHL7Validator | Path to Gazelle HL7 Validator |
| hl7v3_repository | /opt/EVSClient_prod/validatedObjects/HL7v3 | Where to store HL7v3 messages |
| hpd_repository | /opt/EVSClient_prod/validatedObjects/HPD | Where to store HPD messages |
| include_country_statistics | true | Authorize or not the application to query geoip to retrieve the countries the users are from |
| monitor_email | test@test.com | Contact of the person who monitors the application |
| number_of_segments_to_display | 40 | Number of segment to display when displaying HL7v2 messages |
| object_for_validator_detector_repository | /opt/EVSClient_prod/validatedObjects/validatorDetector | path to the repository where object for validator_detector are stored |
| pdf_repository | /opt/EVSClient_prod/validatedObjects/PDF | Where to store PDF files |
| root_oid | 1.2.3 | Root of the OID used to uniquely identify validation requests |
| saml_repository | /opt/EVSClient_prod/validatedObjects/SAML | Where to store SAML assertions |
| svs_repository | /opt/EVSClient_prod/validatedObjects/SVS | Where to store SVS messages |
| tls_repository | /opt/EVSClient_prod/validatedObjects/TLS | Where to store certificates |
| xds_repository | /opt/EVSClient_prod/validatedObjects/XDS | Where to store XDS messages |
| xdw_repository | /opt/EVSClient_prod/validatedObjects/XDW | Where to store XDW messages |
| application_admin_email | contact@evsclient.net | Contact of the person responsible for the application |
| application_admin_name | contact | Person responsible for the application |
| application_issue_tracker_url | http://gazelle.ihe.net/browse/EVSCLT | URL of the project in the issue tracking system |

References to standards
What we call a referenced standard in the EVS Client tool is an entry which indicates the underlying standard or integration profile implemented by the system which produces the documents and/or messages that the tool is able to validate. We use this concept to structure both the Java code and the graphical user interface.
A referenced standard is defined by a name, optionaly a version and an extension. Then each entry in the database is given a unique label and we can also provide a name to be displayed to the user in the drop-down menus and a description explaining what is the standard and what the tool is going to validate.
Note that a pre-defined list of standard names is available and matches the standard for which a validation service client has been implemented within the tool.
Administrators will access the section of the tool which enables the configuration of the standards from Administration --> Manage referenced standards. This page lists the standards already defined within the tool. You can edit them or add new ones.
When you create a new standard, make sure you use a unique label. In addition, check the spelling of the extension, it might be used by the tool to query for the list of available validation methods. Note that you can also provide a link to the image to be used in the drop-down menus. For XML-based documents/messages, you can provide the list of the XML stylesheets to use to nicely display the document/message to the user.
Currently available standards are HL7v2, HL7v3, CDA, TLS (stands for certificates), DSUB (metadata), XDS (metadata), XDW (metadata), HPD (messages), SVS (messages), WADO (requests), DICOM, SAML (assertions), ATNA (Audit messages).

Validation services
A validation service in the context of the EVSClient tool is either a web service exposed by another tool or a binary executed directly on the server or even a JAR library called by the tool. An entity has been created in the tool to store all the information about those services. It makes easier the management of the services and allows a different configuration depending on the location of the EVSClient tool.
Going to Adminisration --> Manage validation services, the administrator will access the list of all the validation services which are declared and used by the application. Each entry can be edited. You can also create new entries.
When defining a validation service you need to provide:
- A name and a unique kewyord
- The validation engine (mainly used for validation of XML-based messages/documents; in that case SHALL be schematron or model-based in order to indicate to the tool which client stub to use)
- The link to the stylesheet used to display the result (validation service might return results as an XML string)
- The endpoint to reach the service (may also be a path to a binary on your system)
- You can also indicate if the validation service is available to the user or not
- The list of standards to which this validation service applies.

Configuring the top bar menu
A menu bar is made of two kind of entities, the menu groups which are the menu entries displayed in the top bar and the menu entries which are the entries displayed in the drop-down list. The top bar menu of EVSClient is built using a list of menu groups stored in the database. Administrator users can update this list from the page accessible at Administration --> Menu configuration. On this page are lists all the menu groups defined for this instance of the tool.
A menu group is defined by:
- a label and an icon (path to the icon can be relative to the application or can be an external reference)
- its order on the page
- the list of referenced standards which will be available from this menu group
- a boolean which indicates whether or not displaying the menu group
For each standard listed in the menu group, the icon will be the one defined at standard level. For each menu (except for DICOM) the sub menus will be "validate", "validation logs" and "statistics". Links to these sections are automatically built from the standard name and extension.
Calling tools
Some tools of the Gazelle testbed send validation requests to the EVSClient. To do so, we use servlets and then we may want to send back the result to the calling tool. We assume that not only one tool will send such requests, we maintain a list of tools which are likely to redirect the user to the EVS Client.
This list is accessible under Administration --> Calling tools.
For each tool, we need an OID which uniquely identify the instance of the tool and the URL used to send back results. Currently two categories of tools can use the EVSClient in this way, Gazelle proxy instances and Gazelle Test Management instances; you need to precise it to the tool so that the EVS Client knows how to send back results (if the feature is available in the calling tool).

Dicom validator installation
Dicom3Tools
We need to install Dicom3Tools :
- sudo apt-get install g++
- sudo apt-get install xutils-dev
Download the last dicom3tools version (http://www.dclunie.com/dicom3tools/workinprogress/) and untar it.
Go in the untar folder.
- ./Configure
- make World
- sudo make World install
Now, you need to make symbolic link in /opt/dicom3tools :
- sudo ln -s /usr/local/bin/dcdump dcdump
- sudo ln -s /usr/local/bin/dciodvfy dciodvfy
- cd ..
- sudo chown -R gazelle:gazelle dicom3tools/
Pixelmed
- Launch a build of http://gazelle.ihe.net/jenkins/job/Pixelmed-jar/
- Download Pixelmed-jar-x.x.x-script.zip (exemple : http://gazelle.ihe.net/jenkins/job/Pixelmed-jar/ws/target/Pixelmed-jar-1.0.1-SNAPSHOT-script.zip)
- sudo mkdir /opt/pixelmed
- sudo chown gazelle:jboss-admin /opt/pixelmed/
- unzip it in /opt/pixelmed/
- edit /opt/pixelmed/bin/pixelmedValidator.sh, add JAVA_HOME={path to java 7 home}
[Deprecated] TM - Test Management
Warning: This documentation is out-dated, newest version of the documentation is available at https://gazelle.ihe.net/gazelle-documentation/Test-Management/user.html
- Log in to post comments
Gazelle Test Management Feature List
The following table summarizes the list of features in the Gazelle Test Management Tool.
| Feature | Bordeaux 2010 |
Pisa 2011 |
Chicago 2012 | Bern 2012 |
| Registration Process Management | ||||
| Users Management | x | x | x | x |
| Contacts Management | x | x | x | x |
| Companies Management | x | x | x | x |
| Contracts Management | x | x | x | x |
| Fees Management | x | x | disabled | x |
| Systems Management | x | x | x | x |
| Test Definition Management | ||||
| Tests Management | x | |||
| Binding to Gazelle Master Model | x | x | x | |
| Test Session Management | ||||
| Configuration management | x | x | x | x |
| Proxy Management | x | disabled | x | |
| Order Manager | ? | x | ||
| Monitor Management | x | x | x | x |
| Test Update Notification | disabled | x | ||
| Goodies | ||||
| Mobile Test Grading for Monitors | x | ? | x | |
| Single Sign On | x | disabled | x | |
Test Management Components
Testing Session Management
Gazelle Test Management can handle multiple testing sessions. The Multiple Test session can be run in parallel. Monitor and Systems register for specific testing session. One can select the coverage of the testing session in terms of Domain and/or Profile. One can also specify the type of testing to be performed in a testing session : Pre-Connectathon, Connectathon, Certification.
Users Management
Module for the management of gazelle users and their roles. Handles the users account management: registration, lost password, user information update. Handles the management of the roles of the users.
Users are associated to an organization. .
Contacts Management
Management of the contacts for a participating company. Allows the participating companies to enter contacts within Gazelle. Contacts are mainly used for administrative purposes. Used to identify the financial contact, the contact for marketing questions and the contact for technical questions.
Contacts are NOT required to have a login.
Organizations Management
Management of all organization relative information. This information is mainly for the purpose of the connectathon management. Users, Contacts and Systems belongs to an organization. The module allows the management of the information about the organization : Address, Contacts, VAT information,... Read more...
Contract Management
Component that manages the creation of the contract for testing session participants. Summarize the registration of the participants and create a pdf document based on a template that can be customized for each testing session. This makes use of the jasperreport library. The link to the jasperreport template for the contract definition in a testing session, is specified within the properties of the testing session. One has the choice to enable or disable it for a given testing session. Read more...
Fees Management
Component for the management of invoice (generation of the invoice, based on a template) and estimation of the amount of the fees to be gathered for an event based on participation. Helpful for connectathon management. Invoice generation is dependent of the testing session and as for the contract based on a template that can be specific to a session. Can be disabled for a given testing session. Read more..
Systems Management
Module for the management of Systems Under Tests (SUT). Manages the registration of the SUT for a testing session. What are the actors, integration profiles and options supported by each SUT. Allow participants to copy system characteristics from one testing session to the other.
Contains a rules engine that checks if the system correctly implements the IHE requirements of dependencies among the actors and profiles.
Tests Management
Modules for the definition of the tests. Test requirements per Actor/Profile/Options. Test script definition : Who are the participants ? What are the instructions for the participants ? What are the steps required to perform the test ?
Proxy Management
Interation with the Proxy component. Control of the proxy, instruct the proxy of the interfaces to open and close for testing purposes. Allow participants to link test instance steps to corresponding messages captured by the proxy.
Simulator Management
Component for the declaration and the management of the simulators that Gazelle uses to perform the tests.
Configuration Management
Management of the configuration of the systems and simulators performing together in a testing session. Knowing that most of the time spend during testing is lost during exchange of configuration parameters, it is essential that Gazelle allows the test participants to correctly and rapidly share configuration informations. That component allows the user to provide the information relative to their own systems. It also allow the test participants to rapidly find the relevant information about their peers in a test.
Monitor Management
Management of the monitors. Monitors are the independent and neutral individuals that check and validate the test performed during a testing session. The component allows the Technical Manager to assign tests to specific monitors. It allows the manager to split the load of test verification among the monitors. Test can be assigned to monitors either test by test, or monitor by monitor
Samples Sharing Management
Module for sharing samples. This component allows registered system to share and find samples. Some system need to provide samples, some need to render them. The component allows the participants to easily find the samples relevant for their systems. The sample sharing module is linked to External Validation Services for checking the conformity of the shared samples. The component makes also use of internal validation services
When relevant, the component module allows sample creators to provide a screen capture of the rendering of their samples. It also allows sample readers to provide a screen capture of the rendering of the sample on their system.
A sample and a test can be linked together. This is usefull in the case of scrutiny test. Read more...
Pre-connectathon Test Management
Allows managers to define the pre-connectathon test : Where to find the tool ? Where to find the documentation ? What actors/profile/options are concerned by the test.
Allows participants to find out what pre-connectathon tests they have to perform, to return corresponding logs and view result of logs grading. Read more...
Connectathon Test Management
Allows the managers to define the tests.
- What is the purpose of the test ? (assertion tested)
- What actors/profile/options are concerned by the test ? (test participants including the cardinality for each participants)
- The scenario of the test (sequence diagram of the interactions between the participants to the test), including the definition of what need to be checked at each step.
- How many instances of the test are required for a SUT to be declared as successfull to the test.
Allows engineers to find out what test need to be performed by their systems.
Allows engineers to start a test and select its participants (peer system under test or simulators)
Connectathon Test Grading
Module to allow the grading of systems participation during the connectathon. Allows the project managers to review test performed a determine success or not of a system to the participation of a specific actor / integration profile / option combination.
Patient Demographics for Testing Purposes
Module for sharing patients among the participants to a test instance. The module allow generation of simulated patient data using the Demographic Data Server. Generated patient data can be send to a selection of test participants using HL7 V2 or HL7 V3 messages.
Selection of the target is done based on systems configuration as declared in Gazelle. Target can be also configured manually. The component allows the management of multiple patient identification domains. The generated patient are assigned a unique id in the various patient identification domains of the target systems.
Stored data information can be used for validation of messages exchange by test instance participants.
Single Sign On
When enable component of Gazelle Test Management allows user to use a CAS server for their identification. Allows harmonization of the logins among the different applications. All Gazelle simulators also use the CAS login component. JIRA bug tracking system makes also use of it. Read more...
Test Update Notification
The purpose of the Test Update Notification is to reduce the load on the server that is hosting the Gazelle application. It allows connectathon participants to be informed of updates on the test instances that are of concern for them. Instead of refreshing the Gazelle Connectathon Dashboard all the times the participants are informed of new tests instances creation, updates, comments and grading.
Order Manager Binding
This feature is an extension of the Patient Demographic for testing purposes. It allows in addition of the creation of dummy patients, to create encounters and orders for them and send them to test participants. This is useful in the context of preparing the right conditions for a test. All SUT participating to a test can be aware of the same patient, encounter and order. Read more...
Mobile Test Grading for Monitors
This feature add a webservice front end to Gazelle Test Management in order to allow the grading of the test using a mobile device like a WIFI enabled tablet PC (iPad) or a smart phone (iPhone, android...). Monitors can use their mobile device to scan a QR code on the page of test instance to grade and then directly access the page on their device. Read more...
- Log in to post comments
[Deprecated] Gazelle Test Management User Manual
Warning: This documentation is out-dated, newest version of the documentation is available at https://gazelle.ihe.net/gazelle-documentation/Test-Management/user.html
This page indexes the different links to the user manual for the Gazelle Test Management application.
Basic Terminology
Test Types
No Peer
- Test run by your self. There is no need of a test partner to run this type of test
- Used for conformance testing of artefacts (document, messages) that the SUT can produce.
- No peer tests are usualy pre-requisite to Peer to Peer tests.
Peer to Peer
- Test run with one or two partners SUT.
- Test scheduled by SUT manager.
Group Test
- Test run with a larger group of SUT
- Test scheduled by management
Thorough / Supportive
See more information there. The Thorough / Supportive testing mode is defined at registration time.
Thorough Testing
- For those who do not qualify for Supportive Testing. The default testing mode.
Supportive Testing
- For profiles in Final Text
- For Actor / Integration Profile / Option that have been tested by the vendor in a past connectathon
- There must be a published integration statement
- Used for participants who would like to help partners
Test / Test Instance
Test
A definition of a test involving one or more IHE actors in one or more profile.
Test Instance
One instance of a test with specific test partners
Registration Process
During the Registration process, the Gazelle Test Management Application gathers information needed in order for an organization to participate in an upcoming testing session.
To complete registration for a testing session, an organization uses Gazelle to enter:
- User account(s) in Gazelle
- Organization details
- Contact persons in your orgainzation
- System information - the profiles/actors/options that you will test
- Participant information - people who will attend the testing session
When this information is complete, you may be asked to generate a contract in Gazelle for the testing session.
"How to" details for these tasks follow in the pages below.
- Log in to post comments
Registration concepts
Organization
In Gazelle, an organization is the entity that is presenting test systems at the Connectathon.
IHE publishes Connectathon results are per organization, thus, the organization name, address, and finanical contact you enter in gazelle is important.
Users and Contacts
A “User” has a login and password to access the gazelle webtool
A “Contact” is a person in your organization who will interact with us in preparation for the connectathon:
- Financial Contact (only 1)
- Marketing Contact (1 or more)
- Technical Contact (1 or more)
A user may, or may not, be a contact
Users and Contacts belong to an Organization
Users Roles
Two levels of users :
- Vendor admin role
- Approves new user accounts for your organization
- Can edit user and contact information
- Can edit organization info (eg address)
- Can edit all test system & testing details
- Vendor role
- Can edit all test system & testing details
System
In Gazelle, a ‘system’ represents
- a set of IHE profiles, actors and options an organization wants to test.
- Participate in the testing session as the SUT
Testing Session
Gazelle Test Management can manages multiple testing session. A testing sessions may represent:
- Connectathons
- Internet Testing
- Projectathons
When a user logs in to Gazelle, the user is viewing information for a single testing session. Gazelle always "remembers" the last testing session a user was working in. A user may switch between testing sessions. How-to instructions are here.
Creating and managing user accounts for an organization
A "user" is person with a login and password to access the Gazelle Test Management tool. A user in Gazelle is always linked to an organization. A user can only view/modify information for that organization.
Creating a new user account
To create a new user, go to the home page of Gazelle Test Management and click on the link "Create an account"

Then you need to fill the form with valid information.
If your organization is already entered in gazelle, select it from the "Organization Name" dropdown list; otherwise select "New company" as the "Organization Name" in to create a new organization in Gazelle.

Whn you complete the user information, an email is then sent to you to confirm your registration.
The user account is not activated until a user in your organization with admin privileges in Gazelle activates your account.
User privileges in Gazelle
If you are registered as a user with 'vendor' privileges in Gazelle (the default), you can manage the tests and configurations for your organization's test systems.
If you are registered as user with 'admin' privileges in Gazelle, you are able to :
- manage users related to your organization (activate/de-activate accounts)
- manage contacts to your organization
- manage the testing session participants
- manage contracts and invoice
Managing your organization's user account as a "vendor_admin" user
As an admin user you can manage the users in your organization from Gazelle menu Registration -> Manage users
You can use this form to activate or de-activate user accounts, or update email or password for a user.

Registering an organization
Gazelle gathers information about organizations participating in a testing session. This enables managers of the testing session to contact you about invoicing and other testing session logistics. The organization information is also used when publishing the successful results of a testing session.
Organization information is entered in two scenarios
- If an organization is registering in Gazelle for the first time, a user creating an account in Gazelle is asked to link the account to an organization and enter organization details.
- You can edit the information for your organization through the Gazelle menu Registration --> Manage organization information. The organization information is as follows:


Contacts Management
A "Contact" is a person in your organization who will interact with managers helping you to prepare for the testing session.
An organization must identify:
- Financial Contact (only 1)
- Marketing Contact (1 or more)
- Technical Contact (1 or more)
Note: a "contact" may, or may not, be a person with a "user" account in gazelle
A user with vendor_admin privileges can enter contact information in Gazelle with menu Registration --> Manage Contacts
The page looks like this.
Selec the "Add a contact" button to enter name, email and phone information for the contacts in your organization.

Entering system information -- profile/actor/options to be tested
In Gazelle Test Management, the term "system" refers to a set of application functionaity expressd in terms of IHE profiles, actors, and options. An organization may register one or more systems in a testing session.
The "system" participates in the testing session with peer "systems" from other organizations.
"System registration" is an important step because the profiles/actors/options you select drive much of what happens during the test session. It determines:
- what test tools you will use
- what test you will be required to perform
- who your test partners will be
Starting system registration
First, ensure that you are logged into the Testing Session that you want to register for. The name of the testing session is displayed at the top of the page whenever you are logged into gazelle. You can learn more about testing sessions here.
Next, the system registration page is accessed through Gazelle menu : Registration -> Manage Systems.
On that page you can :
- Add a system : This will create a new system in the Gazelle tool.
- Import systems from another testing session : A click on that button enables you to copy a system from a previous testing session into this new testing session. The new systems contains all of the profiles/actors/options that you registered in the previous session. You will be able to modify them if you wish. The name and the keyword of the system are appended with the string "_COPY" in order to distinguish the new system from the old one.
The instructions below assume you select Add a system.
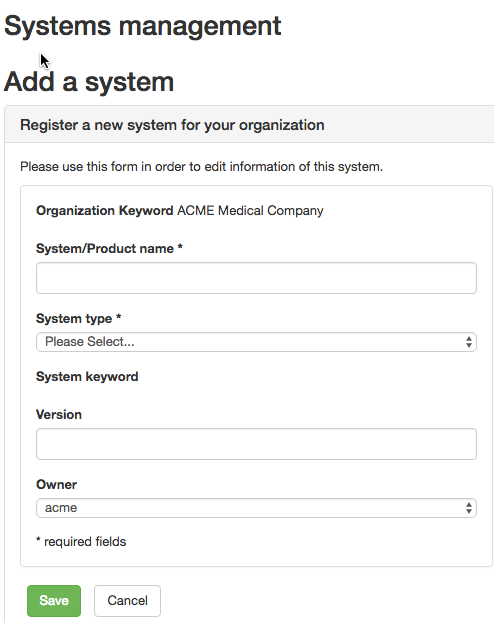
Completing the System Summary
You will be prompted for general information to identify your system:
- System/Product Name - this is how you refer to your system within your organization
- System type - you will select from a drop-down list of labels that are general categorizations of systems under test (eg "PACS", "EHR", "GATEWAY"). There is no right or wrong selection here.
- System keyword - this is how we will refer to your test system during the testing session. This field is auto-filled by Gazelle. It is a combination of the system type you selected and your organization's acronym (eg "EHR_ACME"). You can append a suffix to the gazelle-generated value.
- Version - an optional field that enables you to identify the version of your product
- Owner - this is a user within your organization who will have primary responsibility for managing this system during the test session
Completing the Profiles/Actors tab
After saving the system summary information, Gazelle creates a System Management page to collet information about your tests system.
The next step is toProfiles/Actors tab and Edit.
Select "Click on this link to add IHE Implementations..."
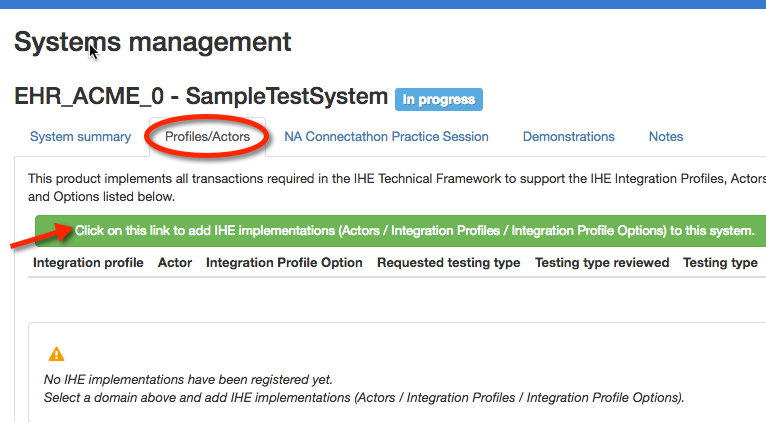
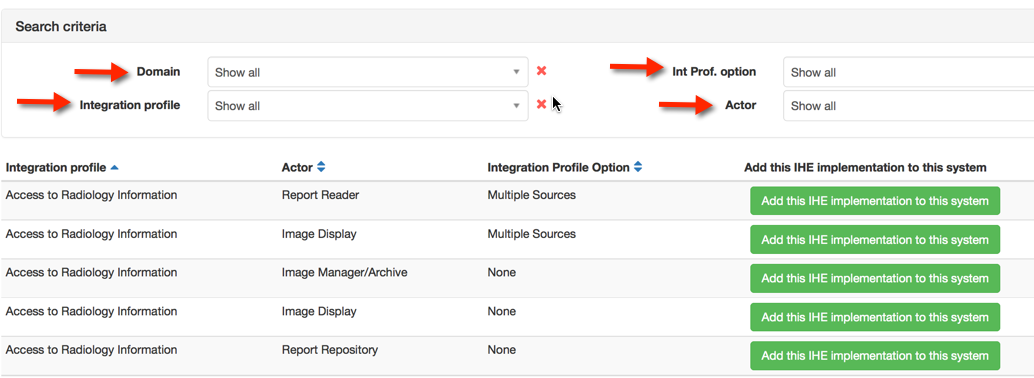
Next, you will use the dropdown lists to select the Domain, Profile, Actor, Option supported by your system. After making your selection, click on "Add this IHE Implementation to this system." You will repeat this procedure for each profile, actor, and option your system supports. Note that the "None" option represents the baseline requirements for that profile/actor without any option.
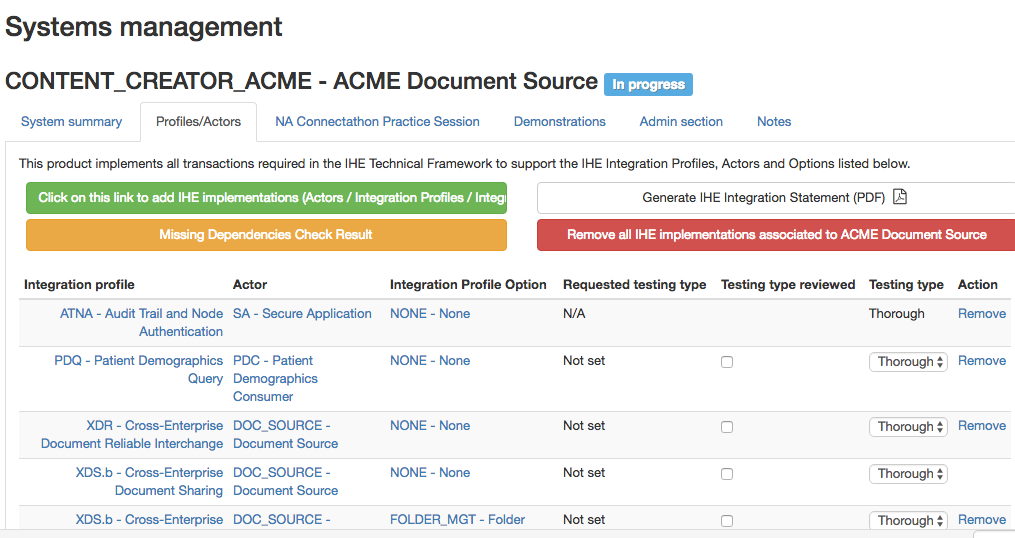
When you have selected the profile, actor, and options for your test system, they will appear on the Profile/Actors tab of your system's registration as follows:
Finishing System Registration
To finish your system registration:
- On the "Profile/Actors" tab, look for the yellow "Missing Depenendencies" button. If it appears, it means that you have registered for a profile/actor that has a dependency on another profile. Select the button to complete registration for those dependencies.
- On the "Profile/Actors" tab, some of the profile/actor pairs you selected may be eligible for "Supportive" testing. "Thorough vs Supportive testing" is explained here.
- On the "System Summary" tab, change the Registration Status from "In progress" to "Completed". This is a signal to the technical manager of your testing session that you have completed your registration for this system
Generating a contract in Gazelle
Introduction to contract generation
The Gazelle Test Management tool is used to generate a contract for some testing sessions.
The contract includes the information you have entered into gazelle during the registration process:
- Organization details
- Contacts in your organization - financial, marketing, and technical
- One or more systems to be tested and several contacts .
If any of these is missing, Gazelle will not let you generate a contract.
To generate your contract
A gazelle user with "vendor_admin" privileges is able to generate a contract. Select Gazelle menu Registration --> Financial Summary
First Level Registration Errors
This section contains common error messages that occur when generating a contract. The error messages in red are generated by Gazelle. The numbers in ( ) are pasted onto the screen capture and refer to notes below the figure.
- The mailing address is missing for the company
- This is for general correspondence with your company.
- Select Registration -> Manage company information
- Under Mailing address, add an address for your company. This is on the right half of the form. Select Click here to add a new address. If you already have entered an address but you were presented with the error message, you need the next step that associates the address as your company mailing address. This first step adds an address to our database, but does not make it your mailing address.
- The address that you entered is presented in a table with the rightmost column an action column. If you have added a second address, you will see a table with two lines. To associate an address as your mailing address, click on the Select link in the appropriate row.
- You will now see the address copied from the right part of the form to the left side of the form, including the country flag. Scroll down and select Save. That should get rid of error (1).
- Missing address for Financial Contact
- This address is for the person in your organization responsible for processing our requests for payment.
- Select Registration -> Manage company information
- Scroll down to the Billing address section. Add an address on the right side of the form; Select Click here to add a new address.
- i) You might already have an address for your company that is the same for thisperson. Great; skip down to iii.
- ii) If you don’t have an address registered for this financial contact or the address of the financial contact differs from the main address, add it now.
- iii) In the table of addresses on the right side of the form, under the Billing address section, click on the Select link in the appropriate row.
- iv) You will now see the address copied from the right part of the form to the left side of the form.
- Scroll down and select the Save button.
- Missing Technical Contacts
- We need to verify that there are one or more staff members in your organization we can contact for testing and other technical details.
- Select Registration -> Manage contacts
- You will see a table of contact points in your organization. That table might be empty or already have members. You can add a contact person with the Add a contact button in the upper right corner. For this error (Missing Technical Contacts), make sure you select the checkbox for Technical.
- If the Technical Contact was already listed in the table but is not indicated as a Technical Contact in the Professional functions column, edit the row for that person (right most column of the table, edit button). Select the checkbox for Technical and do not forget to hit Save.
- We require at least one contact entered in the system for the generation of the contract. You are welcome to enter more technical contacts. This will be useful for organizations that have multiple systems, each with a separate technical contact.
- If you are bringing one system and three engineers, please enter one candidate as your technical contact. That person would be able to answer most technical questions or delegate to someone else. Please do not enter a person who is merely going to contact your engineers and pass along the questions.
- Missing Marketing Contacts
- We need to verify that there are one or more staff members we can contact if we have marketing questions (is there a logo we can use in documentation? What is the exact name to use for your company?).
- Refer to (3) above. Rather than selecting the checkbox for Technical, select the checkbox for Marketing/Commercial.
- The same person can fill the roles for Billing, Technical and Marketing/Commercial. We split them out for those organizations that have separate duties.
- Missing System Information
- If there is missing system information, you have registered zero systems for testing. The purpose of the contract is to explicitly list what you will test and include a computation for fees. You will need to register the system or systems you wish to test and all profile/actor pairs to be tested.
- Select Registration -> Manage systems
- Enter one or more systems.
- Make sure you save the systems.
- Make sure you select the Profile/Actors tab and enter what you want to test. Check for missing dependencies (ATNA requires CT).
- Fill in information if you plan to participate in a Showcase/Demonstration
- Missing Domain Information
- This means you have either entered zero systems, or you have entered systems but included no profile/actor pairs.
- Refer back to (5) for details.
Second Level Errors: Dependencies
Many IHE Integration Profiles have dependencies defined in the documentation. One example is that an ATNA Secure Node is always required to implement the Time Client actor in the Consistent Time profile. When you enter registration information, there is a button available to you labeled Check for Missing Dependencies. Rather than automatically register you, the system gives you this button to let you check when you feel it is appropriate. A box will pop up, list the missing dependencies, and give you the option to click a link to add them on the spot.
When you return to the financial page, one section will list all of your registered systems. The grid will give the system name, domains tested and fee information. One column will also indicate if all dependencies have been resolved. A green icon indicates sufficient registration; a red icon means that a dependency needs to be satisfied.
You cannot generate a contract if there are dependencies to be resolved, so you need to return to the page for managing systems.
- The rules defining dependencies are written in the Technical Frameworks. We transcribe those rules into Gazelle.
- The rules defining dependencies do not identify all combinations that you will find important. For example, the XDS.b profile requires the Document Source and Document Consumer to obtain a consistent patient identifier for an Affinity Domain but does not specify the mechanism. We support that with the PIX and PDQ profiles for Connectathon testing, but do not require that. Participants fail to register for PIX or PDQ and are then surprised to realize they do not have a mechanism to obtain the patient identifier in the Affinity Domain.
Register Participants to Testing Session
This page describe how to register the participants to a Testing Session. Participants to the testing session are the person who will get a badge an will be able to enter the floor where the testing in taking place.
Registration of the participants to the Testing Session can only take place when the registration of the systems is over.
Only the users with the role "vendor_admin" can register participants to the testing session.
One accesses the participants registration page through the menu Registration -> Testing Session Participants
See the illustration below :

There are 3 means to register a participant to a testing session :
- import from users
- import from contacts
- add participant
Import from Users
By selecting the button import from users, one can select the participants to add from the list of registered users for the organization.
Import from Contacts
By selecting the button import from contacts, one can select the participants to add from the list of contacts already declared in Gazelle Test Management tool. Contacts do not need to have a login.
Add Participants
When selecting the button add participants, the users can enter manually all the information about the participant to register.

User Preferences
User preferences are mainly used the GazelleTest Management application to customize some views according to the user's wishes. The main preferences you may want to update are
- The number of results (rows) in table
- Whether or not you want the diagram sequence of a test to be displayed on the Test Instance page. If not, you may save some space in the page, the one will be lighter to load.
User preferences can also be used to communicate some useful pieces of information to monitors and other connectathon participants, such as your photo, the languages you speak...
To configure your own user preferences, you must first log in to Gazelle. Then, on the top right corner of Gazelle, click your username and then select User Preferences (shown below).

This link leads you to your preferences management page. If you never change anything, the page may look something like this.

Preferences on this page:
Change your password
Skype account During the connectathon week, it can be useful to communicate using Skype. Such a field already exists for the system but a monitor for example, who does not own systems may want to "publish" his/her Skype name to speak with other monitors or participants.
Table Label During the connectathon week, you will sit at a table, the one will be localized by everybody thanks to a table label, typically A1, J10... When you sit the first day of the connectathon, fill this value so that other attendees will find you more easily.
Spoken languages The languages you are able to speak.
Hit the Edit button to update those fields. The following panel will be displayed.

When you hit the "plus" icon, a menu is displayed and you can pick up your language(s). If need, hit the "red cross" button in front of a language to remove it from the list. When finish, hit the "finish" button.

When you hit the "add/change photo" button, a panel like the one below is displayed. Clicking on "add" will open your file repository. Select your photo, only PNG and JPG files are allowed. Be careful to do not choose a too large image, all images with a height greater than 150px will be proportionately resized up to 150px (height).

Do not forget to save your changes before leaving this page.
- Log in to post comments
Testing Session
Concept of the Testing Session
Gazelle Test Management can manages multiple testing session. A testing sessions may represent:
- Connectathons
- Internet Testing
- Projectathons
Testing sessions are created by Gazelle Test Management administrators.
When a user logs in to Gazelle, the user is viewing information for a single testing session. Gazelle always "remembers" the last testing session a user was working in. A user may switch between testing sessions.
Selecting a Testing Session
In order to change testing session, log in to Gazelle. The name of your current testing session is displayed at the top of the screen.
To change testing sessions, select the "Switch" button.

Then select the session of your choice by clicking on the check-mark in the right column and press the "Continue" button on the bottom right of the page

The top of the screen displays the name of the testing session that you have selected.
- Log in to post comments
Pre-Connectathon Testing
Testing before IHE Connectathons is a requirement and is achieved using software written by several different organizations
An index to all available tools for testing IHE profiles is provided at the following URL: http://wiki.ihe.net/index.php?title=IHE_Test_Tool_Information
Gazelle helps Connectathon participants manage the pre-connectathon test.
- Based on the system declared list of actors and profiles, Gazelle will identify the list of test that needs to be executed.
- Gazelle provides information about the location of the documentation of the tests
- Gazelle provides a mechanism for a participant to return the test logs and for a connectathon manager to grade the returned logs.
Getting the list of test to be performed
This screen capture presents the Pre-connectathon test overview page in gazelle. The page is accessed through the menu : Connectathon->Pre-Connectathon Testing.

It shows the list of systems registered by the Organization, and for each system :
- the number of tests to do
- the number of tests to complete
- the number of tests verified
Click on the link in the: "Number of tests to do" column in order to view the detailled list of test to be executed for each system:

If you have a long list of tests, use the filters at the top.
Each row in the table represents one pre-Connectathon test and contains:
- a test identifier, usually a number. Hover your mouse over the test number to see a tooltip containing the test name
- a globe icon which is a link to the detailed description for the test. These test descriptions exist on several different websites, depending on the tool used.
- the profile, actor, and option the test applies to
- Optionality. R=the pre-Connectathon test is required. O=the pre-Connectathon test is optional.
- Status of the test
- Running--you are still working on it
- Verified by vendor--you have run the test, confirmed that the results are good, and uploaded evidence of that result (eg a log file, screen shot)
- Completed, with errors--you have run the test, but some problems occurred--either with the tool or with your implementation. You have made a comment in the test explaining the error.
- Supportive--you have registered for supportive testing. Selecting this status is a signal to connectathon management that you are choosing to skip this test (but you could perform it if you wish).
- A link to enable you to "Return a log file"
To learn how to submit results for a pre-Connectathon test, click on "Return logs for performed tests" below.
Return logs for performed tests
The general process for performing a pre-Connectathon test instance is:
- Read the Test Description (test steps). This is found by clicking the globe icon in the test.
- Access the tool used for this test (if applicable). An index to all IHE tools is here: http://wiki.ihe.net/index.php?title=IHE_Test_Tool_Information
- Perform the test.
- Capture evidence of your success; this may be a log file output by the tool, a screen capture showing success, or a text file you create that describes your successful result.
- Upload the result file into gazelle using the 'Upload a file' button. You can 'drag and drop' a file onto the button, or use your file browser to select the file.
- Change the status of the test
- Running: you are still working on it
- Verified by vendor: you have run the test, confirmed that the results are good, and uploaded evidence of that result (eg a log file, screen shot)
- Completed, with errors: you have run the test, but some problems occurred--either with the tool or with your implementation. You have made a comment in the test explaining the error.
- Supportive: you have registered for supportive testing. Selecting this status is a signal to connectathon management that you are choosing to skip this test (but you could perform it if you wish).
This screen capture presents an example pre-Connectathon test instance in gazelle:

Sample Sharing
The following sections describe how to use the Gazelle Test Management application to share samples (DICOM images, CDA documents...) and to verify the content of those samples.
Concepts -- sample sharing
Gazelle has a feature that allows participants in a testing session to share sample objects with other participants.
In Gazelle a "sample" is any object or message that an application creates and is used by another application. Typical samples include:
- DICOM object
- ISO image of DICOM CD-ROM or DVD
- CDA documents
- XDW documents
- HL7 messages
- ...others...
Gazelle Test Management uses the profiles and actors selected during Connectathon System Registration to determine which systems are 'creators' of samples and which system are 'consumers' of samples
Creators upload a file containing their sample into Gazelle.
Creators may use the Gazelle EVSClient tool to perform validation of the sample.
Consumers find samples uploaded by their Creator peers. Consumers download the samples and are able to test them with their application.
The following pages in this section detail how to upload, validate and access samples in gazelle.
Uploading a new sample
Creators of samples include DICOM Modalities, Content Creators of CDA documents, and other actors. These systems upload samples into Gazelle so that they are available to their test partners.
To upload a new sample, select Gazelle menu Connectathon-->Connectathon-->List of samples

When you select your system from the dropdown list, the "Samples to share" tab shows a list of samples for which your system is a creator. The list is based the profiles/actors in your system registration.
To add a new sample, for click the green "+" button next to the sample type.

Give your sample a name as follows:

Next complete the "summary" tab, and on the "file(s)" tab, upload a file containing your sample.
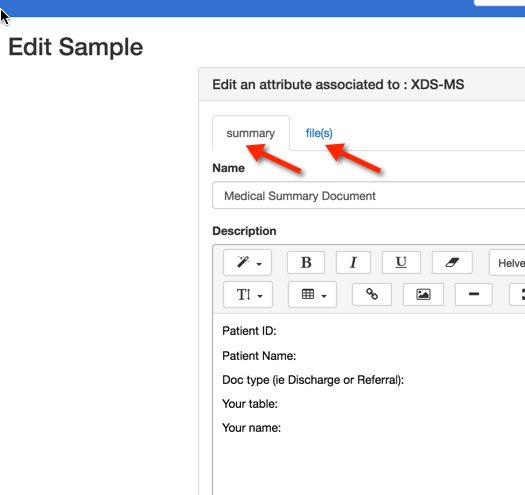
When you have finished uploading your file and saving your sample, the sample entry in Gazelle will look like this:

Verifying samples using Gazelle EVSClient
After creators upload their sample file(s) into gazelle, it is possible to validate that content using the Gazelle EVSClient tool. (Note that Gazelle has validators many sample types, but not all.)
On the "Samples to Share" tab, find the entry for the file uploaded. Clicking on the green arrow will call the Gazelle EVSClient application:

In the EVSClient application, select the proper validator from the dropdown list. In this example, we are validating a DICOM image:

Depending on the type of sample you are validating, you may need to choose the tool and execute the validation. The results will appear at the bottom of the page:

And, here is a screen shot of a the validation result for a CDA document. The gazelle EVSClient shows a "permanent link to the sample". You may be asked to provide that link as evidence for a test case. The validation status and details appear at the bottom.

Finally, note that you can use the EVSClient application directly. See these EVSClient tests: https://gazelle.ihe.net/content/evs-client-tests
Accessing shared samples
If your systems is a Consumer of objects (documents, images...), to access samples that have been uploaded by Creators, select Gazelle menu Connectathon-->Connectathon-->List of Samples
After selecting your system from the dropdown list, find the "Samples available for rendering" tab as follows:

When you select a sample from the list, you will have access to sample details and can download the sample file(s):

System Configuration
Default configurations are assigned to the systems participating to a testing session. Once the Testing Session manager has assigned the configurations, participants can edit them and approve them.
This section describe how to edit and approve the configuations in Gazelle Test Management
The configurations are accessed through the menu "Configurations" as shown on the follwoing screen capture

HL7v2
This page present the form to edit the HL7v2 configurations :

HL7v3
DICOM
Webservices
Extract Configs from Gazelle
This page explains how to export the configuration information from Gazelle in a format the SUT can use to configure themselves.
There are 2 methods to get the configurations from test partners :
For the moment the only export format is CSV (Comma Separated Values) files generation.
Export Peers configuration parameters from the GUI
When searching for peers configurations in Gazelle (menu Configurations-> All Configurations)

In the configurations page, when available, click on the link "URL for downloading configurations as CSV" :

This URL is accessing the parametric service for downloading configurations.
testingSessionId, configurationType and systemKeyword are parameters that can be set by accessing the URL directly :
Europe : http://gazelle.ihe.net/EU-CAT/systemConfigurations.seam
North America : http://ihe.wustl.edu/gazelle-na/systemConfigurations.seam
System keyword is given if you use the GUI.
You can build the url that matches your need and have periodic query to the tool in order to feed your SUT with the most up to date information from the database.
Here are examples on how to use it :
- http://gazelle.ihe.net/EU-CAT/systemConfigurations.seam?testingSessionId=25&configurationType=HL7V2InitiatorConfiguration
- http://gazelle.ihe.net/EU-CAT/systemConfigurations.seam?testingSessionId=25&systemKeyword=ADT_AGFA_ORBIS_8.4
The response is a CSV file like this one :
"Configuration Type", "Company",  "System" , "Host" , "Actor" , "is secured", "is approved" , "comment" , "aeTitle", "sopClass","transferRole","port" ,"port proxy" ,"port secured"
"DICOM SCU","AGFA","WS_AGFA_0","agfa13","IMG_DOC_CONSUMER","false","false","For optional DICOM Q/R","WS_AGFA_0","QR","SCU","","",""
"DICOM SCU","AKGUN","PACS_AKGUN_2012","akgun10","PPSM","false","false","","PACS_AKGUN_2012","MPPS","SCU","","",""
Export peers configuration parameter using SOAP webservices
The wsdl of the webservice to access the peers configuration parameter is located there :
For Europe :
For North America :
http://ihe.wustl.edu:8080/gazelle-tm-gazelle-tm-ejb/ConfigurationsWS?wsdl
OID Management
This page explains how to access the OID values assigned to the systems participating to a testing session.
There are 3 methods for that purpose :
Export OIDs from GUI
You can get the list of OIDs from the GUI : configurations --> "OIDs for current session". On this page, you can do a search for a specific OID by filtering on the institution, the systemKeyword, the testing session, the integration profile, the actor, the option, and the label of the OID (homeCommunityId, organization OID, etc).
You can then use the link "Export as Excel file" to get an xls file containing all OIDs looking for.
Export OIDs using Rest webservices
You can generate directly a CSV file containing the oid, the label and the system keyword, by using REST webservice. The URL of the webservice is :
http://131.254.209.16:8080/EU-CAT/oidSystems.seam?systemKeyword=XXX&testingSessionId=YYY&requirement=ZZZ
where arguments used are :
| Argument | Opt | Type | List of Possible Values |
| systemKeyword | O | String | |
| testingSessionId | R | Integer | |
| requirement | O | String |
|
Export OIDs using SOAP webservices
The wsdl of the webservice to access the OIDs of systems is located there :
http://131.254.209.16:8080/EU-CAT-prod-TestManagement-ejb/ConfigurationsWS?wsdl
The concerned methods are :
- getListOIDBySystemByRequirementAsCSV : return a csv string which contains all OIDs searched by systemKeyword, testingSessionId and oidRequirementLabel
- getOIDBySystemByRequirement : return exactly the first OID searched by systemKeyword, testingSessionId and oidRequirementLabel

Network Configuration
The page Network Configuration Overview provides the users with the necessary information for the current testing session.
The information provided in that page is of 2 kind.
A blob where the administrator of the current testing session can provide to the participants a list of usefull an relevant information. This can be the networking parameters:
- Default gateway
- DNS
- Netmask
- ...
But it may also contain the information for the printer that is on site.
The page also provides a button to download a hosts file for the configuration of the systems that do not support DNS.
THe preferred method is for the participants to the testing session to use DNS in order to resolv hostnames. However we have encountered some systems in some past session that could not use DNS. So we have provided a mean to give the participants the access to a hosts file that can be installed on their SUT for name resolution.
Note that hosts file is NOT dynamic and the hosts file will have to be reloaded and reconfigured by the participants who have chosen not to use DNS after each test partner IP or name change.
Once the hosts file is downloaded it can be used to configure the SUT. Please refer to the operating system of the SUT for the set up of that file. Below is a list of pointer for 3 OSes
Connectathon Testing
Different category of tests
There are 3 types of test :
- No peer tests
- Peer to peer tests
- Group tests
Starting a Test Instance
Connectathon Dashboard
Gazelle Test Management users access the connectathon dashboard through the menu "Connectathon -> Connectathon " as shown on the following screen capture.

The dashboard offer advance filtering capabilities and allows the user to have an overview of the testing progress from different angles.

Monitor Workflow
Test validation workflow
- Find test in the monitor worklist
- Claim test (release it if necessary)
- Review test requirements
- Visit participants, look for evidence
- Grade the test
- Verified -> Done
- Failed -> Enter comments, done
- Partially Verified -> Enter comments, done
Gazelle Monitor App
The Gazelle Monitor application has been developed to help monitors validating tests without spending their time running from their desk to the participants' table. If the monitor own a smart phone with a WiFi connection, they will be able to claim and validate tests from their smart phone.
The GazelleMonitorApp is a tomcat application designed for mobile screens. It requires the installation of an application on the mobile devide that scans a QR code (for example http://en.wikipedia.org/wiki/QR_code).
The application you choose will depend on your device. You can download Barcode scanner, Google or other free applications from your market places. The use of MobileTag is discouraged since it accesses the links through an external server, and that will not work from most connectathon floor.
We have successfully tested the application with Android phones, iPhones and Windows phones.
In Europe, you will access the application at the following URL : http://gazelle.ihe.net/GazelleMonitorApp , the QR code leading to this application is given below:
How to proceed
After you have installed the QR scanner, connect your mobile device to GazelleMonitorApp application and sign in using your login and password; they are the same as what you use to connect to Gazelle (Test Management). Once the application has identified you, a cookie is stored in your (mobile) browser for 7 days (connect-a-thon duration) so that you will not have to sign in again even if your session expires. If it does not work, check that cookies are enabled in your browser. To remove this cookie, go to the application home page and use the "logout" button.
|
Home page |
|

 login page, use your Gazelle account
This workflow assumes that you have claimed one or more tests from the Gazelle Monitor Worklist, most likely using a laptop/PC. Once you are logged in with your mobile device, hit the "View claimed tests" button. If you are monitor at a Connectathon that is currently in progress, you will see the list of available testing sessions, as shown below. Selecting one of the testing sessions will lead you to the list of test instances you have claimed for that testing session. To select another testing session use the "Sessions" button of the navigation bar.
|
Choose your testing session |
Here is the list of test instance you have claimed and which still need work |
summary of a test instance. Click on update to see details and verify it, click on unclaim to release it |


A second workflow allows you to claim a test directly with your mobile device. You can do this at the participant table or using Gazelle at your laptop/PC. At your laptop/PC, go to Connectathon --> Monitor Worklist, you will see the list of test instances you can verify and claim them. Select a test instance by its identifier (id). When that brings up the Test Instance page, a QR code is displayed beside the metadata of each test instance (see the photo below). By scanning this QR code, for instance, you will be lead to the home page of GazelleMonitorApp; hit the "I've flahed a code" button, the test instance will appear (if you have access rights !)
|
Run a QR code scanner and flash the code |
Click on "I've flashed a code" to confirm and display the test informations |
Update informations and submit the result ("submit" button at the bottom of the page) |


By clicking the "View selected test instance" you confirm that you want to claim this instance. Nevertheless, the application may not be able to assign you this test for one of the following reasons:
- No test instance with the given id has been found within Gazelle
- You are not logged in or not a monitor for the testing session in which the test instance has been performed
- The test instance has already been claimed by someone else
- The test instance status is not either "to be verified", or "critical", or "partially verified"
- The connect-a-thon in which the test instance has been performed is over
When you get the screen with the test instance information, change the test status to failed, passed or patially verified. You may optionally change the status of individual test steps or leave a comment before submitting the result. If you want to add a long comment or if you prefer to change the step status using Gazelle Test Management, submit only the test status using the mobile app and then go to GazelleTest Management for further work. You can easily retrieve a test instance by its id using the search bar at the top of the home page of Gazelle Test Management on your laptop or PC.
Test Instance Workflow
Test Instances Statuses
A test instance can have the following statuses :
- Running : this is the initial state of a test instance, once the user press on the "Start" button.
- Paused : A test instance can be paused, and the restarted by the user.
- Aborted : If the test instance was started per mistake, or is a duplicate of an existing test instance. Then one can abort it. Aborted test instances are not checked by monitors.
- To be verified : Once a test instance is completed, the user can set it status to "to be verified". Monitors work list contains test instances with that status.
- Failed : Based on the evidences and the observation of the logs or the actual run of the test by vendors, a monitor may fail a test.
- Verified : A monitor once convinced that the test is successful can mark it as verified
- Partially verified : If a monitor thinks that a test is incomplete but that their is a chance that the vendor may fix the problem during the test session, then he/she can mark the test as partially verified.
- Critical : Sometime toward the end of the connectathon, the project manager activates the "critical" status mode in Gazelle. Monitors verify then the Test instances with the status critical first.
Test Instances Transitions states
From the Vendor perspective

From the Monitor perspective
Monitors work on test instances that have one of the 3 following status:
- To be verified,
- Critical or
- Partially Verified.
The output status are :
- Failed
- Verified
- Partially Verified
")
Complete state diagram for Test Instances

Validation of test steps logs within test instance
The aim of this page is to explain how the validation result displayed on a test instance page are retrieved from the EVSClient tool.
When a test instance is created, the page looks like:

The are different possibilities, like the next sequence diagram shows :

If we choose the first case, which is to add the permanent link from the proxy in a step message :

When it 'is added :

The file is to be validated in Proxy to EVSClient, the test instance page looks like (use the refresh button is not) :

We can see in data column the last validation status from EVSClient.
We can see in EVSClient status column :
-A color button (green=passed, blue=unknown or not performed, red=failed)
-The last date when the status was verified
-The refresh button
If the user clickon color button, then he is redirected towards the last result of validation.
If the user click on refresh button, then TM reloads the last validation status.
The button's color evolves according to the result and the date is update.
Generate and Share patient data
One of the numerous functionnalities of Test Management is called "Patient Generation and Sharing". This feature, available under the "Connectathon" menu, enables testers to generate patient demographics and to share them among systems registered within Gazelle for the same testing session. In this way, systems involved in a same test can be pre-filled with the same patients, the ones will be used during the test process.
List of patients
The first tab available in the "Patient Generation and Sharing" page is entitled "Existing patients". It list all the patients registered in Test Management, you can restrain the list of patients using the filters available in the table column headers. If you need to find a patient created by yourself, select your username in the "Select creator" drop-down list.
For some of the patients, the "test keyword" column is filled, it matches the test keyword in which you have to use this patient. For instance, if you want to pre-fill your system for testing PIX, enter "PIX" in the filter box of the "Test keyword" column, you will get the list of patients to use for this set of tests.
Update patient data
Test Management enables you to edit a patient in order to update his/her demographic data. Actually, instead of updated the information in the database, a new patient is created with the new demographics and the original patient cannot be updated anymore. For the new patient, a link to the "original patient" is made. To access this feature, use the edit button displayed on each row of the table ![]() (except for patients already updated once).
(except for patients already updated once).
Share a list of patients
Using the "Export as CSV file" link, below the table, you will get a CSV file gathering all the demographics data for all the patients displayed in the page. If you need patients displayed on several pages, please, before clicking on that link, increase the number of "results per page" in a manner that you will see all the patients you want to export.
In the same way, the ![]() button at the bottom of the page enables you to share those same patients using an ADT message. See below for explanations about how to set the sending options.
button at the bottom of the page enables you to share those same patients using an ADT message. See below for explanations about how to set the sending options.
Share a patient
The tab entitled "Share patient" is available only if at least one patient is selected. The purpose of this page is to send HL7 messages to the CAT participants in order to help them with sharing the same patients demographics. You will first have to select the message to send and then to select the systems to which send those messages.
Four HL7 message types are available in this section:
- ADT^A01^ADT_A01 (HL7v2.3.1)
- ADT^A04^ADT_A01 (HL7v2.3.1)
- ADT^A28^ADT_A05 (HL7v2.5)
- PRPA_IN201301UV02 (HL7v3)
Depending if you select a message with a version equals to HL7v2.x or HL7v3, the list of available systems will gather systems registered with respectively an HL7v2 Responder or HL7v3 Responder configuration approved within Gazelle. Those systems are listed by HL7 Responder actors. Select all the systems you need (by double-clicking on a system, it will pass from a box to the other). Once the systems, for a given actor, are selected, click on the "Add selection" button. The systems and their configurations will appear in the table below.
If the system you are looking for is not available in the displayed list or if you are using this functionality out of a connectathon period, you may want to manually enter the configuration of the system (IP address, port, receiving application/facility ...). To do this, use the form available in the right hand part of the screen.
You can use at the same time Gazelle and manual configurations. When all of them are selected, click on the "Send Message" button.
A table will then appears which gathers all the logs of the event. For each selected systems, the message sent by Gazelle and the acknowledgment received are stored there; so that you can see which systems received and integrated the message.
Generate a patient
This part of the tool is available under the "Generate patient" tab. The generation of patients' demographics and addresses is done calling the webservice offered by the Gazelle tool named Demographics Data Server (DDS). The generator can be configured to return or not such or such data. For instance, you might not want your patient to have a religion or a race but you want it to be called MY_COMPANY MY_SYSTEM. You can do that. Select the "random" option for the generation of names and fill out the first name and last name; also select the gender of the patient. Then, select the other criteria you want and click on the "Generate patient" button. After a while, the patient demographics will show up.
If you want to immediate share the just generated patient, click on the "Share patient" button, available under the patient's demographics.
Permanent link
Each patient can be accessed using a permanent link. This one is available in the page gathering the data of a particular patient.
Quick search
Using the quick search box available beside your username at the top of the tool, you can search the patient by its name, first name (criteria: Patient by name) or by id (criteria: Patient by id).
For learning more about this functionality and seeing annotated screen shots, refers to the attached pdf file.
- Log in to post comments
Internet Testing
The purpose of this chapter is to explain how to use gazelle test management in order to perform testing over the internet.
Using Gazelle Test Management for Internet testing provides testers with the following functionalities.
- Registration
- Sharing of configurations
- Partner discovery
- Test execution and logging
Specificity of Internet testing
Internet testing using Gazelle Test Management is very similar to testing during the connectathon. The major difference between connectathon testing and Internet testing is an increased difficulty to achieve the communication between the different test partners.
- Test Partners are not located in the same room.
- Communication between the SUT needs to go through corporate firewalls
Registration
Usage of Connectathon and PreConnectathon presets
The purpose of this chapter is to explain how to use presets in Gazelle pages where they are available.
Presets are available for the following page :
- Connectathon page
- Pre-Connectathon page
The aim of the preset is to allow the user to save some filtering configuration and directly load the page with the filtering value set with the saved ones. The intent is double : speed up navigation for the user and reduce the load on the server by avoiding loading all the tests when only a few of them needs to be loaded.
First of all, a preset use cookies,you need to activate them! Normally if you are able to log into the application your brower is already configured to accept cookies
Let's take the PreConnectathon result page for instance, it is ver y similar to the Connectathon page.

You can see in red rectangle the new feature.
Select an organization, add a name to your preset and clic on save. Your preset is added !

Two fonctions are available:
- You can check a box to replace your main PreConnectathon result page. By default, it's none.
- You have a list of all of your presets with the name, the possibility to remove it, the current and default page.
You can save up to 4 presets. Once they are all created, you need to remove one before creating a new one.

Now you can click on PreConnectathon results page and the loaded page is your default page :

Systems Management
- Log in to post comments
Permanent link to system
For each system, there are a permanent link from gazelle to go directly to the summary of the system on the specified session. The link contains the description of the system, implemented IHE actors/profiles, system information summary, and the list of demonstrations that the system is registered for.
This permanent link has this form :
http://gazelle.ihe.net/EU-CAT/systemInSession.seam?system=XXXX&testingSessionId=XX
- system : the keyword of the system
- testingSessionId : the id of the testing session (15 for pisa, 8 for Bordeaux, etc).
Test Specification
- Log in to post comments
Searching a test
Editing a test
[Deprecated] Gazelle Test Management Administration Guide
Warning: This documentation is out-dated, newest version of the documentation is available at https://gazelle.ihe.net/gazelle-documentation/Test-Management/admin.html
This section of the user guide is dedicated to the administrator of Gazelle Test Management, Gazelle Product Registry and Gazelle Master Model tools. It explains how to configure the tool, how to manage users, systems and so on.
Home page
The home page of Gazelle Test Management can be customized for your needs. This page is made of two main frames, one is first populated with informations coming from the database and you can edit the rest, the other one, can be displayed only if you need it, above or below the first one; and you are totally free to define its content.
From the home page, "Edit" button are available in the panel headers to edit the title. The ones available at the bottom of the panels are for editing the content. The "Move panel to the botoom/top" button can be used to change the location of this panel.
When you edit a title or a panel content, do not forget to hit the "Save" button.

Configuration of the application preferences
The configuration of gazelle TM is done throught the menu Administration --> Application Preferences

This page contains multiple sections allowing to configure the different behaviors and modules of gazelle.
Application mode

This section allows to configure the different modes of the gazelle TM application.
Gazelle TM can be configured into three modes, and four configurations:
- Master Model: gazelle act as editor of profiles, samples, and tests plan (example GMM: gazelle.ihe.net/GMM/)
- Test management (for a Connectathon): used when gazelle act as manager of CAT testing sessions
- Product registry (store integration statements): gazelle used in this mode to store the integration statements
Gazelle can act as
- Master Model
- Test Management
- Master Model and Test Management
- Product Registry
Any other configuration will make gazelle out of use
Application settings

This section allows to configure the different administration properties of gazelle TM, which are:
- Application URL: the URL to gazelle application (example: http://gazelle.ihe.net/EU-CAT/). This attribute is used to create permanent links into the application to the test plan, test instances, etc
- Application OID: the unique identifier of gazelle instance (example: 1.3.6.1.4.1.12559.11.1.5). This element is used to create permanent identifiers into the application
- Application URL basename: the base name of gazelle TM instance (example: EU-CAT)
- Application Name: the name of gazelle instance (example: gazelle)
- Admin Name: the administrator's name
- Admin title: the fonction of the admin
- Admin Email
- History Account Email
- Documentation URL: the URL to the documentation of gazelle
- Issue Tracker URL: the URL to the jira tool
- Release Notes URL: URL to release note
- Zone: example : EUROPE
- Google Analytics Code: the identifier of GCA
- Default test language: the default language of test plan descriptions
- Default color: the default skin of the tool
- Session timeout (in minutes)
- Ping frequency (s): the frequency to update the status of sessions (example : 30)
Messages
![]()
This section describes the ability to uses messages modules into gazelle. When allowed, the monitors and the vendors are notified of the status and changes into their test instances.
Assertions

Allows to show or to hide assertions link to a test. This sections is linked to assertion manager via the property 'Assertion Manager rest api url' (example: http://gazelle.ihe.net/AssertionManagerGui/rest/)
CAS - Central Authentication Service
This section allows to link the gazelle TM to a cas service, or to use local database of the TM tool.

Deploy section

The deploy section allows to schedule deployment of gazelle TM ear into a jboss server. This section contains 4 elements:
- Auto deploy scheduled
- Deploy source : the path to the ear to be deployed
- Deploy target: the path to the ear in the jboss server
- next schedule : the next time of deploying
Cache section
![]()
Allows to reset the cache used with gazelle (for developers, the cache used is ehCache).
Jira

Allows to link gazelle TM to the jira used, and then vendors can report problems encountered in tests descriptions or test steps.
Avaiable attributes:
- Display jira issues related to test
- Jira base url
- Jira Projects keys to fetch issues from: List of project keys (comma separated) that store test issues
- jira Project key to Report issues : Test issues will be reported in this project
Security
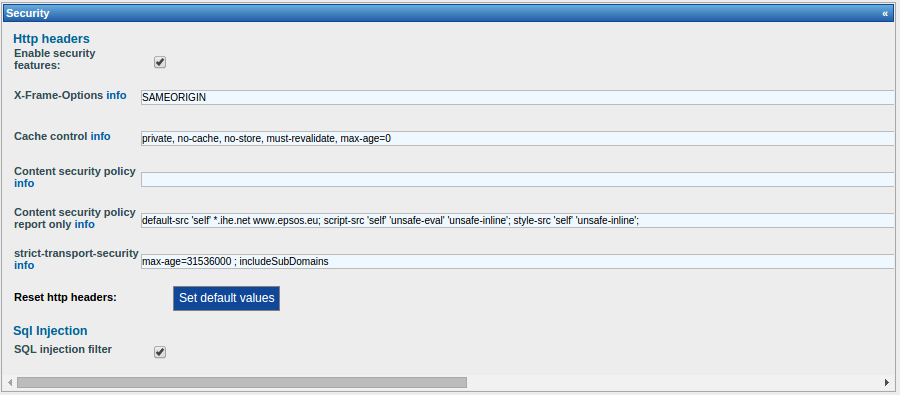
This section allows to describes the differents http security attributes related to gazelle.
New features added to improve the security of applications developed by IHE-Europe
The audit security was done by two external teams.
Improvement added :
- CSRF (cross site request forgery)
- SQL injection filter
- HTTP Headers security enforcement
- Better cookies management
| Pref key | kind Pref | value | description |
| security-policies | Boolean | true | Enable or Disable http security headers |
| sql_injection_filter _switch |
Boolean | true | Enable or Disable Sql Injection filter |
| X-Content-Security -Policy-Report-Onl y |
String | default-src 'self' *.ihe.net; script-src 'self' 'unsafe-eval' 'unsafe-inline'; style-src 'self' 'unsafe-inline'; |
To verify that the content of the site is provided only by domain specified (trusted domain) (report only!) |
| X-Content-Security -Policy |
String | To force that the content of the site is provided only by domain specified (trusted domain) |
MESA tests

This section allows to configure the behavior of pre-cat tests : automatic validation and mail notification
Certificates
![]()
Provides a link to the TLS tool
External Validation Service Front-end
![]()
Provides a link to EVSClient tool
Auto update section

This section describe a module in gazelle allowing to update the relationship between Results of testing session, and the systems participating. This section contains two attribtues:
- Auto update CAT results : this section shall be selected during testing session registration and execution, no need to it otherwise
- Test Result Refresh Interval (s): the interval of updates
Proxy

This section describes the proxy tool informations
TLS Section
![]()
Link to the Client simulator related to gazelle
QR Codes

used for communication between the monitorApp and the gazelle TM. Each TestInstance is described then by a DR codes, which used later by the monitorApp.
DDS - Demographic Data Server

Link to the DDS tool.
Order Manager section

Link to order manager tool
Files/Paths Management
List of path files used by gazelle TM in the server.
Users Administration
The admin can manae user registration, for all the companies, vendor_admin can do so for users registred for his company.
To do so, the admin shall go to menu -> Administration -> Manage -> manage users

The GUI of the users administration page looks like this:

The admin has the possibility to filter users by
- Organization
- Firstname
- active users
- role of users
- username
- lastname
- blocked or not blocked users
The table that show the list of users contains the following information:
Organization keyword
- username
- name
- activated
- blocked
- number of logins
- last login date
- last modifier username
- the roles affected
The administrator is able to
- create new user
- edit old users
- view information of a user
- connect as a user !
- disable user account : the delete act as 'block', the user is not really deleted from the database
Add users
To add user the admin shall click on the button 'add user'

The page of adding user contains this information:
- The name of the organisation the user belongs to
- firstname
- lastname
- email (shall be a valid mail, and so the user can activate it, and the reset his password, etc)
- username
- blocked?
- account activated
- the list of role attributed:
| admin_role | The admin role is responsible to manage gazelle |
| monitor_role | A monitor for gazelle testing sessions |
| project-manager_role | a project manager in gazelle (rarely used) |
| accounting_role | |
| vendor_admin_role | an admin of a system / organizarion |
| vendor_role | a simple vendor |
| user_role | a user |
| tests_editor_role | a test editor role -> allowed to edit test plans |
| vendor_late_registration_role | a vendor who is lately registred to a testing session ( this allows to register even if the session is closed) |
| testing_session_admin_role |
An admin for a specific testing session |
The following table describe what a user can do and cannot do:
| Fonction | admin_role | monitor_role | project-manager_role | accounting_role | vendor_admin_role | vendor_role | |
| Edit institution | x | x | x | x | |||
| Delete institution | x | ||||||
| View institutions list | x | x | x | ||||
| View institution summary | x | x | x | x (only his company) | x (only his company) | x (only his company) | |
| Access institution web site | x | x (only his company) | |||||
| Access users list | x | x (only his company) | |||||
| Access contacts list | x | x (only his company) | |||||
| Access invoice | x | x (only his company) | |||||
| Add system | x | x | x | x | |||
| Edit system summary | x | x | x (only his company) | ||||
| CRUD Actor/Profiles for a system | x | x | x (only his company) | ||||
| CRUD Demo for a system | x | x | x (only his company) | ||||
| Delete system | x | x | x (only his company) | ||||
| View system | x | x | x | x | x | x | |
| View systems list | x | x (all companies) | x | x (only his company) | x | x | |
| Generate Integration Statement | x | x | x | x | x | x | |
| Check missing dependencies | x | x | |||||
| Add missing dependencies | x | x | |||||
| Create user | x | x | x | ||||
| Edit user | x | x | x | ||||
| Delete user | x | x | x | ||||
| View User | x | x (only his account) | x | x (only his account) | x | x (only his account) | |
| List all users | x | x (only his account) | x | x (only his company) | |||
| Update user preferences | x | x (only his account) | x (only his account) | x (only his account) | x (only his account) | x (only his account) | |
| Create/Update user picture | x | x (only his account) | x (only his account) | x (only his account) | x (only his account) | x (only his account) | |
| Change password | x | x (only his account) | x (only his account) | x (only his account) | x (only his account) | x (only his account) | |
| password lost | x | x (only his account) | x (only his account) | x (only his account) | x (only his account) | x (only his account) | |
| Create contact | x | x | x | x | ??? | ||
| Edit contact | x | x | x | x | ??? | ||
| Delete contact | x | x | x | x | |||
| List contacts | x | x | x | x (only his company) | x (only his company) | ??? | |
| Create invoice | x (automatic) | x (automatic) | x (automatic) | x (automatic) | x (automatic) | ||
| Edit financial summary | x | x (in institution page) | x (in institution page) | ||||
| Edit invoice | x | ||||||
| Delete Invoice | x | ||||||
| View Invoice | x | x | x | ||||
| Download PDF Contract | x | x | x | ||||
| Generate PDF Invoice | x | ||||||
| Generate report of financial overview of all companies | x | x | |||||
| List invoices | x | ||||||
| Add / Edit a test | x | NA | NA | NA | |||
| Add/Edit RoleInTest | x | NA | NA | NA | |||
| Add / Edit metaTest | x | NA | NA | NA | |||
| Add / Edit path | x | NA | NA | NA | |||
| Copy a test | x | ||||||
| Print a test | x | x | x | x | |||
| Add / Edit Domain | x | NA | NA | NA | |||
| Add / Edit Integration Profile | x | NA | NA | NA | |||
| Add / Edit Actor | x | NA | NA | NA | |||
| Add / Edit Options | x | NA | NA | NA | |||
| Add / Edit Transaction | x | NA | NA | NA | |||
| Add Transaction Option Types | x | NA | NA | NA | |||
| Add/Edit Message Profiles | x | NA | NA | NA | |||
| Add/Edit documents | |||||||
| Link documents to TF concepts | |||||||
| Add / Edit ObjectType | x | ||||||
| Add / Edit ObjectFileType | x | ||||||
| Define validators | x | ||||||
| Access certificates page | |||||||
| List Pre-CAT Tests | |||||||
| Add logs | |||||||
| List Pre-CAT Tests | |||||||
| Consult test logs | |||||||
| Change status | |||||||
| Create demo | x | ||||||
| Edit demo | x | ||||||
| Delete demo | x | ||||||
| View demo | x | x | x | x | x | x | |
| Create Testing Session | x | ||||||
| Edit Testing Session | x | ||||||
| Delete Testing Session | x | ||||||
| View Testing Session | x | x | x | x | x | x | |
| List Testing Session | |||||||
| Activate/Deactivate Testing Session | |||||||
| Create/Edit sample | |||||||
| View samples | |||||||
| Upload samples | |||||||
| Validate samples | |||||||
| Update status | |||||||
| Search for samples | |||||||
| Generate connectathon report | |||||||
| Download Systems summary | x | x | |||||
| Create a new patient | x | x | x | x | x | x | |
| List patients | x | x | x | x | x | x | |
| Edit patient | x | x | x | x | x | x | |
| Delete patient | x | x (only the ones he/she created) | x (only the ones he/she created) | x (only the ones he/she created) | x (only the ones he/she created) | x (only the ones he/she created) | |
| Share patient | x | x | x | x | x | x | |
| List sharing logs | x | x | x | x | x | x | |
| Add/Edit assigning authorities | x | ||||||
| Link systems to authority | x | x | x | x | x | x | |
| Create patient (admin part) | x |
Edit users
To edit a user, you have to click on the button ![]()

The edit page contains the same information as the add user page, with the possibility to change the password for a user, using the button "change password"
View users
To view user information, admin shall click on the button ![]()

The information provided are the same as in the edition mode
View user preference

The admin is able to view the user preferences, regarding gazelle use, which are:
- Username
- firstname
- last name
- organization
- skype account
- table label : the table used in a current testing session CAT
- show sequence diagram: this enable or disable the use of sequence diagram under test plan and test instances, may be important for performance issues
- Display your email address to everybody ? : for security issue we added this optionality
- Display Tooltips ? : a number of tooltip are disabled when user want it
- Results per page : the number of result found by page of search, largely used in seach pages (like for test plan , etc)
- Spoken languages : the list of spoken language ( useful in CAT)
- user's picture
User preference is more explained in this link : http://gazelle.ihe.net/node/141.
Connect as user
Gazelle offer the possibility to the admin to view the GUI of the vendor, the same GUI configuration, and to connect as the corresponding user; which could be useful when the vendor has a problem, and the admin want to see what it really looks like.
Companies/Organizations administration
The administrator has the possibility to edit Administrations registred into gazelle, or to add new organization/companies.
To do so, the admin shall go to menu -> administration -> manage -> Manage Organizations.

The page of this module looks like this:

For each organization, we can go to :
- its website
- the list of users related
- the list of contacts related
- the invoice of the institution
The table describes the information related to the institutions: the name, the keyword; the type, the number of related systems, the last modifier and the last modified time.The administrator has the possibility to view, edit or delete an institution.
Create New Organization
The administrator is able to create a new administration using the button "Add an organization".
The result of clicking on this button is the organization edit page:

View Mode
The view mode is possible using the loop : ![]()
The result of this page is a html description of all the information related to the institution:
- Organization Demographic Summary
- Mailing address
- The billing address
Edit Mode
the Edit mode is shown using the button ![]()
The result of this page is the same rendering for the vendor who create the organization, and which look like this:
Contacts Administration
The admin of gazelle TM can access to the list of contact of organizations, modify, delete or add new ones.
To access the administration of contacts, the admin shall go from the menu to administration -> Manage -> Manage Contacts
The main page looks like this:

The button "Add a contact" allows to add a new contact.
The table describes the information related to contacts registred, and we can filter by organization.
The contacts displayed can be edited or deleted, as a vendor admin can do.
Systems administration
The management of systems contains 6 sub-sections listed below
Manage systems
The manage system page allows the admin to have the same optionality as the vendor admin, the advantage is the admin is able to edit all the systems related to Gazelle TM.
To go to this page, from the menu Administration -> Manage -> System -> Manage systems

 4
4
Add systems
The administrator is able to add new system to gazelle TM for the current testing session, by clicking on the button "add system"

Import Systems
The admin is able to import old systems from other testing session.
Edit Systems

The admin is able to edit information related to existing system in the current session. The information related to the system are:
- system summary (org, name, etc)
- Profiles/actors registred for
- Information related to the session
- demonstrations registred for
- admin information system
- notes (text area)
Update the registration status
The admin is able to update the system registration status (dropped, in progress, completed)
View Systems
The admin is able to view information related to systems by clicking on the button ![]()
This information is the same in the page of edition of systems.
Find systems
This page is here to allows the admin to look for systems in the gazelle TM tool.
To go to this page, the admin shall go from the menu Administration -> Manage -> System -> Find systems


This allows to search by
- organization's name
- testing session
- domain
- integration profile
- actor
- test registred for
- demonstration registred for
- integration profile option
- transaction
The table of systems provides information about the table odf the systems looked for, and the principal contact email.
Also, from this page, the admin is able to edit, add, remove, or view systems informations.
Manage Simulators
Systems acceptation
This module is very important, as if the admin does not accept the system registred, it will not be able to execute tests with other partner during the CAT.
To go to this page from the menu Administration -> Manage -> System ->Systems acceptation

The admin is able to filter by Organization keyword or institution, and then he is able to :
- accept all the system in the list
- do not accept all the list systems
and this can be done by clicking on the buttons under the filter from the GUI.
Supportive AIPOs
This is the page where admin or testing session manager can grant testing session participating system the ability to participate as "supportive" with a selected list of actor/profiles.
It is not our purpose here to describe what supportive and thorough testing means. For more information please visit this link
To go to this page, from the menu Administration -> Manage -> System -> Supportive AIPOs
The page offers the ability to use filters in order to get the system information, and is able to set to supportive or to thorough all the systems filtered.
Please also note that it is possible to set the value of the testing type by using the select on the top right of the table. All the entries in the table will then be set in a single click

Registration Overview
The registration overview allows the admin to view the list of profiles and actors by system.
The admin is able to download the coverage of the profiles by systems, and to download the systems summary regarding the profiles.
This help the admin to know which profile/option has missing parteners, and what actions should be taken in accordance to this information.
To go to this page, the admin shall go to: Administration -> Manage -> Registration Overview


Administration of Testing Sessions
A testing session in Gazelle Test Management is used to manage a testing event. It can be a connectathon, an accredited testing session, a projectathon or even a virtual testing session. Users registered in the application will be able to create new system for a testing session in particular or to import systems from other events.
The tool is able to manage several sessions at the same time; each session can have a different status.
Accessing the testing sessions
Management of sessions is performed from menu Administration --> Manage --> Manage sessions.
The first page you access to list the testing sessions registered in your instance of Gazelle Test Management. The highlited one (bold font) is the testing session you are currently logged into.

From this page, you can see what are the active testing sessions, active/inactive them, edit them or event delete them. You can also, by clicking on the green tick, set the one which will be used as default when a new user creates an account. Note that logged in user will also be able to acess the activated testing sessions; the other ones will be hidden from the list.
Creating a new testing session
From the Administration of testing sessions page, click on "Add an event"; a new form will be displayed. The following information are requested
- Year : when the testing event takes place
- Zone : where the testing event takes place
- Type : what type of event are you registering
- Description : will be used as title of the testing session
- Start date : beginning of the testing event itself
- End date : end of the testing event
- Registration deadline : after this date, users will not be able to alter their system (addition/removal of actor/profile)
- Mailing list URL and wiki URL are given for informational purpose only
- Logo URL : can be the link to an image in the tool (/img/gazelle.gif for instance) or an external link. It will be displayed in the right of the page when this testing session is selected by the user)
- Link associated to the logo : when clicking on the logo, user wil be redirected to that page
- Color: theme of Test Management can be customed and the background color can be different for each testing event. Note that the color of the text will not change, so be careful to use a color which will still allow the reading of the application
- Order in GUI : used to order the testing session in the pop-up used to change the current testing session of the logged in user
Then you can select several options :
- If this event the default one for new users (Default testing session)
- Is Internet testing enabled (that means that users can enter their SUT endpoints outside of the testing event network)
- Is pre-connectathon testing requested (users will be expected to perform some in-house tests before showing up at the event)
- Is Gazelle Test Management used to manage the badges (Allow Participant registration)
- Hidden from list : if checked, users will not be able to select this testing session
- Critial Status : At some point during the event, you may want users to highlight the test instances they really need; enabling the critical status will allow users to mark some test instances as critical and will then be checked in priority by monitors
- Session closed: if the testing event is closed, users will not be able to create new test instances nor alter others
- Disable auto update result : the connectathon results are periodically computed, you can disable it for a testing session. Note that you might not want to disable it until a testing event is running since it will also prevent the tool from creating the test plan of the systems.
Then you can select a set of test types among the following ones :
- 17025 : used for accredited testing sessions, only tests of type 17025 Cofrac will be displayed to the user
- certification: only tests of type "certification" will be displayed to the user
- connectathon: only tests of type "connectathon" will be displayed to the user, this is the testing type to use in most cases
- HISTP was used in the USA in the context of a regional project
- interoperability-testbed enables the ITB (Interoperability Test bed) feature

The testing session administrators are used in the header of the test reports
Then, pick up the integration profiles for which the users will be allowed to register their systems.

Contact information
Here you need to give information about the person to contact for questions about the event.
Certificates menu URL
Depending of the events, the management of certifactes is not performed by the same tool. If you want users to share certificates using a specific tool, tick the "Display certificates menu" checkbox and enter the URL of the tool.
Financial section
Gazelle Test Management can generate the contract and the invoice, if this testing event requires a contract and you want the tool to manage it, tick the checkbox "Required a contract ?".
Note that the rule for computing fees currently applies in Gazelle Test Management is the following:
The amount is relative to the number of systems the company has registered, and marked "completed". You can state that the price for the first system is different from the one for the following. Regarding the fees for additional participants, it is the amount due per participant when the number of participants is strictly higher than 2 times the number of systems.
Currency code is used to express the currency to be used. Then you can custom the VAT and give the list of country VAT it the VAT of the country applies instead the global one (that's the case in Europe).
Finally, the contract and the invoice are generated based on a Jasper report, you need to provide the location of those *.jrxml files.
Testing management
From this point, you can randomly generate test instances for testing the tool. You can also delete all the test instances to reset the testing session.

Manage demonstrations

Demonstrations liste

View demonstration

Edit demonstration

Systems Configurations Administration
The system configuration administration is divided into 3 parts, reachable from the Administration --> Manage --> Configurations menu
- Manage Hosts' configuration : manage the host name and IP addresses assigned to systems for the event (in the event floor)
- All configurations : manage all the configuration of all the systems
- OIDs management : manage the OIDs to be used by system during the event

Network Configuration
Before managing the hosts and the system network configurations, you need to configure the network of the testing event. To do this, go to Configurations --> Network configuration Overview. This page is made of three sections materialized by three tabs.
Hosts configuration
This page shows to text area. In the first one, you can give tips to the user regarding the network configuration during the event. We usually provide the Wireless SSID and keys, the subnet information (netmask, gateway, DNS server, internal domain name and so on), the URL of the tools and their IP addresses.
In the second area, you are requested to provide the header of the host file so that people will be able to download a complete host file gathering the hostnames and addresses of all the systems connected during the connectathon.

Participants to the testing session who do not want to use DNS can download the host file and use it to configure their system. THIS OPTION IS NOT RECOMMENDED BUT WAS IMPLEMENTED FOR ONE DEVICE THAT COULD NOT USE DNS. DNS IS THE PREFERRED SOLUTION AS IT IS DYNAMIC !
- Configuration of host file on windows system
- Configuration of host file on MacOsX system
- Configuration of host file on Linux system
Configure IPs and DNS
Filling out those information will help the tool with assigning IP addresses and build the DNS and DNS reverse file.
Example of DNS file header and DNS reverse file header are provided below.
;
; BIND data file for local loopback interface
;
$TTL    604800
@    IN      SOA     ihe-europe.net. root.localhost. (
                              1         ; Serial
                         604800         ; Refresh
                          86400         ; Retry
                        2419200         ; Expire
                         604800 )       ; Negative Cache TTL
;
@                      IN      NS      ihe-europe.net.
@                   IN      A       127.0.0.1
$ORIGIN            ihe-europe.net.
;
;
;
ntp                  IN  A 192.168.0.10
dns                  IN  A 192.168.0.10
ihe-eu0            IN  A 192.168.0.10
gazelle            IN  A 192.168.0.10
proxy              IN  A 192.168.0.10
printer             IN  A 192.168.0.10
syslog           IN  A 192.168.0.13
central-archive     IN  A 192.168.0.11
central    IN  A 192.168.0.11
gazelle-tools     IN  A 192.168.0.13
dvtk    IN A 192.168.0.12
 $ORIGIN 168.192.in-addr.arpa.
$TTL    86400
@       IN      SOA     ihe-europe.net. root.ihe-europe.net. (
                              1         ; Serial
                         604800         ; Refresh
                          86400         ; Retry
                        2419200         ; Expire
                          86400 )       ; Negative Cache TTL
; authoritative name server
;       NS      127.0.0.1
@       IN      NS      dns.ihe-europe.net.
;
10.0  PTR     dns.ihe-europe.net.
10.0  PTR     ihe-eu0.ihe-europe.net.
10.0  PTR     proxy.ihe-europe.net.
11.0  PTR     central.ihe-europe.net.
11.0  PTR     central-archive.ihe-europe.net.
12.0  PTR     dvtk.ihe-europe.net.
12.0 PTR     connectathon2014.ihe-europe.net.
13.0 PTR     syslog.ihe-europe.net.
13.0 PTR     gazelle-tools.ihe-europe.net.

DNS automatic configuration on the server
In order to automatically update the DNS configuration on the server that is hosting the Gazelle Test Management application, one need to run the following script update_dns.csh
- Download the script and place it in the directory /opt/gazelle/dns
- install bind9 on the server :
apt-get install bind9
You also need to configure bind9 (see documentation) in order to add a new zone that matches the requirement of the network on your session.
In the file /etc/bind/named.conf.local add a line specific to your zone
include "/etc/bind/named.conf.ihe-zones"
Here is an example of the file named.conf.ihe-zones as used at one of our event for illustration. Note that the file makes references to the 2 files created by the update_dns.csh script.
zone "ihe.net" IN {
  type master;
  file "/etc/bind/zones.ihe.net";
  forwarders {
        213.33.99.70;
        };
};


zone "ihe-europe.net" IN {
  type master;
  file "/etc/bind/db.192.168";
  forwarders {
        213.33.99.70;
        };

};
zone "168.192.in-addr.arpa" {
  type master;
  file "/etc/bind/reverse.192.168";
};
Finally edit the script update_dns.csh and configure it in order to match the configuration of your network and the session in use.
Currently the DNS can only be updated for ONE SINGLE testing session.
We recommend to use a cron to automatically update the DNS configuration on the server
*/15 * * * * /opt/gazelle/dns/update_dns.csh
Then SUT can be configured to point to the DNS server that is configured that way.
- Configuration of DNS client on windows system
- Configuration of DNS client on MacOsX system
- Configuration of DNS client on Linux system
Configure IPs and port for proxy
You may have configue the URL of the proxy in the application preferences. However, you might not want to use the Gazelle Proxy tool for all the testing event registered in the tool. From this page, you can enable/disable the use of the proxy during the event. In order to help users with using the Proxy, you are asked to provide the IP address used to contact it.
When generating the system network configurations, if the proxy is enabled, each configuration will have a proxy port assigned. You need to provide the range of port used by the proxy so that the tool knows which values are allowed.
From this page, you can also start all the channels on the proxy; that means that the tool will gather all the system network configuration of receivers and tell the proxy to open the corresponding ports.

Manage Hosts' configuration
The list of hosts which is displayed on that page is restricted to the host assigned to the systems from the testing session you are currently logged in. If you need to access the list of hosts for another testing event, you need to change your testing session from the Gazelle --> Change testing session menu.

From the Manage Hosts' configuration page, you can assign internal IP addresses to all the hosts/systems registered for the testing event or you can even release all the IP addresses. The latter means that for each host defined in this testing session, the IP address will be set to null.
- A host name in Gazelle Test Management has the following attribute
- The system it is assigned to
- The host name
- An alias for this host name
- The assigned IPv4 address
- A comment about its usage
You can edit each host and then get additional options/informations:
- Is the host external to the testing event network
- Assign the next available IP address from the range defined for the event
All Configurations
A network system configuration gives information to the user on how to configure their systems for the testing event and how to reach the systems of their partners for testing. Which type of configuration is requested by each actor is defined in Gazelle Master Model.

From menu Administration --> Manage --> Configurations --> All configurations, you will access the list of configurations defined for the testing session you are currently logged in. From this page, you can edit each configuration one by one, approve it (it is usually an action to be performed by the SUT operator) or delete it.

"Add a config" button will allow you to create a new entry in the list for a system registered in the testing session you are currently logged in.
"Generate configs for selected session" will generate all the entries for all the systems registered in the testing session. Note that this task is long and performed in background; you will have to refresh the page latter on to get the list of configurations.
Note that if you select an Organization in the filter available at the top of the page, you will get a button to generate the configurations for all the systems owned by this organization; if you select a system from this same filter, you will get a button to generate the configuration for this specific system.
OIDs management
In some profiles, the messages or the documents described must be populated with OIDs. An Object Identifier shall be unique, it is composed of a root, managed by an authority and the rest manage by the system to which the root is assigned; in order to help vendor to configure their system, Gazelle Test Management offers a feature to manage the OID roots.
From menu Administration --> Manage --> Configuration --> OIDs management, you will access a page divided into four tabs; they are described below:
OID - System assignement
In this tab, you will find the list of OID roots assigned to the systems registered within the tool. You can filter the list by testing session; knowing that the testing session set when you accessed the page is the testing session you are currently logged into.
Note that you can edit those values by clicking on the edit icon.

OID requirements
This section allows the administrator of the tool to define for which actors OIDs need to be defined and what this OID will be used for. You can edit, delete or create requirements. Before creating a new requirement, if you intent to use an OID different from the ones already used, first jump to OID Roots tab to define a new OID. Note that those OID requrements are common to all the testing sessions.
When you edit or create a requirement, you are ask to provide the list of Actor/Integraiton Profile/ Option tuples to which it applies; to do so, use the "add AIPO" button; select your AIPO and click on the "Add new AIPO" button.
You can also remove an AIPO from the list, only click on the red cross in the table on the corresponding line.

OID Roots
Here are listed all the OID roots which are used to build OIDs; the last value coming from the database is already displayed there. For each root, you can also provide a comment to inform the users what this root is used for.
You can edit and delete root OID, you can also create new ones; only click on the "Add a new OID Root" button and fill out the form which appears in the pop-up. Note that those roots are common to all the testing sessions.

OID Testing Session Management
From this section, you are allowed to perform three actions:
- Removing all the OIDs which have been assigned to the systems registered to the current testing session
- Removing and generating again all the OIDs for the current testing session
- Updating the OIDs assigned to the systems; that means that systems which have been newly added will get OIDs and if no requirements have been creating, they will be applied to the concerning systems.

Invoices Administration
Financial Summary Administration
Samples Administration
Sample Type management
The sample type view mode is accessible for the admin of gazelle TM when the tool act as Test Management mode, or as master model mode. However, the edition of samples type is accessible only when master model mode is activated.
To access the sample type management, from menu -> administration -> manage -> samples -> Manage samples

The home page of sample type management looks like

The module Sample management contain two panel : sample type management and document type management.
The document types are used to describe files used in sample type description.
Sample Type edition
To edit sample type, we use the icon edit.

The GUI of edition of sample type contain :
- summary : the description of the sample type
- creators : the list of creators of the sample type
- readers : the list of readers of sample type
- files : the list of files related to the sample type
- attribtues : the list of attributes that could be selected for the sample type

The creators of the sample type are defined by the list of AIPO that can create the sample. So, when a system implement an AIPO, and this aipo is a creator of the sample, the system can add files corresponding to the sample type defined.
The readers are also definded by the list of AIPO that can read the sample, and so when a system implements an AIPO , which is a reader of sample, the system could access to the list of sample uploaded by the creators, and even add comment, or upload files related to the sample type, as a reader.

The edition of files contains two list: the list of files that could be uploaded by the creators, and the list of files that could be uploaded by the readers. Generally the readers can upload a snapshot of the rendering of the file of the creator.
Document Type Edition
This panel allows to edit the document type, and to specify their properties.

Validator Management
Annotation Management
This section allows to manage the comments written by the vendors into the samples uploaded by systems.
As the vendors are not allowed to delete these comments from the sample, and only the admin can do it, this module is extracted in a page for the admin.
To access to the Annotation management, from teh menu -> -> administration -> manage -> samples -> Manage Annotation
Monitors Administration
The monitors are the persons who are present during the testing event to verify the tests performed by the SUT operators. The recruitment process is not descibed there neither the work of the monitor. This section focuses on how to set persons as monitor, how to say to which testing session they attend and how to create their list of tests, it means, what are the tests they will have to verify during the event.
First of all, all the users in Test Management who are aimed to be a monitor for a testing session shall have the "monitor_role" role. Refer to the User Administration part if you do not know how to grant users.
Then, under the Administration --> Manage --> Manage monitors, there are two entries. The first one "Manage monitors" will be used to link the users with role "monitor-role" to a testing session and then assign them a list of tests. The second entry "Assign monitors to tests" is useful if you want to assign a batch of monitors to a batch of tests.

Manage monitors

This page lists the monitors already link to the current testing session (the one you are currently logged into). For each monitor, beside his/her contact and connection information, you will get the number of tests which have been assigned to him/her. Note that above the table is given the number of monitors registered for the current event.
In the last column, buttons are available to view the detail of a monitor test list, print this test list, edit it or unassign the user from the list of monitors (the red cross).
When you edit the test assignments of a monitor, the list of already assigned tests is displayed, you can remove some of them by hitting the red cross. If you want to add some more, use the "Edit Test Assignment" button, il will open a new panel. You can filter the test either by domain, integration profile or actor. First select the criteria type, then select one domain or integration profile or actor and pick up the tests to assign to the current monitor.
At the bottom of the page, two buttons are available : the first one will open the "Assign monitors to tests" page and the second one opens a new panel in which you can pick up the users to add to the list of monitors. Monitors are sorted by organization. When you have made your choice, do not forget to hit the "Add monitors to activated session" button (bottom right corner); this button shall be hit before moving to another organization.
Assign monitors to tests
If you prefer to assign the monitors to a list of tests instead of assigning a list of test to a monitor, you can use this feature.
First, select a sub set of tests by applying filters. Then, click on the green tick in the Selection column. If you click on the icon located in the table header, it will select all the tests currently displayed in the table. To unselect a test / all the displayed tests, hit the grey tick.
When at least one test is selected, the number of monitors assigned to this selection is displayed below the table. Note that if several tests are selected, the number displayed represents the intersection of the monitors assigned to each test. If at least one monitor is assigned, the list is displayed below the table.
From this point, you can modify the list of monitors by clicking on the button "Modify list monitors", pick up the ones to add (or to remove) and it the "Save modifications" button.

Testing Session Participants Management

It gives the administrator an overview of users attending to the connectathon. It helps planning the catering, tables...
A participant can register for some connectathon days, specify if he eats vegetarians and if he will attend the social event.
The administrator has an overview of who is going to attend the connectathon on moday, tuesday....
An administrator can add participants from the users list, contact list or create a new participant.
![]()
An administrator can remove a connectathon participant, or edit it.
An administrator can filter participants by organization

Edit testing session participants

Connectathon results
Grading the systems during a testing event is a manual process performed by the testing session managers.This section of the administration manual does not focus on the rules to grade system (they might be different depending on the testing events) but it describes how to do it with Gazelle Test Management.
You will access the connectathon result page from menu Connectathon --> Connectathon --> Connectathon results.

This page is divided into two parts; first you can filter the results and below the results (restrained to the filter criteria) are displayed.
In the first panel, a button labeled "Update results" can be used to force the update of the results. It will not grade the system, it will retrieve some information from the database like the number of test instances performed by each system and compute an indicator to help you with grading the systems.
In the table, a line is displayed for each actor / integration profile / option (AIPO) tuple registered by a system; in Test Management, results are given at system level even if we usually communicate the results at company level.
- The column "Type" tells you if the system is supportive (S) or Thorough (T) for this AIPO.
- Column "R/O" indicates the number of required vs optional tests to be performed by the system for this AIPO
- Column "V" indicates the percentage of verified (successful) test instances versus the number of expected successful test instances
- Column "W" indicates how many test instances are waiting for verification
- Column "P" indicates how many test instances are in state "Partially verified"
- Column "F" indicates how many test instances are failed
- In the "Partners" column, you will find, for each role involved in the test other than the one played by the system, the number of "used" partners versus the number of available ones. For each a tool tip give you the keyword of the role.
- In the Tests column, the magnifying glass opens a sub table which gathers all the test instances related to this AIPO. To close a sub-table, click again on the magnifying glass. To close all the sub tables you have previously displayed, use the "Close and reset all details" button available above the table.
- In the Results column, you can select the status for this line, it will be automatically saved
Finally, you can leave a comment to the user.
To help you focussing on the lines which need to be reviewed, lines are colorized and appears in grey if no result is set.

TM Functional Checking
This list of modules allows the admin to verify and to check the well functioning of the Test Management tool.
TF Model Consistency Check List
This module allows the admin to check the consistency between the different profiles/actors/domain defined in the database.
To access to this page, from the menu -> administration -> check -> TF Model Consistency Check List

This page allows to do the checking about the following objects:
- domains
- actors
- Integration profiles
- actors
-Integration profile options
- Documents and Documents sections

Tests Definition CheckList
This module allows the admin to verify the consistency of the information in the test plan module. We could so verify if there are RoleInTest with no participant, or some test step instances with no test instances. Multiple check could be performed in this page.
To access to this page, you should go from the menu -> administration -> check -> Tests Definition CheckList

To access a check, you have to select the information looked for from the tree.
Sessions Dashboard
The session dashboard allows to access information about the current selected session.
The information provided are :
- Companies without participants
- Tests overview for systems/companies
- Test Instances Overview
To access to this page, you have to go to menu -> Administration -> Check -> Sessions Dashboard

Companies without participants
This describe the companies that do not have a participants in the current testing session, and which are registred by a system.
Tests overview for systems/companies
This panel describes the list of systems registred in the testing session, and for each system we provide : the organization, the status of the system, the number of tests executed by the system during the CAT and the details about the results of these tests.
Test Instances Overview
This panel allows to have information about the use of the monitor app tool.
Gazelle KPIs

There are 4 types of KPIs:
- Tests kpi
- Systems kpi
- Monitor kpi
- Validator kpi
All KPIs can be exported in an excel file
Monitors KPIs
This page displays for each monitor the number of:
- test assigned
- systems in the session that the monitor can work with
- test instances claimed
- test instances claimed and started
- test instances claimed and completed
- test instances claimed and paused
- test instances claimed and verified
- test instances claimed and aborted
- test instances claimed and partial
- test instances claimed and failed
- test instances claimed and critical

Filtering
Results can be filtered by:
- Testing session
- Domain
- Integration profile
- Actor
- Test
- monitor first name
- monitor last name
- monitor username
- integration profile option
- transaction
| Attachment | Size |
|---|---|
| 37.03 KB |
Systems KPIs
This page displays for each system the number of:
- test to realize
- monitors involved
- test instances
- test instances started
- test instances completed
- test instances paused
- test instances verified
- test instances aborted
- test instances partial
- test instances failed
- test instances critical

Filtering
Results can be filtered by:
- Testing session
- Organization
- Domain
- Integration profile
- Actor
- Test
- Demonstration
- integration profile option
- transaction
Tests KPIs
This page displays for each test the number of:
- monitors assigned to the test
- systems in the session that have to test it
- test instances
- test instances started
- test instances completed
- test instances paused
- test instances verified
- test instances aborted
- test instances partial
- test instances failed
- test instances critical

Filtering
Results can be filtered by:
- Testing session
- Domain
- Integration profile
- Actor
- Test type
- Test peer type
- last modifier
- integration profile option
- transaction
- test status
- test version
Validators KPIs
This page displays for each validator the number of:
- Validations performed
- Users that used it
- File validated

Filtering
Results can be filtered by:
- Testing session
- validator name
| Attachment | Size |
|---|---|
| 66.16 KB |
Gazelle Server Monitoring

This page allows you to monitor:
- memory usage through time
- active pages through time
- sessions through time
- session details
- caches usage
In graphs trought time on the time axis you can move time cursors to zoom into a specific time.
Memory usage though time

Active pages through time

Sessions through time

Session details

Caches usage

TM - Release notes
Gazelle Test Management release notes can be found on the JIRA pages of the project at the following URL :
- Log in to post comments
[Deprecated] GMM - Gazelle Master Model
Warning: This documentation is out-dated, newest version of the documentation is available at https://gazelle.ihe.net/gazelle-documentation/Gazelle-Master-Model/user.html
The gazelle master model manages the sharing of the model information to be used by the different Gazelle instances. Gazelle database consist of more than 190 tables. Gazelle instances are running as slaves of the master model and can request updates from the master.
Gazelle Master Model

Instances of Gazelle
Edition of the Technical Framework Concepts / Test definitions / Meta Tests / Dependencies. (available)
Module that allows the user to create/read/update/delete/deprecate concepts in the master data model.
Sharing of Technical Framework (available)
Each gazelle instance can get the update of the Technical Framework concepts from the master models.
Sharing of Test definitions (available)
As for IHE Technical Framework concepts, sharing of test definitions is possible through the Gazelle Master Model.
Sharing of samples (available)
Samples are used by the connect-a-thon participants to share images and documents between the creator and reader without using transactions. Files are stored into Gazelle and can be downloaded by other users. Numerous types of samples are defined, the ones are stored in Gazelle Master Model. Sharing of Links to technical referencies (available) Link (URL) to reference documents can be associated to Domain, Profile, Transactions and tupple Actor/Profile/Option. Those links are share through GMM with the clients.
TF - Overview
Click to here to enter the TF overview
Project overview
The Technical Framework (TF) overview is a tool that displays a graphical interface for the navigation among the TF concepts, indicating the description of those concepts and the access to their informations page.
Web user interface
Description

-
Breadcrumb : indicates the path in the navigation among TF concepts
-
Root : the keyword of the concept selected
-
Children : results concerning the root
-
Edge : link between the root and its children
-
Description : information about the child whose the mouse is over it
-
Link to access to the information page of the concept in the description
-
To close the description
Navigation
The first graphical representation displays all domains of the Technical Framework. Then, the navigation must be done in the following order :
- all integration profiles for given domain
- all actors for given integration profile
- all transactions and all integration profile options for given actor and integration profile
- all initiatiors and responders for given transaction
A click on the keyword of a children allows to generate the graphic. A click on the root allows to go back in the navigation and it allows to generate the previous graphic.
- Log in to post comments
TF - Integration profile diagram
Project overview
On the information page of an integration profile, the integration profile diagram is a graphical representation that displays the transactions between the actors for this integration profile.
Technical Framework Web user interface
Description

- diagram of actor/transaction pairs in the selected integration profile
- zoom out
- zoom in
- save the diagram on the user computer
- Log in to post comments
Editing Profile Information
Introduction
Gazelle Master Model (GMM) allows administrators to add new Integration Profile information into Gazelle. This enables vendors to register testing these profiles at a Connectathon. Gazelle must be configured to know about the actors, transactions, and options defined within an Integration Profile. It must know which Domain the Integration Profile belongs to.
Entering IHE Profile information consists of these 6 steps detailed in this documentation:
- Add New Actors
- Add New Transactions
- Link Transactions to Actors
- Add New Options
- Add a New Integration Profile
- Link Actors, Transactions, and Options to the Integration Profile
- Link the Integration Profile to a Domain
Not currently covered in this document, but needed in order for profile entry to be complete:
- Entering profile mandatory groupings (aka profile dependencies) ie Actor A in Profile P must also implement Actor B in profile Q (eg all actors in the XDS.b profile must also implement ATNA Secure Node)
- Entering default configurations for transactions in the profile
- Entering sample definitions
- Entering Roles for test definitions
Add new actors
Gazelle is populated with Actors from Integration Profiles across all IHE domains. Prior to adding a new Actor, search the list of existing Actors to see if it already exists (eg. an Acquisition Modality or a Content Creator actor is used by many IHE Integration Profiles).
- From the main menu, select TF -> Actor Management

- Search for existing Actors. There are several methods you can use:
- You can restrict the search to a specific domain by selecting a value in the Select a Domain list box
- Search by Keyword by typing into the data entry box at the top of the Keyword or Name column. (The search starts as you begin typing; there is no need to press Enter to start the search.)
- You can sort the Keyword or Name columns by clicking on the up and down triangles in the column heading.

- To add a new actor, select the Add an actor button at the top right of the page.
- On the Actor : New screen, enter:
- Keyword - This is a short form of the Actor name; it can be an abbreviation or acronym. Use all upper case letters and underscores. No spaces. (Although gazelle allows you to edit this keyword, once you complete all of your data entry, you should not change this keyword later. The dependency configuration relies on this value to remain the same.)
- Name – This is the full name of the actor from the Technical Framework.
- Description – You can copy the definition for the actor from the Technical Framework. May be left blank.

- Select the Save button to finish.
Add new transaction
Transactions, like actors, can be viewed in a list fashion accessed from the TF drop down menu.
- From the main menu, select TF à Transaction Browsing

- Search for existing Transactions.
- Search by entering a Keyword. This is the abbreviation of the transaction, eg ITI-2, QRPH-1, RAD-8.
- Sort the list by Keyword or Name and page through the list using the page numbers at the bottom of the screen.

- To add a new transaction, select the Add transaction button at the top right of the page.
- On the following page, enter:
- Keyword – This is a shortened form of the Transaction containing the domain acronym followed by a dash, then a number (no spaces) Example: RAD-4
- Name – This is the full name of the transaction from the Technical Framework.
- Description – You can copy the definition for the transaction from the Technical Framework. May be left blank.
- TF Reference – The reference to the particular volume and section from the Technical Framework. May be left blank.
- Status – All new transactions entered into Gazelle will be entered as Trial Implementations. May also be Final Text.

- Click on the Save button to save your changes
Link Transactions to Actors
Transactions occur between actors; one actor is the source and another is the destination. Gazelle is configured to know that a transaction is From an actor To another actor. can be viewed in a list fashion accessed from the TF drop down menu.
- From the main menu, select TF -> Transaction Management

- Search for existing Transactions. Search by entering a Keyword. This is the abbreviation of the transaction, eg ITI-2, QRPH-1, RAD-8.
- Click on the Edit icon in the Action column for the transaction you found.
- On the Edit Transaction page, select the Transactions Links for Transaction tab, then click the Add Transaction Links button.

- Select the appropriate actors from the From Actor and To Actor list.

- Click the Create Transaction Link button. Repeat as needed, then click the Done creating links button
- Verify the accuracy of your data entry by going back to review the Transaction links for Transaction tab.
Test Definition
Test definitions are available
- in Gazelle Master Model under Tests Definition --> Tests Definition (read/write)
- in Test Management under Tests Definiton --> Tests Definition (read only)
Test definitions are, with the technical framework, the basis of Gazelle and its important feature to prepare for and participate in a connect-a-thon. The tests define the scenarios the different actors implemented by a system must pass to be validated by the connect-a-thon managers. This section of the documentation is mostly dedicated to test editors to explain the different sections of a test and how they have to be filled when creating new tests.
Prior to writing a test, three main concepts have to be introduced that determine who will see the test and when.
- Test type: indicates whether the test has to be performed during the connectathon or the pre-connect-a-thon period. A third type was added in order to gather the tests dedicated to HITSP profiles.
- Test status: indicates the level of advancement of the test. Only "ready" tests will be displayed in the participants' system's tests list during the connect-a-thon or pre-connect-a-thon period. "To be completed" are test currently under development, but are not yet ready to expose to participants. "Deprecated" tests are those which are not used anymore, in the same way the storage/subsitute tests have been replaced by more relevant ones. Finally, the "convert later" status has been created when the test definitions have been imported from the Kudu system; it means that we do not need this test by now and consequently it is not a priority to work on it.
- Test Peer Type: indicates if the system can perform this test with "no peer" (no transaction to exchange with a vendor test partner), "peer to peer" are tests covering a subset of a profile, typically with 2, or sometimes 3, partners. "Group tests" cover a workflow within an integration profile and are tests run by a full set of actors within the profile; group test are typically supervised directly by a connectathon monitor.
Each test definitions is built of four parts which are defined below. Each part is contained on an separate tab within the test
1. Test Summary

It gives general informations about the test:
- Keyword, name and the short description are used to identify the test. By convention, the keyword name starts with the profile acronym.
- The test type is connectathon, pre-connectathon but can be other type as defined in the database.
- The test status indicates the readyness of the test. Only test with a status marked as ready are visible by the testers.
- The peer type indicates is the test is of type "No peer", "Peer to Peer" or "Group Test"
- The permanent link to the test is printed in this part (computed by Gazelle)
- The version of the test gives an indication of the most recent testing event for which the test was created/modified.
- The "Is orchestrable" attribute indicates whether the test will be run against a simulator (true) or against another system under test (false). When run against a simulator, the test requires the use of Bpel service and Gazelle web services to be orchestrated. Those services will enable the simulator to communicate with Gazelle in a standalone mode without any help from somebody.
- The "Is validated" attribute indicates whether the test is validated or not.
2. Test Description
This section describes very precisely the test scenario and gives indications to the vendor on how to perform the test, which tools are required and so on. This part also gives keys to the monitor about the things to check, the message to validate and so on. This part of the test can be translated into different languages. By convention, there are three sections in the test description:
- Special Instruction: contain information for the vendor of "special" considerations for this test, for example "ABC test must be run before this one", or "XYZ tool is used in this test"
- Description: Is a short overview of the scope of the test.
- Evaluation: These are the specific instructions to the connectathon monitor describing what evidence must be shown by the vendor in order to "pass" this test.

3. Test Roles
It is the most important part of the test, it is also the most complicated and confusing part of the work.
Assigning one or more Roles to a test determines which Actor/Integration Profile/Profile Option (AIPO) are involved in the test. Roles must be well-chosen for two reasons: (1) If a Role is assigned to a test, it means that the test will appear on the list of tests to do for any test system which supports the AIPO in the Role, and (2) only the transactions supported by the chosen Roles will be available when you define individual Test Steps on the next tab..
Prior to starting a test definition, you should ensure that the Test Roles you need for the test exist; if not, they can be created under Tests Definition --> Role in test management.
A test role (or role in test) is defined as a list of Actor/Integration profile/Profile Option and for each of these AIPO we must specify if the tuple is tested or not. The primary reason to include a Test Participant (ie an AIPO) in a Role with "Tested?" unchecked is because you want the transactions supported by that Test Participant (AIPO) to be used by the other test participants in that Role, but you do not want that test to show up as required for that test participant that is "not tested". This primarily occurs when one actor is "grouped" with another actor.
The whole test role can be set as "played by a tool", for example the OrderManager (formally RISMall) or the NIST registry or a simulator or so on.
A convention has been put in place for the naming of test roles:
<ACTOR_KEYWORD>_<INTEGRATION_PROFILE_KEYWORD>[_<PROFILE_OPTION_KEYWORD>|_ANY_OPTIONS][_WITH_SN][_WITH_ACTOR_KEYWORD][_HELPER]
If several actors from a profile or several profiles are used to defined the test role, only the main couple Actor/Integration Profile must be used to name the role.
By ANY_OPTIONS we mean that any system implementing one of the option defined for the profile must perform the tests involving this role.
_WITH_SN means that the transactions in which the role takes part must be run using TLS, consequently the involved actors must implement the Secure Node actor from ATNA profile. Note that, in that case, the Secure Node actor is set "not tested", so that failling this test do not fail the Secure Node actor.
_WITH_ACTOR_KEYWORD means that the system must support a second actor, the one is not tested, in order to perform some initialization steps. For example PEC_PAM_WITH_PDC gathers the Patient Encounter Consumer actor from the Patient Admission Management profile and the Patient Demographic Consumer from the same profile; this is required because we need to populate the database of the PEC with some data received thanks to the PDC. Keep in mind that such associations must be meaningful that means that the gathered actors are linked by an IHE dependency.
Finally, _HELPER means that the role is not tested but is required to ensure the coherence of the test.
Here are some examples to let you better understand the naming convention:
DOC_CONSUMER_XDS.b_ANY_OPTIONS gathers all the Document Consumer of the XDS.b profile no matter the options they support.
IM_SWF_HELPER gathers all the Image Manager from the Schedule Workflow profile but those actors are not tested.
If the test participant is a tool or a simulator, we will used the system name as test role name: <SIMULATOR or UTILITY_NAME>, for instance ORDER_MANAGER, CENTRAL_ARCHIVE, NIST_REGISTRY and so on.

Once you have chosen the roles involved in your test, you will be asked, for each of them to give some more information such as:
- # to realize: the number of times the system must realize with success this test for the tested actor to be validated. Typically, this is "3" for peer to peer tests, and "1" for No Peer and Group tests.
- Card Min: (cardinality) how many (at least) systems with this role must be involved in the test
- Card Max: (cardinality) how many (at most) systems with this role can be involved in the test
- Optionality: whether or not this role is a mandatory participant in the test. "Required" means a vendor cannot start the test until a system is identified for this role. "Optional" means that the test may be run whether or not a system is identified for this role in the test.
4. Test Steps
To help vendors with performing the test, we cut the test into small entities called test steps. In a newly defined test, when you first arrive on this page, you will find a sequence diagram only filled with the different roles you have previously defined. As you add test steps, you will be able to see the sequence diagram is automatically updated according to the steps you have defined. The red arrows stand for secured transaction (TLS set to true)
Test steps are ordered based on the step index, in most of the cases, vendors will have to respect the given order, especially if the test is run against a simulator.

Each step is described as follows:
- Step index: index of the step
- Initiator role: test role in charge of initiating the transaction (only roles with actors which are initiators for at least one transaction can be used as initiator role)
- Responder role: test role acting as the receiver for this step (only roles with actors which are responders for at least one transaction can be used as responder role)
- Transaction: the transaction to perform by the two actors
- Secured: indicates whether the transaction must be perform over TLS or not
- Message type: the message sent by the initiator
- Option: indicates whether the test step is required or not
- Description: detailed instructions on how to perform the step
When editing a step, you can choose to check or not the Auto Response box. When it is checked, it indicates that the selected role has to perform a step alone (initialization, log ...), no transaction nor message type have to be specified.

In order not to waste time editing steps for a little change, the step index field, secured checkbox, option selection and description fields can be filled from the main page of test steps. The change is recorded in database each time you lose the focus of the modified field.
If you have chosen to write an orchestrated test, that means that the system under test will communicate with a simulator, you may have to enter some more informations called "Contextual Information". In some cases, those informations are needed by the simulator to build a message which match the system configuration or data. This can be used to specifiy a patient ID known by the system under test for instance.
Two kinds of contextual informations are defined:
- Input Contextual Information: The information provided to the simulator
- Output Contextual Information: The information sent back by the simulator and that can be used as input contextual information for the next steps
For each contextual information, you are expected to provide the label of the field and the path (it can be XPath or HL7 path if you need to feed a specific XML element or HL7v2 message segment). A default value can also be set.

If you have defined output contextual informations for previous steps, you can use them as input contextual information for next steps by importing them, as it is shown on the capture below. So that, the simulator will received the return of a previous step as new information and will be able to build next messages.

For more details about the expectation of simulators, read the developer manual of the simulator you want to involve in your test. A short example based on XCA Initiating Gateway Simulator use is given below.
XCA Initiating Gateway supports two transactions: ITI-38 for querying the responding gateway about the documents for a specific patient and ITI-39 to retrieve those documents. In a first step we may ask the responding gateway for the documents of patient 1234^^^&1.2.3.4.5.6&ISO, in the second step we will ask the responding gateway to send the first retrieved document.
| step 1 | label | path | value |
| Input Contextual Information | |||
| XDSDocumentEntryPatientId | $XDSDocumentEntry.patientId | 1234^^^&1.2.3.4.5.6&ISO | |
| Output Contextual Information | |||
| XDSDocumentEntryUniqueId | $XDSDocumentEntry.uniqueId | 7.9.0.1.2.3.4 | |
| step 2 | Input Contextual Information | ||
| XDSDocumentEntryUniqueId | $XDSDocumentEntry.uniqueId | 7.9.0.1.2.3.4 | |
In this way, no action on the simulator side is required from the vendor, he/she only has to set up his/her system under test and give the first input contextual information to the simulator through the Test Management user interface.
Meta tests
This page is not complete yet and need review
In some Peer to Peer tests, the transactions supported by one Role are identical across multiple different tests, yet that Role's partners across those tests are different. This is best illustrated by an example: In Cardiology and Radiology workflow profiles, a scheduling system (Order Filler Role) profiles a worklist to various imaging systems (Modality Roles). A vendors' Order Filler may play the Order Filler Role in Radiology SWF profile and Cardiology ECHO, CATH and STRESS profiles. If the Order Filler may be assigned a Peer to Peer "worklist" test with modalities in each of these profiles. This could result in 12 worklist tests to pass for the Order Filler (3 worklist tests x 4 profiles). Meta Tests allow test definers to eliminate this kind of redundant testing.
Meta tests are special tests are built of equivalent test definitions for a given test role. Actually, we try not to duplicate tests but it can happen that two different tests are the same according the point of view of one test role involved in both. In that case, we merge the two tests under one Meta Test for this specific role.
When a vendor sees a Meta Test in his/her system's test list the equivalent tests are listed within the meta test. He/she is allowed to perform 3 instances of any of the tests within the meta test instead of three instances for each individual test.. That means that if the meta test is composed of 4 tests, the involved actor is expected to have any combination of 3 instances verified,
Meta tests are defined in gazelle under Test Definition --> Meta test list. A Meta test is given a keyword and a short description; then the equivalent tests are linked to the meta test.
As an example, let's take the meta test with keyword Meta_Doc_Repository_Load. This Meta test gathers four tests defined, among other, for the Document Repository actor of the XDS-I.b profile. Each of these tests ask this actor to perform the RAD-68 and ITI-42 transactions against an actor supporting several options. From the point of view of the Document Repository, those four tests are equivalent since we are testing four times the same transactions. Consequently, running only three of the twelve instances it would have had to do is enough to be successfully graded.
Configuration of master model slaves
This page provides the instructions on how to add a slave application to the master model.
Pre-requisite
- slony 2.0.6 : The version of slony on the slave and on the master shall be identical. Currently the version in use is 2.0.6. Run the following command to find out the version you are running
admin@master:~$ slon -v
slon version 2.0.6
admin@master:~$
admin@slave:~$ slon -v
slon version 2.0.6
admin@slave:~$
- postgresql 8.4.x : the version of postgresql on the slave and on the master are not required to be identical. The version used shall be one of the 8.4 series. The master is running 8.4.7. The master system needs to access the database on the slave. This achieved by configuring the file pg_hba.conf on the slave.
- Make sure that the file pg_hba.conf on the slave contains the following entries.
# TYPE DATABASE USER CIDR-ADDRESS METHOD
host gazelle-on-slave gazelle 131.254.209.12/32 md5
host gazelle-on-slave gazelle 131.254.209.13/32 md5
host gazelle-on-slave gazelle 131.254.209.14/32 md5
host gazelle-on-slave gazelle 131.254.209.15/32 md5
where host is the gazelle-on-slave is the name of the gazelle database on the slave. When the configuration of the slave is succesful then you should be able to run the following command
psql -h slave -U username gazelle-on-slave
and access the remote database.
One this level of configuration is reach we can start configuring slony on the master and on the slave.
Initialisation of slony on the master system
I usually have them in ~/slony
The slony initialisation script is stored in the file : slonik_init.sk. The file should be executable. When this script is run it creates a new schema on each of the nodes (slaves and master). If you need to rerun the script, make sure that you delete the schema from each of the nodes
DROP SCHEMA "_TF" CASCADE ;
Content of the file : slonik_init.sk
#!/usr/bin/slonik
define CLUSTER TF;
define PRIMARY 1;
define EPSOS 10;
define TM 20;
define PR 30;
define ORANGE 60;
cluster name = @CLUSTER;
# Here we declare how to access each of the nodes. Master is PRIMARY and others are the slaves.node @PRIMARY admin conninfo = 'dbname=master-model host=jumbo.irisa.fr user=gazelle password=XXXXXX';
node @TM admin conninfo = 'dbname=ihe-europe-2010 host=kujira.irisa.fr user=gazelle password=XXXXXX';
node @PR admin conninfo = 'dbname=product-registry host=jumbo.irisa.fr user=gazelle password=XXXXXX';
node @EVSCLIENT admin conninfo = 'dbname=evs-client-prod host=jumbo.irisa.fr user=gazelle password=XXXXXX';
node @ORANGE admin conninfo = 'dbname=gazelle-na-2012 host=gazelle-orange.wustl.edu user=gazelle password=XXXXXX'
# Initialisation of the cluster
init cluster (id=@PRIMARY, comment='Gazelle Master Model');
# Declaration of the slaves
store node (id=@TM, event node=@PRIMARY, comment='Test Management Slave');
store node (id=@PR, event node=@PRIMARY, comment='Product Registry Slave');
store node (id=@EVSCLIENT, event node=@PRIMARY, comment='EVS Client Slave');
store node (id=@ORANGE, event node=@PRIMARY, comment='Test Management Slave Orange');
# Define the path from Slaves to Master
store path (server=@PRIMARY, client=@TM, conninfo='dbname=master-model host=jumbo.irisa.fr user=gazelle');
store path (server=@PRIMARY, client=@PR, conninfo='dbname=master-model host=jumbo.irisa.fr user=gazelle');
store path (server=@PRIMARY, client=@EVSCLIENT, conninfo='dbname=master-model host=jumbo.irisa.fr user=gazelle');
store path (server=@PRIMARY, client=@ORANGE, conninfo='dbname=master-model host=jumbo.irisa.fr user=gazelle');
# Define the path from Master to Slaves
store path (server=@TM, client=@PRIMARY, conninfo='dbname=ihe-europe-2010 host=kujira.irisa.fr user=gazelle');
store path (server=@PR, client=@PRIMARY, conninfo='dbname=product-registry host=jumbo.irisa.fr user=gazelle');
store path (server=@EVSCLIENT, client=@PRIMARY, conninfo='dbname=evs-client-prod host=jumbo.irisa.fr user=gazelle');
store path (server=@ORANGE, client=@PRIMARY, conninfo='dbname=gazelle-na-2012 host=gazelle-orange.wustl.edu user=gazelle password=gazelle');
The next file to consider is : script_server.sk
#!/usr/bin/slonik
define CLUSTER TF;
define PRIMARY 1;
define TM 20;
define PR 30;
define EVSCLIENT 40;
define ORANGE 60;
cluster name = @CLUSTER;
#Declaration of the nodes
node @PRIMARY admin conninfo = 'dbname=master-model host=jumbo.irisa.fr user=gazelle password=gazelle';node @TM admin conninfo = 'dbname=ihe-europe-2010 host=kujira.irisa.fr user=gazelle password=gazelle';
node @PR admin conninfo = 'dbname=product-registry host=jumbo.irisa.fr user=gazelle password=gazelle';
node @EVSCLIENT admin conninfo = 'dbname=evs-client-prod host=jumbo.irisa.fr user=gazelle password=gazelle';
node @ORANGE admin conninfo = 'dbname=gazelle-na-2012 host=gazelle-orange.wustl.edu user=gazelle password=gazelle';
# We need 2 sets: One for the Technical Framework (TF) part and one for the Test Definition (Test Management = TM) part
create set (id=1, origin=@PRIMARY, comment='TF');
create set (id=2, origin=@PRIMARY, comment='TM');
# Assign the table and sequences to each of the nodes
set add table (id=176, set id=1, origin = @PRIMARY, fully qualified name = 'public.revinfo', comment = 'table');
set add table (id=174, set id=1, origin = @PRIMARY, fully qualified name = 'public.tf_actor', comment = 'table');
set add table (id=175, set id=1, origin = @PRIMARY, fully qualified name = 'public.tf_actor_aud', comment = 'table');
set add sequence (id=2, set id=1, origin = @PRIMARY, fully qualified name = 'public.tf_actor_id_seq', comment = 'seq');
set add table (id=3, set id=1, origin = @PRIMARY, fully qualified name = 'public.tf_hl7_message_profile_table', comment = 'table');
set add table (id=4, set id=1, origin = @PRIMARY, fully qualified name = 'public.tf_hl7_message_profile_table_aud', comment = 'table');
set add sequence (id=5, set id=1, origin = @PRIMARY, fully qualified name = 'public.tf_hl7_message_profile_table_id_seq', comment = 'seq');
set add table (id=6, set id=1, origin = @PRIMARY, fully qualified name = 'public.tf_actor_integration_profile_option', comment = 'table');
set add table (id=7, set id=1, origin = @PRIMARY, fully qualified name = 'public.tf_actor_integration_profile_option_aud', comment = 'table');
set add sequence (id=8, set id=1, origin = @PRIMARY, fully qualified name = 'public.tf_actor_integration_profile_option_id_seq', comment = 'seq');
set add table (id=9, set id=1, origin = @PRIMARY, fully qualified name = 'public.tf_integration_profile', comment = 'table');
set add table (id=10, set id=1, origin = @PRIMARY, fully qualified name = 'public.tf_integration_profile_aud', comment = 'table');
set add sequence (id=11, set id=1, origin = @PRIMARY, fully qualified name = 'public.tf_integration_profile_id_seq', comment = 'seq');
set add table (id=12, set id=1, origin = @PRIMARY, fully qualified name = 'public.tf_integration_profile_option', comment = 'table');
set add table (id=13, set id=1, origin = @PRIMARY, fully qualified name = 'public.tf_integration_profile_option_aud', comment = 'table');
set add sequence (id=14, set id=1, origin = @PRIMARY, fully qualified name = 'public.tf_integration_profile_option_id_seq', comment = 'seq');
set add table (id=15, set id=1, origin = @PRIMARY, fully qualified name = 'public.tf_actor_integration_profile', comment = 'table');
set add table (id=16, set id=1, origin = @PRIMARY, fully qualified name = 'public.tf_actor_integration_profile_aud', comment = 'table');
set add sequence (id=17, set id=1, origin = @PRIMARY, fully qualified name = 'public.tf_actor_integration_profile_id_seq', comment = 'seq');
set add table (id=18, set id=1, origin = @PRIMARY, fully qualified name = 'public.tf_integration_profile_type', comment = 'table');
set add table (id=19, set id=1, origin = @PRIMARY, fully qualified name = 'public.tf_integration_profile_type_aud', comment = 'table');
set add sequence (id=20, set id=1, origin = @PRIMARY, fully qualified name = 'public.tf_integration_profile_type_id_seq', comment = 'seq');
set add table (id=21, set id=1, origin = @PRIMARY, fully qualified name = 'public.tf_transaction_link', comment = 'table');
set add table (id=22, set id=1, origin = @PRIMARY, fully qualified name = 'public.tf_transaction_link_aud', comment = 'table');
set add sequence (id=23, set id=1, origin = @PRIMARY, fully qualified name = 'public.tf_transaction_link_id_seq', comment = 'seq');
set add table (id=24, set id=1, origin = @PRIMARY, fully qualified name = 'public.tf_transaction_option_type', comment = 'table');
set add table (id=25, set id=1, origin = @PRIMARY, fully qualified name = 'public.tf_transaction_option_type_aud', comment = 'table');
set add sequence (id=26, set id=1, origin = @PRIMARY, fully qualified name = 'public.tf_transaction_option_type_id_seq', comment = 'seq');
set add table (id=27, set id=1, origin = @PRIMARY, fully qualified name = 'public.tf_profile_link', comment = 'table');
set add table (id=28, set id=1, origin = @PRIMARY, fully qualified name = 'public.tf_profile_link_aud', comment = 'table');
set add sequence (id=29, set id=1, origin = @PRIMARY, fully qualified name = 'public.tf_profile_link_id_seq', comment = 'seq');
set add table (id=30, set id=1, origin = @PRIMARY, fully qualified name = 'public.tf_integration_profile_status_type', comment = 'table');
set add table (id=31, set id=1, origin = @PRIMARY, fully qualified name = 'public.tf_integration_profile_status_type_aud', comment = 'table');
set add sequence (id=32, set id=1, origin = @PRIMARY, fully qualified name = 'public.tf_integration_profile_status_type_id_seq', comment = 'seq');
set add table (id=33, set id=1, origin = @PRIMARY, fully qualified name = 'public.tf_profile_inria_hl7_validation_files', comment = 'table');
set add table (id=34, set id=1, origin = @PRIMARY, fully qualified name = 'public.tf_profile_inria_hl7_validation_files_aud', comment = 'table');
set add sequence (id=35, set id=1, origin = @PRIMARY, fully qualified name = 'public.tf_profile_inria_hl7_validation_files_id_seq', comment = 'seq');
set add table (id=36, set id=2, origin = @PRIMARY, fully qualified name = 'public.tm_configuration_mapped_with_aipo', comment = 'table');
set add table (id=37, set id=2, origin = @PRIMARY, fully qualified name = 'public.tm_configuration_mapped_with_aipo_aud', comment = 'table');
set add sequence (id=38, set id=2, origin = @PRIMARY, fully qualified name = 'public.tm_configuration_mapped_with_aipo_id_seq', comment = 'seq');
set add table (id=39, set id=2, origin = @PRIMARY, fully qualified name = 'public.tm_conf_mapping_w_aipo_w_conftypes', comment = 'table');
set add table (id=40, set id=2, origin = @PRIMARY, fully qualified name = 'public.tm_conf_mapping_w_aipo_w_conftypes_aud', comment = 'table');
set add table (id=42, set id=2, origin = @PRIMARY, fully qualified name = 'public.tm_conftype_w_ports_wstype_and_sop_class', comment = 'table');
set add table (id=43, set id=2, origin = @PRIMARY, fully qualified name = 'public.tm_conftype_w_ports_wstype_and_sop_class_aud', comment = 'table');
set add sequence (id=44, set id=2, origin = @PRIMARY, fully qualified name = 'public.tm_conftype_w_ports_wstype_and_sop_class_id_seq', comment = 'seq');
set add table (id=45, set id=1, origin = @PRIMARY, fully qualified name = 'public.tf_transaction_status_type', comment = 'table');
set add table (id=46, set id=1, origin = @PRIMARY, fully qualified name = 'public.tf_transaction_status_type_aud', comment = 'table');
set add sequence (id=47, set id=1, origin = @PRIMARY, fully qualified name = 'public.tf_transaction_status_type_id_seq', comment = 'seq');
set add table (id=48, set id=2, origin = @PRIMARY, fully qualified name = 'public.tm_configuration_type', comment = 'table');
set add table (id=49, set id=2, origin = @PRIMARY, fully qualified name = 'public.tm_configuration_type_aud', comment = 'table');
set add sequence (id=50, set id=2, origin = @PRIMARY, fully qualified name = 'public.tm_configuration_type_id_seq', comment = 'seq');
set add table (id=51, set id=2, origin = @PRIMARY, fully qualified name = 'public.tm_meta_test', comment = 'table');
set add table (id=52, set id=2, origin = @PRIMARY, fully qualified name = 'public.tm_meta_test_aud', comment = 'table');
set add sequence (id=53, set id=2, origin = @PRIMARY, fully qualified name = 'public.tm_meta_test_id_seq', comment = 'seq');
set add table (id=54, set id=2, origin = @PRIMARY, fully qualified name = 'public.tm_meta_test_test_roles', comment = 'table');
set add table (id=55, set id=2, origin = @PRIMARY, fully qualified name = 'public.tm_meta_test_test_roles_aud', comment = 'table');
set add table (id=57, set id=2, origin = @PRIMARY, fully qualified name = 'public.tm_role_in_test_test_participants', comment = 'table');
set add table (id=58, set id=2, origin = @PRIMARY, fully qualified name = 'public.tm_role_in_test_test_participants_aud', comment = 'table');
set add table (id=60, set id=2, origin = @PRIMARY, fully qualified name = 'public.tm_sop_class', comment = 'table');
set add table (id=61, set id=2, origin = @PRIMARY, fully qualified name = 'public.tm_sop_class_aud', comment = 'table');
set add sequence (id=62, set id=2, origin = @PRIMARY, fully qualified name = 'public.tm_sop_class_id_seq', comment = 'seq');
set add table (id=63, set id=2, origin = @PRIMARY, fully qualified name = 'public.tm_test_description', comment = 'table');
set add table (id=64, set id=2, origin = @PRIMARY, fully qualified name = 'public.tm_test_description_aud', comment = 'table');
set add sequence (id=65, set id=2, origin = @PRIMARY, fully qualified name = 'public.tm_test_description_id_seq', comment = 'seq');
set add table (id=66, set id=2, origin = @PRIMARY, fully qualified name = 'public.tm_test_participants', comment = 'table');
set add table (id=67, set id=2, origin = @PRIMARY, fully qualified name = 'public.tm_test_participants_aud', comment = 'table');
set add sequence (id=68, set id=2, origin = @PRIMARY, fully qualified name = 'public.tm_test_participants_id_seq', comment = 'seq');
set add table (id=69, set id=2, origin = @PRIMARY, fully qualified name = 'public.tm_test_test_description', comment = 'table');
set add table (id=70, set id=2, origin = @PRIMARY, fully qualified name = 'public.tm_test_test_description_aud', comment = 'table');
#set add sequence (id=71, set id=2, origin = @PRIMARY, fully qualified name = 'public.tm_test_test_description_id_seq', comment = 'seq');
set add table (id=72, set id=2, origin = @PRIMARY, fully qualified name = 'public.tm_test_steps_input_ci', comment = 'table');
set add table (id=73, set id=2, origin = @PRIMARY, fully qualified name = 'public.tm_test_steps_input_ci_aud', comment = 'table');
set add table (id=75, set id=2, origin = @PRIMARY, fully qualified name = 'public.tm_test_steps_option', comment = 'table');
set add table (id=76, set id=2, origin = @PRIMARY, fully qualified name = 'public.tm_test_steps_option_aud', comment = 'table');
set add sequence (id=77, set id=2, origin = @PRIMARY, fully qualified name = 'public.tm_test_steps_option_id_seq', comment = 'seq');
set add table (id=78, set id=2, origin = @PRIMARY, fully qualified name = 'public.tm_test_steps_output_ci', comment = 'table');
set add table (id=79, set id=2, origin = @PRIMARY, fully qualified name = 'public.tm_test_steps_output_ci_aud', comment = 'table');
set add table (id=81, set id=2, origin = @PRIMARY, fully qualified name = 'public.tm_test_steps', comment = 'table');
set add table (id=82, set id=2, origin = @PRIMARY, fully qualified name = 'public.tm_test_steps_aud', comment = 'table');
set add sequence (id=83, set id=2, origin = @PRIMARY, fully qualified name = 'public.tm_test_steps_id_seq', comment = 'seq');
set add table (id=84, set id=2, origin = @PRIMARY, fully qualified name = 'public.tm_test_status', comment = 'table');
set add table (id=85, set id=2, origin = @PRIMARY, fully qualified name = 'public.tm_test_status_aud', comment = 'table');
set add sequence (id=86, set id=2, origin = @PRIMARY, fully qualified name = 'public.tm_test_status_id_seq', comment = 'seq');
set add table (id=87, set id=2, origin = @PRIMARY, fully qualified name = 'public.tm_test_roles', comment = 'table');
set add table (id=88, set id=2, origin = @PRIMARY, fully qualified name = 'public.tm_test_roles_aud', comment = 'table');
set add sequence (id=89, set id=2, origin = @PRIMARY, fully qualified name = 'public.tm_test_roles_id_seq', comment = 'seq');
set add table (id=90, set id=2, origin = @PRIMARY, fully qualified name = 'public.tm_web_service_type', comment = 'table');
set add table (id=91, set id=2, origin = @PRIMARY, fully qualified name = 'public.tm_web_service_type_aud', comment = 'table');
set add sequence (id=92, set id=2, origin = @PRIMARY, fully qualified name = 'public.tm_web_service_type_id_seq', comment = 'seq');
set add table (id=93, set id=2, origin = @PRIMARY, fully qualified name = 'public.tm_test_type', comment = 'table');
set add table (id=94, set id=2, origin = @PRIMARY, fully qualified name = 'public.tm_test_type_aud', comment = 'table');
set add sequence (id=95, set id=2, origin = @PRIMARY, fully qualified name = 'public.tm_test_type_id_seq', comment = 'seq');
set add table (id=96, set id=1, origin = @PRIMARY, fully qualified name = 'public.tf_domain',  comment = 'table');
set add table (id=97, set id=1, origin = @PRIMARY, fully qualified name = 'public.tf_domain_aud', comment = 'table');
set add sequence (id=98, set id=1, origin = @PRIMARY, fully qualified name = 'public.tf_domain_id_seq', comment = 'seq');
set add table (id=99, set id=1, origin = @PRIMARY, fully qualified name = 'public.tf_integration_profile_type_link', comment = 'table');
set add table (id=100, set id=1, origin = @PRIMARY, fully qualified name = 'public.tf_integration_profile_type_link_aud', comment = 'table');
set add table (id=102, set id=2, origin = @PRIMARY, fully qualified name = 'public.tm_test_test_steps', comment = 'table');
set add table (id=103, set id=2, origin = @PRIMARY, fully qualified name = 'public.tm_test_test_steps_aud', comment = 'table');set add table (id=105, set id=2, origin = @PRIMARY, fully qualified name = 'public.tm_test_option', comment = 'table');
set add table (id=106, set id=2, origin = @PRIMARY, fully qualified name = 'public.tm_test_option_aud', comment = 'table');
set add sequence (id=107, set id=2, origin = @PRIMARY, fully qualified name = 'public.tm_test_option_id_seq', comment = 'seq');
set add table (id=108, set id=2, origin = @PRIMARY, fully qualified name = 'public.tm_test_peer_type', comment = 'table');
set add table (id=109, set id=2, origin = @PRIMARY, fully qualified name = 'public.tm_test_peer_type_aud', comment = 'table');
set add sequence (id=110, set id=2, origin = @PRIMARY, fully qualified name = 'public.tm_test_peer_type_id_seq', comment = 'seq');
set add table (id=111, set id=1, origin = @PRIMARY, fully qualified name = 'public.tf_hl7_message_profile', comment = 'table');
set add table (id=112, set id=1, origin = @PRIMARY, fully qualified name = 'public.tf_hl7_message_profile_aud', comment = 'table');
set add sequence (id=113, set id=1, origin = @PRIMARY, fully qualified name = 'public.tf_hl7_message_profile_id_seq', comment = 'seq');
set add table (id=114, set id=1, origin = @PRIMARY, fully qualified name = 'public.tf_domain_profile',   comment = 'table');
set add table (id=115, set id=1, origin = @PRIMARY, fully qualified name = 'public.tf_domain_profile_aud', comment = 'table');
set add table (id=117, set id=1, origin = @PRIMARY, fully qualified name = 'public.tf_transaction', comment = 'table');
set add table (id=118, set id=1, origin = @PRIMARY, fully qualified name = 'public.tf_transaction_aud', comment = 'table');
set add sequence (id=119, set id=1, origin = @PRIMARY, fully qualified name = 'public.tf_transaction_id_seq', comment = 'seq');
set add table (id=177, set id=1, origin = @PRIMARY, fully qualified name = 'public.tf_hl7_message_profile_affinity_domain', comment = 'table');
set add table (id=178, set id=1, origin = @PRIMARY, fully qualified name = 'public.tf_hl7_message_profile_affinity_domain_aud', comment = 'table');
set add table (id=120, set id=2, origin = @PRIMARY, fully qualified name = 'public.tm_test', comment = 'table');
set add table (id=121, set id=2, origin = @PRIMARY, fully qualified name = 'public.tm_test_aud', comment = 'table');
set add sequence (id=122, set id=2, origin = @PRIMARY, fully qualified name = 'public.tm_test_id_seq', comment = 'seq');
set add table (id=123, set id=2, origin = @PRIMARY, fully qualified name = 'public.tm_transport_layer_for_config', comment = 'table');
set add table (id=124, set id=2, origin = @PRIMARY, fully qualified name = 'public.tm_transport_layer_for_config_aud', comment = 'table');
set add sequence (id=125, set id=2, origin = @PRIMARY, fully qualified name = 'public.tm_transport_layer_for_config_seq', comment = 'seq');
set add table (id=126, set id=2, origin = @PRIMARY, fully qualified name = 'public.tm_role_in_test', comment = 'table');
set add table (id=127, set id=2, origin = @PRIMARY, fully qualified name = 'public.tm_role_in_test_aud', comment = 'table');
set add sequence (id=128, set id=2, origin = @PRIMARY, fully qualified name = 'public.tm_role_in_test_id_seq', comment = 'seq');
set add table (id=129, set id=2, origin = @PRIMARY, fully qualified name = 'public.tm_contextual_information', comment = 'table');
set add table (id=130, set id=2, origin = @PRIMARY, fully qualified name = 'public.tm_contextual_information_aud', comment = 'table');
set add sequence (id=131, set id=2, origin = @PRIMARY, fully qualified name = 'public.tm_contextual_information_id_seq', comment = 'seq');
set add table (id=132, set id=2, origin = @PRIMARY, fully qualified name = 'public.tm_object_file', comment = 'table');
set add table (id=133, set id=2, origin = @PRIMARY, fully qualified name = 'public.tm_object_file_aud', comment = 'table');
set add sequence (id=134, set id=2, origin = @PRIMARY, fully qualified name = 'public.tm_object_file_id_seq', comment = 'seq');
set add table (id=135, set id=2, origin = @PRIMARY, fully qualified name = 'public.tm_object_creator', comment = 'table');
set add table (id=136, set id=2, origin = @PRIMARY, fully qualified name = 'public.tm_object_creator_aud', comment = 'table');
set add sequence (id=137, set id=2, origin = @PRIMARY, fully qualified name = 'public.tm_object_creator_id_seq', comment = 'seq');
set add table (id=138, set id=2, origin = @PRIMARY, fully qualified name = 'public.tm_object_attribute', comment = 'table');
set add table (id=139, set id=2, origin = @PRIMARY, fully qualified name = 'public.tm_object_attribute_aud', comment = 'table');
set add sequence (id=140, set id=2, origin = @PRIMARY, fully qualified name = 'public.tm_object_attribute_id_seq', comment = 'seq');
set add table (id=141, set id=2, origin = @PRIMARY, fully qualified name = 'public.tm_object_file_method', comment = 'table');
set add table (id=142, set id=2, origin = @PRIMARY, fully qualified name = 'public.tm_object_file_method_aud', comment = 'table');
set add table (id=144, set id=2, origin = @PRIMARY, fully qualified name = 'public.tm_object_attribute_option', comment = 'table');
set add table (id=145, set id=2, origin = @PRIMARY, fully qualified name = 'public.tm_object_attribute_option_aud', comment = 'table');
set add sequence (id=146, set id=2, origin = @PRIMARY, fully qualified name = 'public.tm_object_attribute_option_id_seq', comment = 'seq');
set add table (id=147, set id=2, origin = @PRIMARY, fully qualified name = 'public.tm_object_class_validator', comment = 'table');
set add table (id=148, set id=2, origin = @PRIMARY, fully qualified name = 'public.tm_object_class_validator_aud', comment = 'table');
set add sequence (id=149, set id=2, origin = @PRIMARY, fully qualified name = 'public.tm_object_class_validator_id_seq', comment = 'seq');
set add table (id=150, set id=2, origin = @PRIMARY, fully qualified name = 'public.tm_object_file_type', comment = 'table');
set add table (id=151, set id=2, origin = @PRIMARY, fully qualified name = 'public.tm_object_file_type_aud', comment = 'table');
set add sequence (id=152, set id=2, origin = @PRIMARY, fully qualified name = 'public.tm_object_file_type_id_seq', comment = 'seq');
set add table (id=153, set id=2, origin = @PRIMARY, fully qualified name = 'public.tm_object_instance_validation', comment = 'table');
set add table (id=154, set id=2, origin = @PRIMARY, fully qualified name = 'public.tm_object_instance_validation_aud', comment = 'table');
set add sequence (id=155, set id=2, origin = @PRIMARY, fully qualified name = 'public.tm_object_instance_validation_id_seq', comment = 'seq');
set add table (id=156, set id=2, origin = @PRIMARY, fully qualified name = 'public.tm_object_method_parameter', comment = 'table');
set add table (id=157, set id=2, origin = @PRIMARY, fully qualified name = 'public.tm_object_method_parameter_aud', comment = 'table');
set add table (id=159, set id=2, origin = @PRIMARY, fully qualified name = 'public.tm_object_parameter_validator', comment = 'table');
set add table (id=160, set id=2, origin = @PRIMARY, fully qualified name = 'public.tm_object_parameter_validator_aud', comment = 'table');
set add sequence (id=161, set id=2, origin = @PRIMARY, fully qualified name = 'public.tm_object_parameter_validator_id_seq', comment = 'seq');
set add table (id=162, set id=2, origin = @PRIMARY, fully qualified name = 'public.tm_object_reader', comment = 'table');
set add table (id=163, set id=2, origin = @PRIMARY, fully qualified name = 'public.tm_object_reader_aud', comment = 'table');
set add sequence (id=164, set id=2, origin = @PRIMARY, fully qualified name = 'public.tm_object_reader_id_seq', comment = 'seq');
set add table (id=165, set id=2, origin = @PRIMARY, fully qualified name = 'public.tm_object_type_status', comment = 'table');
set add table (id=166, set id=2, origin = @PRIMARY, fully qualified name = 'public.tm_object_type_status_aud', comment = 'table');
set add sequence (id=167, set id=2, origin = @PRIMARY, fully qualified name = 'public.tm_object_type_status_id_seq', comment = 'seq');
set add table (id=168, set id=2, origin = @PRIMARY, fully qualified name = 'public.tm_object_type', comment = 'table');
set add table (id=169, set id=2, origin = @PRIMARY, fully qualified name = 'public.tm_object_type_aud', comment = 'table');
set add sequence (id=170, set id=2, origin = @PRIMARY, fully qualified name = 'public.tm_object_type_id_seq', comment = 'seq');
set add table (id=171, set id=2, origin = @PRIMARY, fully qualified name = 'public.tm_object_method_validator', comment = 'table');
set add table (id=172, set id=2, origin = @PRIMARY, fully qualified name = 'public.tm_object_method_validator_aud', comment = 'table');
set add sequence (id=173, set id=2, origin = @PRIMARY, fully qualified name = 'public.tm_object_method_validator_id_seq', comment = 'seq');
set add table (id=179, set id=2, origin = @PRIMARY, fully qualified name = 'public.tm_path', comment = 'table');
set add table (id=180, set id=2, origin = @PRIMARY, fully qualified name = 'public.tm_path_aud', comment = 'table');
set add sequence (id=181, set id=2, origin = @PRIMARY, fully qualified name = 'public.tm_path_id_seq', comment = 'seq');
set add table (id=182, set id=2, origin = @PRIMARY, fully qualified name = 'public.tf_ws_transaction_usage', comment = 'table');
set add table (id=183, set id=2, origin = @PRIMARY, fully qualified name = 'public.tf_ws_transaction_usage_aud', comment = 'table');
set add sequence (id=184, set id=2, origin = @PRIMARY, fully qualified name = 'public.tf_ws_transaction_usage_id_seq', comment = 'seq');
# Then for each slave we tell to start the sync
#TM
subscribe set (id = 1, provider = @PRIMARY, receiver = @TM);
sync(id=@PRIMARY);
wait for event(origin=@PRIMARY, confirmed=@TM, wait on=@PRIMARY);
subscribe set (id = 2, provider = @PRIMARY, receiver = @TM);
sync(id=@PRIMARY);
wait for event(origin=@PRIMARY, confirmed=@TM, wait on=@PRIMARY);
#EVSCLIENT
subscribe set (id = 1, provider = @PRIMARY, receiver = @EVSCLIENT);
sync(id=@PRIMARY);
wait for event(origin=@PRIMARY, confirmed=@EVSCLIENT, wait on=@PRIMARY);
#PR
subscribe set (id = 1, provider = @PRIMARY, receiver = @PR);
sync(id=@PRIMARY);
wait for event(origin=@PRIMARY, confirmed=@PR, wait on=@PRIMARY);
#ORANGE
subscribe set (id = 1, provider = @PRIMARY, receiver = @ORANGE);
sync(id=@PRIMARY);
wait for event(origin=@PRIMARY, confirmed=@ORANGE, wait on=@PRIMARY);
subscribe set (id = 2, provider = @PRIMARY, receiver = @ORANGE);
sync(id=@PRIMARY);
wait for event(origin=@PRIMARY, confirmed=@ORANGE, wait on=@PRIMARY);
Initialization of slony on the slaves
Starting the slon process is not an easy command to type, so I have made a script on each of the slaves to execute the command.
nohup slon TF "dbname=evs-client-prod user=gazelle" > evs-client-prod.log
Launching the synchronization or restarting the synchronization
If you are lauching the synchronization for the first time (seen from the master) then you can start from point 4. At any point in the process if you encounter an error, you will need to restart from 1.
- kill the slon process on all slaves : killall slon
- kill the slon process on the master : killall slon
- drop the "_TF" schema in all slaves databases
- on the master run the slonik_init.sk script.
- on each of the slaves start the slon processes
- on the master start the slon process
- on the master run the script_server.sk script
- check the log files on each of the slaves and the master in order to make sure that the synchronization is actually taking place.
[Deprecated] Gazelle Security Suite - Installation & Configuration
Warning: This documentation is out-dated, newest version of the documentation is available at https://gazelle.ihe.net/gazelle-documentation/Gazelle-Security-Suite/installation.html
The Gazelle project entitled Gazelle-Security-Suite (alias GSS) gathers the following tools used in the context of the security profile IHE ATNA :
- Gazelle PKI to generate and share certificates for testing purposes
- ATNA Questionnaire used to collect security properties of systems under test
- Gazelle TLS to test implementation of secured connections
- A model-based validation service for validating Audit Messages
- A model-based validation service for validating XUA assertions
- And a Certificate validator.
Since version 5.0.0 the tool is called Gazelle-Security-Suite and run on JBoss 7. It was prior called Gazelle ATNA Tools and ran on JBoss 5. The main title has changed, but a lot of modules have kept the old name, so do not be surprise to find both names in code sources.
Sources & binaries
Gazelle-Security-Suite is an open-source project under Apache License Version 2.0. Sources are available via Subversion at https://scm.gforge.inria.fr/anonscm/svn/gazelle/Maven/gazelle-atna/.
The public packaged application of our development trunk can be found here. If you prefer a more stable version, the latest release can be downloaded from our Sonatype Nexus repository (search for gazelle-atna-ear).
If you download the ear from Nexus it will have a name such as gazelle-atna-ear-4.7.12-tls.ear or gazelle-atna-ear-5.0.0-gss.ear, then be sure to rename it to gazelle-tls.ear or gazelle-gss.ear otherwise the deployment will fail.
Installation
If you are installing a Gazelle tool for the first time in your environment, make sure to read carefully the general considerations for JBoss7.
If your are installing a version of GSS prior to 5.0.0, you will have to set up a JBoss 5 application server instead.
Bouncycastle
Bouncycastle, as a security library, is very sensible to the classloader. This library is prepared during GSS build and available here (Jenkins workspace). Depending on which version of JBoss GSS is running, the installation differs.
Bouncycastle with JBoss 7 :
bcprov library must be installed as a module of the application server.
- Create the followings directories in the JBoss 7 installation : ${JBOSS_HOME}/modules/org/bouncycastle/main/
- Copy the bcprov jar into ${JBOSS_HOME}/modules/org/bouncycastle/main/
- Create a file named modules.xml into ${JBOSS_HOME}/modules/org/bouncycastle/main/
- Edit module.xml and write :
<?xml version="1.0" encoding="UTF-8"?>
<module xmlns="urn:jboss:module:1.1" name="org.bouncycastle">

    <resources>
        <resource-root path="bcprov-jdk15-1.45.jar"/>
    </resources>

    <dependencies>
        <module name="javax.api" slot="main" export="true"/>
    </dependencies>

</module>
Bouncycastle with JBoss 5 :
- bcprov library is not in the ear, WEB-INF/lib or any directory of JBoss
- bcprov library must be unique and only in ${JBOSS_HOME}/server/${YOUR_SERVER}/lib/ (replace ${YOUR_SERVER} by the server where the ear will be deployed)
Java key length policy
The USA government restricts the allowed Java key size by default. It is needed to change the policy of the JVM if you get the error java.security.InvalidKeyException: Illegal key size.
This can be fixed by overwriting policy files in the Java runtime by those provided on the Java download page :
- Java 6 : http://www.oracle.com/technetwork/java/javase/downloads/jce-6-download-429243.html
- Java 7 : http://www.oracle.com/technetwork/java/javase/downloads/jce-7-download-432124.html
Unzip The 2 files jce/US_export_policy.jar and jce/local_policy.jar and paste them into ${JAVA_HOME}/jre/lib/security/
To check whether it's working, try to create a custom certificate with a key size of 2048 once GSS is installed.
Database creation
Your database must have a user gazelle
- Connect to your database
psql -U gazelle
- Execute the SQL statement to create the database.
CREATE DATABASE tls OWNER gazelle ENCODING 'UTF-8' ;
- For GSS 5.1.0 and younger : Download the script schema.sql associated with your GSS version. It can be found in https://scm.gforge.inria.fr/anonscm/svn/gazelle/Maven/gazelle-atna/tags/${GSS_VERSION}/gazelle-atna-ear/scr/main/sql/schema.sql. The create the schema by running:
psql -U gazelle tls < schema.sql
Deployment
To deploy Gazelle-Security-Suite :
- paste the archive gazelle-gss.ear in the JBoss deployment directory:
- JBoss 7 : ${JBOSS7_HOME}/standalone/deployments/.
- JBoss 5 : ${JBOSS5_HOME}/server/${YOUR_SERVER}/deploy/.
- Display JBoss server logs and wait for ear deployment. Then the datatable schema must then have been created.
- Download the script init.sql associated with your Gazelle-Security-Suite version. They can be found in https://scm.gforge.inria.fr/anonscm/svn/gazelle/Maven/gazelle-atna/tags/${GSS_VERSION}/gazelle-atna-ear/scr/main/sql/init.sql and run it to initialize the database :
psql -U gazelle tls < init.sql
- Except for special builds and depending of the JBoss port offset, the application can be browsed at http://localhost:8080/gss (port can be different whether you have modified the JBoss configuration).
Data storage
If the ATNA-questionnaire is enable (true by default), GSS will need a directory to record Audit Messages and validation results. By default, the application is configured to use /opt/tls/.
sudo mkdir /opt/tls
Be sure this directory can be read/written by JBoss.
sudo chmod -R 775 /opt/tls
sudo chown -R jboss:jboss-admin /opt/tls
Update from a previous version
The update mechanism changed at version 5.1.0. Be careful to strictly follow the process associated to the version you come from.
Update from version prior to GSS 5.1.0
- Undeploy the old ear from JBoss by removing it from the deployment directory.
- Backup your database
- Download the new ear and its associated update SQL script. Those scripts can be found in https://scm.gforge.inria.fr/anonscm/svn/gazelle/Maven/gazelle-atna/tags/${GSS_VERSION}/gazelle-atna-ear/scr/main/sql/.. Not each version has an update sql to execute.
- Execute SQL statements that must be run before deployment (Open the update-X.X.X.sql file with a text editor to see which one).
- Deploy the new ear
- Execute SQL statemnts that must be run after deployment (Open the update-X.X.X.sql file with a text editor to see which one).
Due to the update mechanism of the database (the ear is responsible for creating elements, and the update-X.X.X.sql script is responsible for updating or deleting elements), it is important to not skip any version of the application in an overall update. You cannot go directly from 4.7.4 to 4.7.12, you will have to repeat the process from 4.7.4 to 4.7.5, 4.7.6, 4.7.7 and so on.
To update Gazelle-ATNA-tools 4.7.12 to Gazelle-Security-Suite 5.0.0 the process is the same, except that the deployment of the new ear (step 5) must be done on a JBoss7 properly installed for GSS.
Update from GSS version 5.1.0 and younger
- Undeploy the old ear from JBoss by removing it from the deployment directory.
- Backup your database
- Download the new ear and all intermediate update SQL scripts from your old version (excluded) to your target version (included). Those scripts can be found in https://scm.gforge.inria.fr/anonscm/svn/gazelle/Maven/gazelle-atna/tags/${GSS_VERSION}/gazelle-atna-ear/scr/main/sql/.. Not each version has an update sql to execute.
- Execute the update SQL scripts
- Deploy the new ear
Example (version number are hypothetical) : to update GSS from 5.1.0 to 5.1.5 you have to execute 5.1.1, 5.1.2, 5.1.3, 5.1.4 and 5.1.5 update SQL scripts, but you only have to deploy the latest gss 5.1.5 ear.
Configuration
GSS Double Central Authentication Service
Basicaly one Gazelle Central Authentication Service provides user authentication for all Gazelle applications in a test bed. However we once had the need to connect one instance of GSS with two test beds. We implemented a feature to answer this need and decide to leave the option available for public. So GSS can be connected with two distinct Authentication Services and users are identified from two databases. GSS concatenates the username and the CAS key to preserve username uniqueness all over the application. Of course the second authentication channel is optional and can be turned off.
Note that every configuration variable related to a user feature is then derivated in two versions and prefixed with main_ or second_. It allows admin to configure options and services for the first or the second test bed.
Gazelle PKI specific considerations
PKI features of GSS require to define a certificate authority (CA) for :
- Signing test participant certificate requests
- Generating Auto-Login CAS certificate requests
- Batch certificate creation
The certicate authority of the tool can be set in the administration of the application. Set the preference certificate_authority_Id to the id (primary key in database) of the Certificate of the selected CA. GSS requires that the private key of this certificate is stored in the application, otherwise it would not be possible to sign any requests.
There is several way to have a certificate authority stored into the application :
Creating a new self-signed CA
Go to Administration > Create a Certificate Authority, Fill the form and validate. This is the most recommended way.
importing an existing CA
Depending on the format go to Administration > Import p12 or Import PEM. Import also the private key.
If you import an existing CA, do not use a CA chained to an issuer publicly trusted. GSS provides certificates for testing purpose only, they must not be valid outside of this context.
List of properties
| Property name | Description | Default value |
|---|---|---|
| application_api_key | riendutoutpourlinstant | |
| application_documentation | The link to the user manual. | https://gazelle.ihe.net/content/gazelle-security-suite |
| application_issue_tracker | The link to the section of the issue tracker where to report issues about Gazelle-Security-Suite | https://gazelle.ihe.net/jra/browse/TLS |
| application_release_notes | The link to the application release notes | https://gazelle.ihe.net/jira/browse/TLS#selectedTab=com.atlassian.jira.plugin.system.project%3Achangelog-panel |
| application_works_without_cas | Specifies if the Central Authentication Service (CAS) is used or not. If no CAS is used, property shall be set to true | true |
| application_url | The URL used by any user to access the tool. The application needs it to build permanent links inside the tool | http://localhost:8080/gss |
| assertion_manager_url | To link tests and validators to assertions, you will need to deploy Assertion Manager in the test bed. Provide its URL here. | http://localhost:8080/AssertionManagerGui |
| atna_mode_enabled | Enable/disable Audit Trail features : ATNA-Questionnaire and Audit-Message validation. | true |
| atna_questionnaire_directory | Directory used to store Audit-Messages samples and validation results linked with a questionnaire. | /opt/tls/questionnaire |
| audit_message_index | Index used to generate next Audit-Message Specification OID. This value is automatically incremented by the system. | 1 |
| audit_message_root_oid | Root OID for Audit Message Specification. This value is concatenated with the index at runtime. | 1.1.1.1.1.1.1. |
| audit_message_validation_xsl | URL to the validation result stylesheet. Must be in the same domaine, otherwise the majority of modern browser will not perform the transformation. A default one is embedded in the application. | http://localhost:8080/gss/resources/stylesheet/auditMessagevalidatorDetailedResult.xsl |
| certificate_authority_Id | Id of the certificate in database of the main certification authority used by the tool to deliver and sign certificates. | 1 |
| crl_url | Base URL to print into certificates as revocation list. The tool will add /crl/{id}/cacrl.crl at runtime. | http://localhost:8080/gss |
| dicom_xsd | Path to the DICOM schema (Audit Message validation). | /opt/tls/dicom_syslog_ext_us.xsd |
| evs_client_url | The URL of the Gazelle EVSClient application. This is required to validate the messages captured by the proxy. | http://localhost:8080/EVSClient |
| ip_login | If the application is not linked to a CAS, you can choose to restraint the access to the administration sections of the application to a subset of IP addresses | false |
| ip_login_admin | Regex to be matched by IP addresses of the users granted as admin if "ip_login" is set to "true" | .* |
| java_cacerts_truststore_pwd | GSS is also using the cacerts JVM truststore to validate certificates (located in ${JAVA_HOME}/jre/lib/security/cacerts). Provide here its password. | changeit |
| main_cas_keyword | Key used to distinct authentication service (maximum length 8). | 1ST |
| main_cas_name | Name of the authentication service displayed in the GUI. | 1st Authentication Service |
| main_cas_url | URL of the first Gazelle Central Authentication Service. | http://localhost:8080/cas |
| main_tm_application_url | URL of Gazelle Test Management linked with the first CAS. | http://localhost:8080/gazelle |
| main_tm_message_ws | URL of the Messages web-service of Gazelle Test Management linked with the first CAS. | http://localhost:8080/gazelle-tm-ejb/GazelleMessageWSService/GazelleMessageWS?wsdl |
| main_tm_pki_admins | List of PKI admins usernames in Gazelle Test Management linked with the first CAS (separated with a coma). They will receive a message alert each time a certificate is requested and require a manual validation. | admin1,admin2,admin3 |
| NUMBER_OF_ITEMS_PER_PAGE | Default number of rows displayed in tables (20, 50 or 100). | 20 |
| pki_automatic_request_signing | By default, all certificate signing requests must be validated by hand by an administrator. If you enable the automatic request signing mode, users will get the signed certificate immediatley after submiting their request. | false |
| pki_mode_enabled | Enable/disable PKI features. | true |
| proxy_oid | This is the OID that uniquely identify the instance of the tool when submitting message validation to EVSClient. | to-define |
| questionnaire_display_access_phi | Enable/disable the Non network means for accessing PHI tab in ATNA Questionnaire | true |
| questionnaire_display_audit_messages | Enable/disable the Audit Messages tab in ATNA Questionnaire | true |
| questionnaire_display_authentication_process | Enable/disable the Authentication process for local users tab in ATNA Questionnaire | true |
| questionnaire_display_inbounds | Enable/disable the Inbound network communications tab in ATNA Questionnaire | true |
| questionnaire_display_outbounds | Enable/disable the Outbound network communications tab in ATNA Questionnaire | true |
| questionnaire_display_tls_tests | Enable/disable the TLS Tests tab in ATNA Questionnaire | true |
| rfc3881_xsd | Path to the RFC3881 schema (Audit Message validation). | /opt/tls/RFC3881.xsd |
| second_cas_enabled | Enable/disable second CAS authentication. | false |
| second_cas_keyword | Key used to distinct authentication service (maximum length 8). | null |
| second_cas_name | Name of the authentication service displayed in the GUI. | null |
| second_cas_url | URL of the second Gazelle Central Authentication Service. | null |
| second_tm_application_url | URL of Gazelle Test Management linked with the second CAS. | null |
| second_tm_message_ws | URL of the Messages web-service of Gazelle Test Management linked with the second CAS. | null |
| second_tm_pki_admins | List of PKI admins usernames in Gazelle Test Management linked with the second CAS (separated with a coma). They will receive a message alert each time a certificate is requested and require a manual validation. | null |
| storage_dicom | Absolute path to the system folder used to store the DICOM datasets | /opt/tls/DICOM |
| time_zone | The time zone used to display the timestamps | Europe/Paris |
| tls_automatic_simulator_address_enabled | SSL/TLS simulators detects their own IP address and host and display it to the GUI. If you prefer manually define the address, set this value to false and set the variable tls_simulator_address with the value of your choice. | true |
| tls_mode_enabled | Enable/disable SSL/TLS simulator features. | true |
| tls_simulator_address | SSL/TLS simulators detects their own IP address and host and display it to the GUI. If you prefer manually define the address, set this value to false and set the variable tls_simulator_address with the value of your choice. | true |
| xua_mode_enabled | Enable/disable XUA assertions validator. | true |
| xua_xsd | Path the XUA schema (Assertion validation) | /opt/tls/saml-schema-assertion-2.0.xsd |
[Deprecated] Gazelle CAS (SSO) - Installation
Warning: This documentation is out-dated, newest version of the documentation is available at https://gazelle.ihe.net/gazelle-documentation
If you'd like more information about the use of the CAS by the gazelle tools, please visit the following page : link to CAS page information
Tomcat7
- You need to download tomcat7 :
sudo apt-get install tomcat7
sudo chgrp -R tomcat7 /etc/tomcat7
sudo chmod -R g+w /etc/tomcat7
- You need to configure server.xml from tomcat7
- Change the http port number from 8080 to 8180
 <Connector port="8180" protocol="HTTP/1.1"
               connectionTimeout="20000"
               URIEncoding="UTF-8"
               redirectPort="8443" />
- Uncomment the ssl part
- Don't forget to add paths for keystoreFile and truststoreFile (replace keyPass and truststorePass by your password)
 <Connector port="8443" protocol="org.apache.coyote.http11.Http11Protocol"
               maxThreads="150" SSLEnabled="true" scheme="https" secure="true"
               clientAuth="false" sslProtocol="TLS"
               allowUnsafeLegacyRenegotiation="true"
               keystoreFile="/etc/tomcat7/keystore.jks" keystorePass="gazelle" keyAlias="tomcat" keyPass="***"
               truststoreFile="/etc/tomcat7/truststore.jks" truststorePass="***"/
- Make sure AJP is enabled on the tomcat7 server.xml file
<Connector port="8109" protocol="AJP/1.3" redirectPort="8443" />
- Create a new certificate on Gazelle PKI with the role "Client and Server"
- Once the request is signed by the CA
- Download files corresponding to your certificate :
Type your code in the box. To create a new line within the box use SHIFT + ENTER.
- PEM : used by the apache2 frontend
- KEY : used by the apache2 frontend
- JKS : used by tomcat
- Now you can generate a truststore :
keytool -import -alias tomcat -file ***.pem -keystore .truststore.jks
- Verify the configuration in your .bashrc file for JAVA_HOME.
- Start tomcat with sudo su
sudo service tomcat7 restart
Apache2
You need to activate https with the following command :
sudo a2enmod ssl
You need to make redirection for login, logout, cas, image, favicon and serviceValidate.
- Open the default-ssl file in /etc/apache2/sites-enabled
- In the same file you need to provide paths to SSL certificate file et key file
 SSLCertificateFile    /etc/ssl/certs/***.pem
 SSLCertificateKeyFile /etc/ssl/private/***.key
- Check the apache2 configuration is ok and then restart apache
sudo apache2ctl configtest
sudo apache2ctl restart
Postgresql
The CAS server application is accessing the Gazelle Test Management database in order to know the username and the credentials of the user. It is necessary that the system that runs the CAS application cas access the postgresql server hosting the Gazelle Test Manager database.
Check it by trying to access the database from the server hosting the CAS :
psql -U gazelle -h localhost gazelle
You may have to edit the the postgresql.conf file and make sure that postgresql is listening on incoming TCP/IP connexions. If the CAS and TM are running on the same machine then you just need to make sure the file postgresql.conf contains the followings:
 #------------------------------------------------------------------------------
# CONNECTIONS AND AUTHENTICATION
#------------------------------------------------------------------------------

# - Connection Settings -

listen_addresses = 'localhost'          # what IP address(es) to listen on;
                                        # comma-separated list of addresses;
                                        # defaults to 'localhost', '*' = all
                                        # (change requires restart)
port = 5432                             # (change requires restart)
If you have to change the postgresql.conf file, then you need to restart postgresql and the jboss application server.
War deployment
- Rename your cas.war in ROOT.war
- Copy ROOT.war in /var/lib/tomcat7/webapps/
- Edit /var/lib/tomcat7/webapps/cas/WEB-INF/view/jsp/default/ui/casLoginView.jsp and replace gazelleUrl by yours
- Edit /var/lib/tomcat7/webapps/cas/WEB-INF/deployerConfigContext.xml and replace <value>jdbc:postgresql://kujira.irisa.fr/ihe-europe-2010</value> by your databse name.
- Stop tomcat
- Remove ROOT.war
- Start tomcat
Your CAS is now activated !
[Deprecated] Gazelle Proxy - Overview
Warning: This documentation is out-dated, newest version of the documentation is available at https://gazelle.ihe.net/gazelle-documentation/Proxy/user.html
Project Overview
The proxy is used to capture TCP/IP packets exchanged by test participants. The packages flow is analyzed and stored in a database for further analysis by protocol specific analysers.
The packet analyser availables are :
- HTTP
- DICOM
- HL7V2
- Syslog
- Raw
Each message is saved with the network details, including an id of the socket (named channel id) used for that message as a socket can transport many messages (HTTP, DICOM).
The proxy is set up on ovh1.ihe-europe.net, and accessed with the web interface. ovh1.ihe-europe.net has a limited range of port numbers available from the Internet. Ports from 10200 to 11000 must be used for channel creation.
Usage
The web interface allows to create channels. A channel opens a port on the server hosting the proxy and redirecting all traffic to a configured server on a specific port.
Data stream is not modified, but analyzed using the chosen packet analyser.
Channel List
This page displays the list of current running channels. A channel can be deleted if password is known.
New channel
It allows to create a new channel if password is known. All fields are required.
Messages list
A grid displays all messages matching provided filter. Reset button sets all fields to default value.
Each row allows to display message details if id is clicked. Network details can also be clicked to define filter values.
For HTTP(S) messages, matching request/response is displayed in parenthesis.
Filter panel is collapsable, to provide more space for grid.
TLS channels (NOT AVAILABLE FOR THE MOMENT)
The proxy allows to capture HTTP messages sent over a TLS channel. However, as we are not yet able to decode encrypted frames (like in a man in the middle attack), the proxy acts as a TLS server and a TLS client. Decoding of the frame is planned for a future release.
If the proxy has to be used transparently, clients and servers should not check for the mapping between the ip and the certificate (server : DN = TCP qualified name, client : validation of certificate based on IP).
When a TLS channel is created, a PKCS12 (.p12) file MUST be provided for the TLS server socket. The p12 should contain a private key and certificates. The .p12 MUST be protected by a password, provided in the matching form input.
The server p12 should mimic the real server certificates, as clients could validate the TLS channel against a truststore.
Also, the proxy supports TLS authentication. When a client connects to the proxy, it first connects to the real server without using any certificate. When the TLS channel is open, data from client is forwarded to the server. The server then can ask a renegotiation to the proxy for authentication. The key used is then the p12 provided for client.
At the moment, if the proxy failed to authenticate on server, the source connection is closed without the source error transmitted.

Gazelle integration
The proxy is integrated with Gazelle using web standards.
It publishes a web service allowing Gazelle to send test instance steps and configurations. Also, when a step is done, Gazelle calls the web service.
The proxy then opens the needed channels and listen on specified ports (provided in the system configurations). It also records the test instance chronology for further searches.
In Gazelle, if the test instance has proxy enabled, a link is available on each step. This link opens the proxy with the Gazelle step technical id as a parameter. The proxy then builds a filter to get messages matching the step and displays the matching messages.
- Log in to post comments
Proxy - User guide
Click to here to enter the Proxy
Proxy trainings:
Introduction
Gazelle TestManagement tools can be used in conjunction with a proxy for the capture of the messages exchanged between a test participants.
The proxy is able to capture :
- HL7v2 messages
- Dicom Transactions
- Webservices messages
- Syslog messages
The advantages of using the proxy when running a test are the followings :
- the Proxy is a neutral way to capture the exchanged messages.
- the Proxy displays the captured messages in a unified way for all the tests performed, simplifying the work of the monitors when examining the logs
- the Proxy provides permanent link to the captured messages that can be linked to test instance steps and avoid the cut and paste of logs in the chat window of the test instance. It then helps linking the logs to the test and enables all the participants to the test to see the entire set of messages exchanges between the test participants.
- the Proxy helps verifying the captured messages through a direct link to the EVS Client GUI.

Limitations
- Proxy acts as a network relay between two SUTs. As a result, system configuration has to be modified. The TCP connection must be established on the proxy on the system configuration's proxy port instead of opening a connection to the responder SUT directly.
How does it work ?
For each system in Gazelle TestManagement tool there is a set of configuration parameters. For each port that an SUT needs to open, there is a mirror port number on the proxy.
All proxy ports must be opened by a Gazelle admin, each system configuration being mapped to a proxy port.
The proxy GUI can be access at the following URL : http://gazelle.ihe.net/proxy
Automated filtering
Proxy and Gazelle know each other, and each test step in Gazelle has a proxy link.

This link displays the list of the messages matching the test step configuration. It also filters the messages by time, showing only messages sent after the last test step marked as verified (or test instance started) and this test step marked as to be verified.

Finding captured messages manually
By accessing proxy directly using http://gazelle.ihe.net/proxy, messages can be filtered on different criterias. By clicking a value in the table, it either opens the message details for id column, or set the filter for other columns.
The messages list displays only one type of message, if HTTP is selected, HL7v2 messages are not shown.
Each captured message has a permanent link that can be used in Gazelle. The best way to use it is to add this link to a test step instance. The monitor will be then able to validate the message using EVSClient.
WebService API
- startAllChannels : It takes "List<Configuration> configurations" in argument. It start a new channel in proxy for each configuration set.
- startTestInstance : It takes "TestInstance testInstance" in argument. It start a new channel in proxy for a test instance.
- markTestStep : It takes "int testStepId" in argument. It set the date of a test step with the current.
- getMinProxyPort : It return the min_proxy_port define in proxy configuration.
- getMaxProxyPort : It return the max_proxy_port define in proxy configuration.
[Deprecated] Order Manager
This documentation is out-of-date. We are now maintaining this page: https://gazelle.ihe.net/gazelle-documentation/Order-Manager/user.html
Introduction
The Order Manager emulates the actors Order Placer, Order Filler and Automation Manager for various integration profiles defining work flows. This simulator is also able to produce DICOM worklists and to respond to SCU queries thanks to the use of the DCMTK toolkit. The aim of this application is, in a first hand, to help modality developers with querying worklists without asking the support of Order Placer and/or Order Filler systems for producing the relative order. In another hand, the OrderManager will help developers of Order Placer, Order Filler, Image Manager, and Automation Manager with testing the sending and receiving of HL7 messages required by the transactions they have to support in the context of a work flow integration profiles. The application is able to act in the following integration profiles:
- Radiology domain
- Scheduled Workflow (SWF)
- Scheduled Workflow b (SWF.b)
- Mammography Workflow (MAWF)
- Import Reconciliation Workflow (IRWF)
- Laboratory domain
- Laboratory Testing Workflow (LTW)
- Laboratory Analytical Workflow (LAW)
- Eye care domain
- Advanced eye care workflow (A-EYECARE, now deprecated)
- Basic eye care workflow (B-EYECARE, now deprecated)
See below the exhaustive list of actors and transactions emulated by the application.
| Domain | Role played by the simulator | Transactions | Availability |
| Radiology/Cardiology | Order Filler | RAD-3 and RAD-2 | 1.0-RC1 |
| - | Order Placer | RAD-2 and RAD-3 | 1.0-RC1 |
| Radiology | Order Filler | RAD-48 | not yet available |
| - | Order Placer | RAD-48 | not yet available |
| - | Order Filler | RAD-5 | 1.0-RC1 |
| - | Image Manager/Report Manager | RAD-4 and RAD-13 | 2.1-GA |
| - | Order Filler | RAD-4 and RAD-13 | 2.1-GA |
| - | Order Filler | RAD-1 and RAD-12 | 3.1-GA |
| - | Order Placer | RAD-1 and RAD-12 | 3.1-GA |
| - | Image Manager/Report Manager | RAD-12 | 3.1-GA |
| - | Acquisition Modality | RAD-5 | 3.2-GA |
| Laboratory (LTW) | Order Filler | LAB-1 and LAB-2 | 2.0-RC2 |
| - | Order Placer | LAB-1 to LAB-5 | 2.0-RC2 |
| - | Automation Manager | LAB-4 and LAB-5 | 2.0-RC6 |
| - | Order Result Tracker | LAB-3 | 2.0-RC6 |
| Laboratory (LAW) | Analyzer | LAB-27, LAB-28 and LAB-29 | 2.0-RC6 |
| - | Analyzer Manager | LAB-27, LAB-28 and LAB-29 | 2.0-RC6 |
| Anatomic Pathology | Order Placer | PAT-1 and PAT-2 | not yet available |
| - | Order Filler | PAT-1 and PAT-2 | not yet available |
| - | Order Filler | PAT-5 | not yet available |
| Eye care | Order Placer | RAD-2 and RAD-3 | 3.0-GA |
| - | Order Filler | RAD-2 and RAD-3 | 3.0-GA |
| - | Order Placer | RAD-48 | not yet available |
| - | Order Filler | RAD-48 | not yet available |
| - | Order Filler | EYECARE-1 | 3.0-GA |
| - | Image Manager/Report Manager | RAD-4 and RAD-13 | 3.0-GA |
| - | Order Filler | RAD-1 and RAD-12 | 3.1-GA |
| - | Order Placer | RAD-1 and RAD-12 | 3.1-GA |
| - | Image Manager/Report Manager | RAD-12 | 3.1-GA |
For more details about the various functionalities of the Order Manager application, visit the following links.
- How to get started
- Codes used in this tool
- Sharing of data with Test Management and PatientManager Gazelle applications
- Order management (creation, cancellation, status update ...)
- Procedure management (scheduled, update)
- Work Order management (for Laboratory domain only: creation, cancellation)
- Analytical Work Order Step (for Laboratory domain only)
- Appointment management
- DICOM Worklist management (how to create them, how to query the SCP)
- DICOM Modality Worklist Query
- Test results management (for Laboratory domain only)
- HL7 messages validation
Release Notes
Roadmap
Learn more about the Order Manager use by watching the training session recorded on webex: http://gazelle.ihe.net/content/order-manager-training-presentation-and-recording-available. Please note that this training session has been recorded the releasing of version 3.1-GA. As a consequence, the application layout is not the current one.
How to get started
Login
The login link ("cas login") is located in the top right corner of the page.
Note that, like the other applications from Gazelle testing platform, Order Manager is linked to our CAS service. That means that, if you have an account created in the European instance of Gazelle Test Management, you can use it, if you do not have one, you can create one now by filling the form here. Note that if you only have an account for the North Americal instance of Gazelle, it will not work with the OrderManager; you will need to create a new account. The OrderManager application is dedicated to the test of several actors and transactions in different domains.
Being logged in the application will give you access to some additional features. As an example, each time you create a new object in the application (patient, order, worklist ...), if you are logged in, you will be set as its "creator", which will enables you to easily retrieve your items. If the system you are testing has to receive messages from the OrderManager, the system you have selected will be stored into your preferences and the application will offer you this one in first position, the next time you launch a test.
Registration of Systems Under Test acting as HL7 responders
Most of the transactions offered by the Order Manager are based on HL7v2.x standard. If your system acts as an HL7 responder in one of the transactions offered by the simulator, for example your system is an Order Placer and supports RAD-3 transaction, you will have to enter its configuration in the application.
In order to proceed, go to "System Configurations" and hit the "Create a Configuration" button. You can also copy ![]() or Edit
or Edit ![]() an existing configuration (one of yours !).
an existing configuration (one of yours !).
In both cases, the simulator needs to know:
- A name for your configuration (displayed in the drop-down list menus)
- The actor played by your system under test
- The receiving facility/application
- The IP address
- The port the system is listening on
- The charset expected by your SUT
If you are logged in when creating the configuration, you will be set as the owner of the configuration. If you do not want other testers to send messages to your SUT you can uncheck the box "Do you want this configuration to be public?" and you will be the only one to be able to select your system in the drop-down list and to edit it (if logged in !).
Before sending messages to your system under test, ensure that your firewall options give to OrderManager the access to your system.
Starting a test
The menu part located at the top of the application offers access to the three IHE domains in which the Order Manager can be involved for testing. Each domain menu is divided into sub menu, each of them standing for an actor of the domain. The other entries are dedicated to the application configuration and browsing.
- SUT configurations is the starting point for users who test an HL7 responder, this menu is a link to the page of system configurations
- HL7 messages leads to the page gathering all the HL7 messages sent and received by the simulator.
Below are some tips to easily access the right page of the tool depending on what you want to do.
Send and receive queries for AWOS
If you want to test your Analyzer Manager, select Laboratory/Analyzer/[LAB-27]Query Analyzer Manager for AWOS to send messages (defined by LAB-27 transaction) to your system under test
If you want to test your Analyzer, select Laboratory/Analyzer Manager/Configuration : this page shows the configuration of the Analyzer Manager actor to which your Analyzer can send messages in the context of a LAB-27 transaction.
Create, cancel, replace ... an order
If you want to test your Order Filler, select the Radiology/Order placer submenu. This sub menu will offer you 2 choices
- [RAD-2] Create/Cancel order: use this page to send the messages specified by the Placer Order Management transaction (RAD-2) to your Order Filler
- Configuration : this page shows the configuration of the Order Placer to which your Order Filler can send messages in the context of a RAD-3 transaction.
If you want to test your Order Placer, select the Radiology/Order filler submenu. This sub menu will offer you 2 choices
- [RAD-3] Create/Update/Cancel order: use this page to send the messages specified by the Filler Order Management transaction (RAD-3) to your Order Placer
- Configuration : this page shows the configuration of the Order Filler to which your Order Placer can send messages in the context of a RAD-3 transaction.
If you want to test your Laboratory Order Placer, select the Laboratory/Order Filler submenu. This sub menu will offer 3 sets of transactions, only two of them are of your interest:
- [LAB-1/LAB-2] Notify Order Placer of orders: use this page to send messages (from LAB-1 and LAB-2 transactions) to your system under test
- Configuration: this page shows the configuration of the Order Filler to which your Order Placer can send messages in the context of a LAB-1 transaction.
Create a worklist and query the SCP
The part of the simulator acting as an Order Filler is also able to create DICOM worklists, the latter can be queried by your modalities in the context of RAD-5 transaction for instance. A kind of proxy is running and listening to your C-FIND queries, the ones are forwarded to the DICOM Basic Worklist Management SCP (wlmscpfs) from the DICOM toolkit developed by OFFIS, DCMTK. Before being forwarded, the messages are stored in database and the received responses are also stored before being forwarded to your system. In this way you can look at the exchange messages and we plan to add a validation service. The log file produces by the SCP is split and stored in the database of the tool, in that way you can consult more details about the DICOM association performed with our tool.
- Log in to post comments
[Deprecated] Codes used in this tool
This page is no longer maintain. Please visit https://gazelle.ihe.net/OrderManager/administration/valueSetManager.seam for the up-to-date list of codes.
(1) This table contains the list of codes used by the Order Manager tool. They are also codes at Connectathon by ADT, Order Placer and Order Filler actors exchanging HL7 patient registration and order messages.
All codes are stored in the Repository part of the SVS Simulator and can be retrieved from a REST service.
(2) The mapping between ordering codes in the following table and the procedure codes in Radiology is based on the file available at https://gazelle.ihe.net/common/order-manager/orderHierarchy4Radiology.xml
|
Value set OID |
Value set name |
Usage (HL7) |
Usage (DICOM) |
|
Patient Class - HL7 Table 0004 |
PV1-2 |
||
|
Physician ID - HL7 Table 0001 |
PV1-8 ORC-10, ORC-11, ORC-12 OBR-16, OBR-28, OBR-34 OBX-16 |
(0032,1032) (0008,0090) (0040,2008) (0040, 0006) |
|
|
Priority |
ORC-7-6 (RAD/CARD) OBR-27-6 (RAD/CARD) TQ1-9 (LAB) |
||
|
Entering Organization - HL7 Table IHE005 |
ORC-17 OBX-23 |
(0040,2009) |
|
|
Ordering Codes - Universal Service ID (RAD) |
OBR-4 |
||
|
Danger Code - HL7 table IHE007 |
OBR-12 |
(0038,0500) |
|
|
Transportation mode code - HL7 Table 0124 |
OBR-30 |
||
|
Transport arranged - HL7 Table 0224 |
OBR-41 |
(0040,1004) |
|
|
Ordering Codes - Universal Service ID (LAB) |
OBR-4 |
||
|
Specimen Source/Specimen type |
OBR-15 SPM-4 |
||
|
Acquisition Modality Codes |
OBR-24 (radiology) |
(0008,0060) |
|
|
Specimen Collection Method - HL7 Table 0488 |
SPM-7 |
||
|
Specimen Role - HL7 Table 0369 |
SPM-11 |
||
|
Risk Code - HL7 Table 0489 |
SPM-16 |
||
|
Diagnostic Section Service ID (subset for LAB) |
OBR-24 |
||
|
Value type - HL7 Table 0125 |
OBX-2 |
||
|
Abnormal flags - HL7 Table 0078 |
OBX-8 |
||
|
Observation result status code interpretation - HL7 Table 0125 |
OBX-11 |
||
|
Source of comment (defined in LAB TF) |
NTE-2 (not used yet) |
||
|
Comment Type (defined in LAB TF) |
NTE-4 (not used yet) |
||
|
to be defined |
access check |
OBX-13 |
|
|
Observation identifier (related to order) |
OBX-3 (in OBX segment related to an OBR segment) |
||
|
Observation identifier (related to specimen) |
OBX-3 (in OBX segment related to a SPM segment) |
||
|
Result status (sub set of HL7 Table 0123) |
OBR-25 |
||
|
order status (sub set of HL7 Table 0038) |
ORC-5 |
||
|
Bed |
PV1-3-3 |
(0038,0300) |
|
|
Facility |
PV1-3-4 |
(0038,0300) |
|
|
Room |
PV1-3-2 |
(0038,0300) |
|
|
Point of care |
PV1-3-1 |
(0038,0300) |
- Log in to post comments
Sharing of data with Test Management and PatientManager Gazelle applications
Order Filler and Order Placer actors needs to be aware of the patient's demographics and encounters. In the radiology and cardiology domains, this functionnality is assumed by the ADT actor with the RAD-1 and RAD-12 transactions. In other domains, the use of PAM (Patient Admission Management) integration profile is recommended and often required. In order to populate the Order Manager with consistent data, we have chosen to put in place a mechanism for sharing patient and encounter data between several applications from the Gazelle testing platform. In case you just need a patient and an encounter but you did not use PAM Simulator or Test Management applications to create it, you can randomly generate one.
Random generation of patient and encounter
For the needs of the OrderManager, a REST web service has been implemented in PAMSimulator application which enables the other applications to get random data for a patient and/or an encounter. As a consequence, if you want to create an order for a new patient or for a new encounter (you already have the patient created in OrderManager) you only have to select the country in the application (or the existing patient), the PAM Simulator will return you a patient and a related encounter or only an encounter.
The example below is taken from the page which enables a user to send a new order to his/her Order Filler.
1. Hit the button entitled " Create new patient and encounter" if none of the offered encounters nor patients meet your needs.

2. You will then have to choose the country of your patient. Here we have chosen India.

3. Finally, the patient and the encounter have been created

If you want to use a patient already registered in the application, use the "Create a new encounter for an existing patient" button, you will be asked to pick up one of the existing patient and an encounter will be automatically, randomly generated.
Import patient from PAM Simulator and Test Management
Both PAM Simulator and Test Management application enable the user to create patients according various criteria. In some tests, you will want to reuse the same patient without losting your time copying each piece of information one by one. In order to save your time during the connectathon or during your testing periods, we have added a feature in those application. You will only have to select the patient you need, hit a button, choose the patient identifier to use for creating the order or the worklist and send the request to the OrderManager.
In PAMSimulator, the button is available for each patient in the All Patients page. In Test Management, go to Connectathon --> Patient Generation and Sharing --> tab "Existing patients".
The screenshots below are taken from Test Management.
1. Select the patient to import in Order Manager. Here we have chosen the first one, Yanira Gregg by hitting the "Create a worklist for this patient" button; the last button of the row, on the right.

2. A pop-up shows up and ask you from which assigning authority you want to use the patient identifier. Select the proper assigning authority and hit the green button.

3. I will then arrive in OrderManager, the patient demographics are filled and an encounter has been created randomly. You then need to tell the application if you want to create an order or a worklist for this patient. If you want to create an order, specified which actor will have to send it (Order Placer or Order Filler). If you choose to create a worklist, specified the integration profile for which you are performing the test. Finally, hit the "create" button.

Note that, if you choose to create a worklist, the order will be filled with random values.
Import encounter from PAM Simulator
If you have created an encounter in the PAM Simulator application, you may want to use it to create an order or an encounter. In this case, choose the encounter you want to import into OrderManager; go to its permanent page and hit the button "Create a worklist or an order for the selected encounter". You will also be asked to select the patient's identifier; then you will reach the page described in point 3.
- Log in to post comments
Order management
The OrderManager tool is able to manage orders from various domains:
- Radiology, Eye Care, and Cardiology orders (RAD-2 and RAD-3 transactions)
- Laboratory orders (LAB-1 and LAB-2 transactions)
- Pathology orders (PAT-1 and PAT-2 transactions)
Radiology, Eye Care, and Cardiology orders
The order management part for radiology/cardiology is divided into two parts: placer order and filler order. The placer order part gathers the actions related to the Placer Order Management transaction (RAD-2) whereas the filler order part is dedicated to the Filler Order Management transaction (RAD-3).
The orders can be created either by the Order Placer (RAD-2) or by the Order Filler (RAD-3). In both cases, each system attributes an order number to the just created order. In the RAD-3 transaction case, initiated by the Order Filler, the Order Placer has to notify the Order Filler of the number it has attributed to the order contain in the message sent by the Order Filler.
SWF.b
From version 4.0.0, the Order Manager tool supports the SWF.b profile. It will be able to handle and validate the OMG messages your SUT sent to it. You can also ask the tool to use HL7v2.5.1 instead of HL7v2.3.1 when configuring the message to send to your SUT, to do so, tick the "Send HL7v2.5.1 messages ?" checkbox.
Placer Order management (RAD-2)
The placer order management transaction is initiated by the Order Placer, the one sends a message of type ORM^O01^ORM_O01 to the Order Filler. Three actions can be performed, for each one, the order control code contained in the message (ORC-1) differs.
Your system plays the role of the Order Filler for this transaction, read the following lines:
You reach this page from menu Radiology/Order Placer/[RAD-2] Create/Cancel orders.
Create a new order (order control code = NW)
Firstly, select the configuration of your system under test; the simulator needs it to send the message. Then select "Create a new order" choice. The list of encounters stored in the simulator is displayed, you just have to select the one you want. If you are logged in, you can easily retrieve the encounters you have previously created by checking the "Display only my data" checkbox. The demographics of the patient related to the selected encounter and the details about the encounter are displayed. Below, you can see a panel entitled "The order". Here are the values required by the simulator to create the message. If you are boring with filling all the fields, you can fill only some (or none) of them and hit the "Randomly fill the order and send message". Random values will be taken from the SVS repository. If you feel courageous, fill the requried fields and hit "send message" button. Finally, the table gathering the message sent by the simulator and the one received from your system is displayed. You can used the validation button to check the conformance of the messages to the IHE specifications.
Hit the "Perform another test" button to continue testing.
Cancel an existing order (order control code = CA)
Select the action to perform as "Cancel an existing order". You will be provided with the list of orders holded by the Order Placer part of the simulator. Select the one you want to cancel, a pop-up shows up which ask you to confirm your choice. If you click "yes", the message is automatically sent to your Order Filler. If you click "no", the pop-up is closed and nothing else is done.
Stop the fullfilment of an "in progress" order (order control code = DC)
The order control code DC is sent when an order is already started. The action to perform are the same as the one for cancelling an order.
Your system plays the role of the Order Placer for this transaction, read the following lines:
Read carefully the configuration of our Order Filler. To do so, go to Radiology/Order Filler/Configuration. The Order Filler will store all the messages it receives and integrates them; that means that it will create/cancel/discontinue the sent order. Be carefull to always send the same placer/filler order number for a given order. The orders received from your simulator are stored in the database and you can browse them from menu Radiology/Order Filler/Data Browser. The name of the creator is "{sending application}_{sending facility}".
Filler Order management (RAD-3)
The placer order management transaction is initiated by the Order Filler, the one sends a message of type ORM^O01^ORM_O01 to the Order Placer. Three actions can be performed, for each one, the order control code contained in the message (ORC-1) differs.
Your system plays the role of the Order Placer for this transaction, read the following lines:
You reach this page from menu Radiology/Order Filler/[RAD-3] Create/Update/Cancel orders.
Create a new order (order control code = SN)
Firstly, select the configuration of your system under test; the simulator needs it to send the message. Then select "Create a new order" choice. The list of encounters stored in the simulator is displayed, you just have to select the one you want. If you are logged in, you can easily retrieve the encounters you have previously created by checking the "Display only my data" checkbox. The demographics of the patient related to the selected encounter and the details about the encounter are displayed. Below, you can see a panel entitled "The order". Here are the values required by the simulator to create the message. If you are boring with filling all the fields, you can fill only some (or none) of them and hit the "Randomly fill the order and send message". Random values will be taken from the SVS repository. If you feel courageous, fill the requried fields and hit "send message" button. Finally, the table gathering the message sent by the simulator and the one received from your system is displayed. You can used the validation button to check the correctness of the messages.
Hit the "Perform another test" button to continue testing.
Cancel an existing order (order control code = OC)
Select the action to perform as "Cancel an existing order". You will be provided with the list of orders holded by the Order Filler part of the simulator. Select the one you want to cancel, a pop-up shows up which ask you to confirm your choice. If you click "yes", the message is automatically sent to your Order Placer. If you click "no", the pop-up is closed and nothing else is done.
Update the status of an order (order control code = SC)
Select the action to perfrom as "Update order status". you will be provided with the lists of orders horded by the Order Filler part of the simulator. Select the order you want to update, a pop-up shows up which ask you to select the new status of the order. Click on the "Send update notification", the message will be automatically sent to your system under test.
Your system plays the role of the Order Filler for this transaction, read the following lines:
Read carefully the configuration of our Order Placer. To do so, go to Radiology/Order Placer/Configuration. The Order Placer will store all the messages it receives and integrates them; that means that it will create/cancel/update the sent order. Be carefull to always send the same placer/filler order number for a given order. The orders received from your simulator are stored in the database and you can browse them from menu Radiology/Order Placer/Data Browser. The name of the creator is "{sending application}_{sending facility}".
Laboratory orders
All the actors playing a role in the LTW and LAW integration profiles from the Laboratory domain are available under the Laboratory menu.
Order Placer
Under the Laboratory/Order Placer menu, you will find three sub menus:
- [LAB-1/LAB-2] Notify Order Filler of orders: this page is dedicated to the sending part of the Order Placer actor from LTW profile. You will be able to create/cancel an order and to send a message to your SUT acting as an Order Filler.
- Configuration: this page is dedicated to the receiving part of the Order Placer. You will find the IP address, port and receiving application/facility names of this part of the simulator.
- Data Browser: this entry points to the page where the patients and the orders/specimens owned by this part of the simulator are gathered.
Order Filler
Under the Order Filler menu, you will find five sub menus but only two of them deal with the management of orders :
- [LAB-1/LAB-2] Notify order placer of orders: this page is dedicated to the sending part of the Order Filler actor from the LTW profile. You will be able to create/cancel update the status of an order and send a message to your SUT acting as an Order Placer.
- Configuration: this page is dedicated to the receiving part of the Order Filler. You will find the IP address, port and receiving application/facility names of this part of the simulator.
Creation of a new order
Both Order Filler and Order Placer parts of this simulator work in the same way; only some little differences can be noticed due to differences between those two actors as described in the Technical Framework of Laboratory.
First of all, select your system under test from the drop-down list entitled "System Under Test".
Then select the action to perform: Create a new order
As defined in the Technical Framework, LAB-1 and LAB-2 transactions allows the Order Filler and Order Placer actors to exchange orders using different structures. In this part of the simulator, we enable you to test all of them. Differences between structures implies that the way to build an order in not the same depending on the message you want to send. As a consequence, before creating an order, you will have to tell the simulator which structure you want to use (see below).
Then select an encounter from the displayed list. Using "Create a new patient and encounter" you will be able to ask for the generation of a new patient with random demographic data, using "Create a new encounter for an existing patient" you will get a new encounter for a patient selected in the displayed list.
Laboratory order message (OML^O21^OML_O21)
This message structure is battery-centric. To build such an order, follow the steps below:
- You are first asked to fill out the order properties (use the "Fill with random values" button for a random filling of the form).
- Once you think the order is properly defined, click on "Create a specimen for order" button.
- A new form appears, fill it out with specimen properties, in the same way as previously the "Fill with random values" button can help you for this task.
- Click on "Add to current order" to add the specimen to the order you have previously created.
- If you need more than one specimen, click on "Add a specimen to this order" button and repeat steps 3 to 5.
- Once all the specimens are created, click on "Send message" button.
Note that you can remove a specimen from the list using the red "minus" sign located on each row of the table.
Laboratory order for multiple orders related to a single specimen (OML^O33^OML_O33)
This message structure is specimen-centric. To build such an order, follow the steps below:
- You are first asked to fill out the specimen properties (use the "Fill with random values" button for a random filling of the form).
- Once you think the specimen is properly defined, click on "Create an order for specimen" button.
- A new form appears, fill it out with order properties, in the same way as previously the "Fill with random values" button can help you for this task.
- Click on "Add to current specimen" button to add the order to the specimen you have previously created.
- If you need more than one order, click on "Add an order to this specimen" button and repeat steps 3 to 5.
- Once all the orders are created, click on "Send message" button.
Note that you can remove an order from the list using the red "minus" sign located on each row of the table.
Laboratory order for multiple orders related to a single container of a specimen (OML^O35^OML_O35)
This message structure is specimen-centric. For each specimen, a list of containers is given and for each container, a list of orders is specified. To build such an order, follow the steps below:
- You are first asked to fill out the specimen properties (use the "Fill with random values" button for a random filling of the form).
- Once you think the specimen is properly defined, click on "Create a container for specimen" button. The list of containers specified for the current specimen is displayed.
- To add an order for a given specimen click on the "Add an order for this container" button.
- Fill out the order properties and click on the "Add to current container" button. The order will be displayed within a table below the relative container.
- Repeat steps 3 and 4 until you have created all the orders you want.
- If you need to add another container to the specimen, click on "Add a container for specimen" button.
- To add orders to this new container, repeat steps 3 and 4.
- Finally, click on the "Send message" button.
Note that you can remove an order from a container using the red "minus" sign located on each row of the table. You can also remove a container from the specimen by clicking on the red "minus" sign located beside the container identifier.
Cancellation of an order
Both Order Filler and Order Placer actors can cancel existing orders. See below the instructions to send such a message to your SUT.
- Select your system under test from the drop-down list entitled "System Under Test".
- Then select the action to perform: Cancel an existing order
- Select the structure of message to use
- Select the order to cancel. A pop-up raises, click on "Yes" to send the cancellation message.
Update of an order
Only the Order Filler has the capabilities to update the status of an order. See below the instructions to send such a message to your Order Placer.
- Select your system under test from the drop-down list entitled "System Under Test".
- Then select the action to perform: Update order status.
- Select the structure of message to use
- Select the order to update. A pop-up raises, select the new status of the order and click on "Send update notification" button.
Sending messages to the simulator from your SUT
As mentionned above, the simulator is able to act as an Order Filler and an Order Placer (receiving role) for LAB-1 and LAB-2 transactions. The messages supported by the simulator are the same as the one it is able to send, all of three defined structures will be understood by the simulator. To browse the orders received by the simulator, go to the Data Browser menu linked to the actor you are using:
- All orders (battery-centric) for the orders sent and received within OML^O21^OML_O21 messages
- All orders (specimen-centric) for the orders received and sent within OML^O33^OML_O33 and OML^O35^OML_O35 messages. In that page, you will first see the specimen, and then, for each specimen, the list of orders.
Pathology orders
Not yet implemented
- Log in to post comments
Work Order management (Laboratory domain)
The OrderManager tool is able to manage work orders; that means that it can act either as an Order Filler or an Automation Manager for the LAB-4 transaction defined in the Laboratory Technical Framework. As a consequence, both parts support OML^O21^OML_O21, OML^O33^OML_O33 and OML^O35^OML_O35 message structures.
Your SUT acts as an Order Filler
As an Order Filler, you may want to send messages to our Automation Manager. To do so, retrieve the configuration of the Automation Manager part of the simulator from menu Laboratory/Automation Manager/Configuration.
If you want to see the work orders received by the Automation Manager, go to Laboratory/Automation Manager/Browse data menu. The creator of the work orders contained in the messages you send is set to SendingApplication_SendingFacility.
Your SUT acts as an Automation Manager
There are two ways to send messages to your Automation Manager from the Order Manager tool. The first thing you have to do in both cases, is registering your system under test within the application. To do so, go to the "SUT Configurations" section of the tool, and click on the "Create a configuration..." button. Read the tutorial here for further explanation.
Creating a work order from scratch
Going to Laboratory/Order Filler/[LAB-4] Notify Automation Manager of work orders, you will reach the page which allows you to configure a new work order or to cancel a work order known by the Order Filler part of the tool.
As defined in the Laboratory Technical Framework, the Order Filler and the Automation Manager may use three different structures to share work orders. The Order Filler implemented in the tool is able to send all of them. Differences between structures imply that the way to build a work order in not the same depending on the message you want to send. As a consequence, before creating an order, you will have to tell the simulator which structure you want to use.

Then select an encounter from the displayed list. Using "Create a new patient and encounter" you will be able to ask for the generation of a new patient with random demographic data, using "Create a new encounter for an existing patient" you will get a new encounter for a patient selected in the displayed list.
Laboratory order message (OML^O21^OML_O21)
This message structure is battery-centric. To build such a message, follow the steps below:
- You are first asked to fill out the work order properties (use the "Fill with random values" button for a random filling of the form).
- Once you think the order is properly defined, click on "Create a specimen for order" button.
- A new form appears, fill it out with the specimen properties, in the same way as previously the "Fill with random values" button can help you for this task.
- Click on "Add to current order" to add the specimen to the work order you have previously created.
- If you need more than one specimen, click on "Add a specimen to this order" button and repeat steps 3 to 5.
- Once all the specimens are created, click on "Send message" button.
Note that you can remove a specimen from the list using the red "minus" sign located on each row of the table.
Laboratory order for multiple orders related to a single specimen (OML^O33^OML_O33)
This message structure is specimen-centric. To build such a message, follow the steps below:
- You are first asked to fill out the specimen properties (use the "Fill with random values" button for a random filling of the form).
- Once you think the specimen is properly defined, click on "Create an order for specimen" button.
- A new form appears, fill it out with the work order properties, in the same way as previously the "Fill with random values" button can help you for this task.
- Click on "Add to current specimen" button to add the work order to the specimen you have previously created.
- If you need more than one work order, click on "Add an order to this specimen" button and repeat steps 3 to 5.
- Once all the orders are created, click on "Send message" button.
Note that you can remove a work order from the list using the red "minus" sign located on each row of the table.
Laboratory order for multiple orders related to a single container of a specimen (OML^O35^OML_O35)
This message structure is specimen-centric. For each specimen, a list of containers is given and for each container, a list of work orders is specified. To build such a message, follow the steps below:
- You are first asked to fill out the specimen properties (use the "Fill with random values" button for a random filling of the form).
- Once you think the specimen is properly defined, click on "Create a container for specimen" button. The list of containers specified for the current specimen is displayed.
- To add a work order for a given specimen click on the "Add an order for this container" button.
- Fill out the work order properties and click on the "Add to current container" button. The work order will be displayed within a table below the relative container.
- Repeat steps 3 and 4 until you have created all the work orders you want.
- If you need to add another container to the specimen, click on "Add a container for specimen" button.
- To add work orders to this new container, repeat steps 3 and 4.
- Finally, click on the "Send message" button.
Note that you can remove a work order from a container using the red "minus" sign located on each row of the table. You can also remove a container from the specimen by clicking on the red "minus" sign located beside the container identifier.
Cancellation of an order
See below the instruction to send a cancellation notification to your Automation Manager.
- Select your system under test from the drop-down list entitled "System Under Test".
- Then select the action to perform: Cancel an existing order
- Select the structure of message to use
- Select the order to cancel. A pop-up raises, click on "Yes" to send the cancellation message.
Creating a work order from an existing laboratory order
In the context of a workflow, the work order is created by the Order Filler from a laboratory order previously received from an Order Placer or created within the Order Filler itself. The tool allows the user to create a work order using a laboratory order owned by the Order Filler part of the tool. The message structure used to send such a work order will be the same that the one used at receiving/sending time of the related laboratory order.
To select the laboratory order to use, go to the "Laboratory/Order Filler/Browse data" section and select one of "All orders (battery-centric)" or "All orders (specimen-centric)". Use the ![]() button to select the laboratory order/specimen to use. A new page will be opened, the lists of related work orders/specimens/containers are displayed. You can remove the entities which must not appear in the message using the
button to select the laboratory order/specimen to use. A new page will be opened, the lists of related work orders/specimens/containers are displayed. You can remove the entities which must not appear in the message using the ![]() button. Do not forgot to select your system under test configuration in the drop-down list at the top of the page and click on the "Send message" button.
button. Do not forgot to select your system under test configuration in the drop-down list at the top of the page and click on the "Send message" button.
- Log in to post comments
Analytical Work Order Step (Laboratory domain)
The OrderManager tool supports the LAW Profile of the Laboratory Domain. It means that the OrderManager tool is able to send and reveive query for AWOS (Analytical Work Order Step) (LAB-27 transaction) and to send and receive AWOS (LAB-28 transaction).
Your SUT acts as an Analyzer
As an Analyzer, you may want to send a query for AWOS to our Analyzer Manager (LAB-27) and receive AWOS from our Analyzer Manager (LAB-28).
Send queries for AWOS to the Analyzer Manager part of the simulator
As defined in the Laboratory Technical Framework Supplement for the Laboratory Analytical Workflow Domain (LAW), the Analyzer can query the Analyzer Manager for a WOS realated to a specimen. This is described in the LAB-27 transaction.
To do so, retrieve the configuration of the Analyzer Manager part of the simulator by going to Laboratory/Analyzer Manager/Configuration.
Receive an AWOS from the Analyzer Manager Simulator
As defined in the Laboratory Technical Framework Supplement for the Laboratory Analytical Workflow Domain (LAW), the Analyzer can receive a new AWOS or a cancelation on an existing AWOS, from the Analyzer Manager. This is described in the LAB-28 transaction.
Going to Laboratory/Analyzer Manager/[LAB-28], you will reach the page which enables you to configure a new work order or to cancel a work order known by the Analyzer Manager part of the tool.
First at all, select a System Under Test (SUT) configuration in the SUT configuration drop-down list.
For the "Action to perform", you have the choice between 2 different ways :
- "Create a new order" : Used to create and send a new order to your SUT.
- Select an encounter from the displayed list. Using "Create a new patient and encounter" you will be able to ask for the generation of a new patient with random demographic data, using "Create a new encounter for an existing patient" you will get a new encounter for a patient selected in the displayed list.
- You are first asked to fill out the specimen properties (use the "Fill with random values" button for a random filling of the form).
- Once you think the specimen is properly defined, click on "Create an order for specimen" button.
- A new form appears, fill it out with the work order properties, in the same way as previously the "Fill with random values" button can help you for this task.
- Click on "Add to current specimen" button to add the work order to the specimen you have previously created.
- If you need more than one work order, click on "Add an order to this specimen" button and repeat steps 3 to 5.
- (Note that you can remove a work order from the list using the red "minus" sign located on each row of the table.)
- "Cancel an existing order"
- Select the order to cancel. A pop-up raises, click on "Yes" to send the cancellation message.
Your SUT acts as an Analyzer Manager
As an Analyzer Manager, you may want to receive a query for AWOS from our Analyzer (LAB-27) and send an AWOS to our Analyzer (LAB-28).
Send queries for AWOS to the Analyzer Manager SUT
As defined in the Laboratory Technical Framework Supplement for the Laboratory Analytical Workflow Domain (LAW), the Analyzer can query the Analyzer Manager for a WOS related to a specimen. This is described in the LAB-27 transaction.
To do so, go to the Laboratory/Analyzer/[LAB-27] .
First at all, select a System Under Test (SUT) configuration in the SUT configuration drop-down list.
Then, select the "Query Mode" and fill the required parameters values. (See the desciption of the LAB-27 transaction in the LAW Technical Framework Supplement for further details about the usage of the parameters).
Finally, hit the "Send Query" button. The Analyzer Simulator will send the query to the SUT.
Receive an AWOS from the Analyzer Manager SUT
As defined in the Laboratory Technical Framework Supplement for the Laboratory Analytical Workflow Domain (LAW), the Analyzer can receive a new AWOS or a cancelation on an existing AWOS, from the Analyzer Manager. This is described in the LAB-28 transaction.
To do so, retrieve the configuration of the Analyzer part of the simulator by going to Laboratory/Analyzer/.
If you want to see the awos received by the Analyzer, go to Laboratory/Analyzer/Browse data. The creator of the work orders contained in the message you send is set to SendingApplication_SendingFacility.
- Log in to post comments
Test results management
The OrderManager also implements the transactions of the LTW and LAW integration profiles used to exchange results. That means that the simulator is able to play the role of Order Filler, Order Result Tracker, Automation Manager, Analyzer and Analyzer Manager actors in the following transactions:
- LAB-3: Order result management (OF and ORT)
- LAB-5: Test result management (AM and OF)
- LAB-29: AWOS Status Change (Analyzer and Analyzer Manager)
- Log in to post comments
DICOM Worklist management
The Order Manager enables the user to create a DICOM worklist from an existing procedure (or order, in that case a procedure is created from the order and then a worklist can be generated from the scheduled procedure steps). This order can be one of the orders received from a system under test or created by the Order Filler functionality of the application. The user has also the possibility to create an new order if his/her purpose is only to test a modality.
Create a DICOM Worklist
Go to Radiology/Order Filler/Create a DICOM worklist or Eye care/Order Filler/Create a DICOM worklist
Basically, worklists are created from the scheduled procedure steps (not cancelled nor complete) which are owned by the Order Filler part of the tool. Nevertheless, you may want to create a worklist for an order for which no procedure exists yet or create a new order from scratch.
- Use an existing order : Click on the "Schedule an order" button. Select one of the orders displayed in the table. You can add some search criteria for restraining the search.
- Create a new order for an existing encounter: After reaching the page to schedule a new order, click on the "Create a new order for an existing encounter" link. The list of encounters known by the application will be displayed, pick one. Then, you are asked to fill the newly created order. Use the randomly fill order button if you do not want to select all values one by one; if some of them are set, only the empty attributes are valued.
Once the order is selected and filled, the procedure is created, set the start/date time of the procedure. Hit the "Save requested procedure" button. Finally, for each step of the procedure, a button "Create a worklis for this step" is displayed, choose one and hit the button. You will be asked to fill out the Station AE Title, do so and hit the button "create the worklist", the worklist is created. Note that the procedure and protocol codes and descriptions are selected in behalf of the Universal Service Id attribute of the order. The matching is done thanks to the XML file available here.
The worklist is created and you can download the result of the generation. An XML file and the DICOM object are both available for download. Note that the worklist is first created in an XML form that match the DTD defined by OFFIS and then converting to a DICOM object using the xml2dcm tool from the DICOM toolkit DCMTK developed by OFFIS.
The configuration of the DICOM part of the Order Filler is available under Radiology/Order Filler/Configuration or Eye care/Order Filler/Configuration.
View all DICOM Worklist entries
Go to Radiology/Order Filler/Data browser or Eye care/Order Filler/Data browser
This page gathers all the worklists which are available in the SCP. For each worklist, you will retrieve the link to download the DICOM object and the associated XML file. In the same way, the configuration of the SCP to query is displayed again.
Worklist query messages
We have put in place a little proxy as a front-end of our SCP. Our SCP is played by the DICOM Basic worklist management SCP (wlmscpfs) developed by OFFIS and available in the DCMTK toolkit. The given port is one of those the OrderManager is listening on. When you send your DICOM query to the given configuration, the OrderManager stores the data set part of the message in its database after some processing (extracts some informations stored beside the request) and forwards it to the DICOM SCP. When the SCP sends you the response, it is first received by the OrderManager which saves it and then forwards the response to your system. See below the sequence diagram for a better understanding of the workflow.
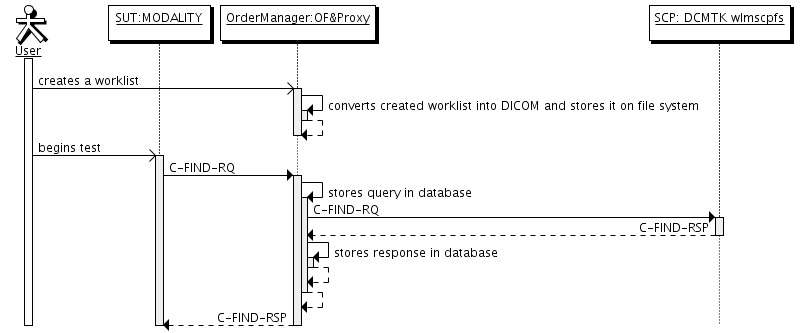
The DICOM messages intercepted by the OrderManager are all available under menu Radiology/Worklists/Worklist query messages.
For each message, we have extracted the data set and its content is converted into an XML file using the dcm2xml tool from OFFIS's toolkit. This file is displayed in the application using an XSL transformation, the XSL file we have written is available here.
In the same way, for a given message you will find a table gathering all the other messages received within the same channel of the proxy. It appears that a new channel is openned for each new association.
Worklist query logs
The error output of wlmscpfs tool is parsed as text is appended and the results of the parsing is stored in the database. You can view these logs in the page Radiology/Worklists/Worklist query logs or Eye care/Worklists/Worklist query logs.
- Log in to post comments
Procedure management
The Order Manager tool is able to act in transactions RAD-4 (procedure scheduled) and RAD-13 (procedure update) as both Order Filler and Image Manager (or Report Manager).
- Radiology/Order Filler/[RAD-4/RAD-13] Scheduled/Update procedures: Send procedures to your Image/Report Manager using our Order Filler
- Radiology/Image Manager/Configuration gives you the connection information to send messages to our Image Manager.
SWF.b
From version 4.0.0, the Order Manager tool supports the SWF.b profile. It will be able to handle and validate the OMG messages your SUT sent to it. You can also ask the tool to use HL7v2.5.1 instead of HL7v2.3.1 when configuring the message to send to your SUT, to do so, tick the "Send HL7v2.5.1 messages ?" checkbox.
Order Filler sends procedure notifications
The application offers you two ways of creating procedures:
- Schedule a procedure for an order already created within the Order Filler. This can be useful if you want to test a workflow and the Order Filler actor is missing and thus replaced by the tool
- Schedule a procedure for an order you create from scratch. This feature may be useful if you only need to test the behaviour of your Image Manager.
In those two cases, the procedure information are retrieved from an XML file which is used to map the ordering codes with the procedure informations. By now, we create only one requested procedure per order. If when reading those files you notice that an ordering code and/or procedure code your system supports is not available, please provide us with those informations and we will append them in our configuration files.
Ordering Codes (SVS file): http://gazelle.ihe.net/RetrieveValueSet?id=1.3.6.1.4.1.21367.101.118
Procedure mapping: http://gazelle.ihe.net/examples/Bern2012-orderHierarchy.xml
Procedure scheduled
The first time you use the application to send a procedure scheduled message to your Image Manager, you must register your system under test into the application, that means, providing the application with your connection informations: IP address, port, receiving application/facility. To do so, go to the SUT Configurations menu and click on the "Create a configuration..." button.
Then, go to Radiology/Order Filler/[RAD-4/RAD-13] Procedure Scheduled/Update and follow the instructions below.
- Select your system under test in the drop-down list and verify the connection information. Also check on your system under test that no firewall rules prevent Gazelle servers from accessing your system.
- Select "Procedure scheduled" as action to perform. The list of available orders should be displayed
- You can restrain the search by using both the filters on columns and the research fields above the table. When you have found the order you want to use, click on the select link in the last column of the table.
- The Requested Procedure is then created by the application and you only have to set the Scheduled Procedure step start date/time and eventually the modality type (if not specified in the mapping file)
- Finally click on "Send message" and wait for the application to receive the acknowledgement from your system. As a last step, you can validate the conformance of the acknowledgement your system has sent against our HL7 message profile.
Procedure Update
According to the table gathering the required order control codes and order statuses (Table 4.13-1 in RAD TF volume 1), there are 4 actions that the Order Filler and the Image Manager must be able to support. Those actions are gathered in the "Action to perfom" list.
- Procedure Update: cancel order request
- Procedure Update: discontinue order request
- Procedure Update: change order request
- Procedure Update: order has been completed
For the two first ones, you only have to select a procedure and to hit the "Yes" button when the pop-up raises. For the two last ones, you will be asked to update the start date/time and then you can press the "Send message" button. Note that once a procedure is cancelled, discontinued or said as completed, it does not show up again in the list of available procedures.
Image Manager receives procedure notifications
The Image Manager actor acts as responder in the transactions RAD-4 and RAD-13. As a consequence, you will have to feed your system under test with the connection information of this part of the tool. As mentionned earlier in this page, you must be logged in to access those information.
Go to Radiology/Image Manager/Configuration
Once your system is configured to communicate with the tool, you can send it ORM^O01^ORM_O01 messages as defined for transactions RAD-4 and RAD-13. Note that, the Image Manager implemented in the Order Manager only plays a role of a message recipient. New procedure will be created, updated, cancelled... according to the message content but no other actions will be taken by this part of the tool.
If you want to see how the messages you have sent have been integrated by the tool, go to the section Radiology/Image Manager/Browse Data.
- Log in to post comments
Test results management
This page describes the Test Result Management part of the Order Manager. This part involved
Analyzer (LAW)
Analyzer Manager (LAW)
Order Filler (LTW)
Order Result Tracker (LTW)
Automation Manager (LTW)
- Log in to post comments
HL7 messages validation
HL7 validation
The simulator communicates with our HL7 validator based on message profiles developed at INRIA and HAPI validation. For each received and sent messages, you can ask the simulator to validate the messages. Below is the meaning of the different icons you can meet in the Test Report section of each page or under the HL7 messages menu (gathers all the messages received and sent by the simulator).
| Opens the pop-up containing the received and sent messages beside their validation results. The validation service is automatically called each time you hit this button. Consequently, the validation result you see is always the one matching the newest version of the message profile. | |
| The message has not been validated yet. Hitting this button leads to the same action as the previous icon (magnifying glass). | |
| The message has been successfully validated. Hitting this button leads to the same action as the previous ones. | |
| The message has been validated but the message contains errors. Hitting this button leads to the same action as the previous ones. |
|
| Opens a pop-up asking you to which system under test you want to send this message again. The simulator is able to replay a message it has already sent. The messages which have been received by the simulator (as responder) cannot be send a second time. |
- Log in to post comments
DICOM Modality Worklist Query
The Order Manager tool integrates a feature which allows the user to send Modality Worklist Information Model C-Find queries to order fillers.
Register your SUT as a DICOM SCP
If you are already a user of the Order Manager tool, you may have registered your System Under Test as an Order Filler, giving its HL7 configuration. In order to send the DICOM queries to your SUT, the tool also needs some informations about your DICOM configuration.
Create a new configuration under SUT Configurations / DICOM SCP. You need to provide a name (to easily retrieve your configuration), the hostname or IP address, the port and the AE title used by your SUT. If you are logged in when creating the configuration, you will be asked if you want this configuration to remain private or if you want to share it with others.
The AE Title sent by the tool is Gazelle_OM. If your SUT accepts only some AE titles, do not forget to add this one.
Configure the message to be sent
Go to Radiology / Acquisition Modality / [RAD-5] Modality Worklist Query.
In the top part of the page, select the configuration of your SUT. Connection information will be displayed on the right hand of the sequence diagram, check they are still up-to-date.
Then, the page is divided into two parts, on the left hand you have a tree representation of the C-FIND message being sent and on the right hand you have a panel to append additional tags to the query.
Tree representation and value setting
Each leaf of the tree represents a DICOM attribute: name tag <VR> <value>
To set a value to a leaf, just click on "value" and enter the attribute value to send. Then press ENTER key or click on the green mark. If you want to remove a value, either edit the tag and delete its content, either right-click on it and select "Empty attribute" in the contextual menu.
Each branch of the tree represents a DICOM sequence attribute : name tag <VR>
Appending attributes
To append an attribute to the root of the query, use the panel located on the right hand of the page; either enter the tag (use hexa format, eg. 0x0101,0x1010) the hit the "Add" button either select its name in the drop-down menu and hit the "Add" button. The list contains the name attribute which can be found in a worklist. If one of the attribute is missing, add it using its tag.
To append an attribute to a sequence, right-click on the sequence name and select "Add an item". Then process as described just below.
To value a newly added attribute, proceed as described in the previous section.
Removing tags
Each attribute/sequence attribute can be removed from the tree. Right-click on the attribute to delete and select "Remove attribute".
Options
The technical framework defines to set of matching key attributes to be supported by the acquisition modality and/or importer actors. You can choose to highlight those attributes in the tree.
Below the tree, an "Options" panel is available. You can expand it by clicking on its header. Three choices are available:
- None: nothing is highlighted
- Keys for Query by Patient: the attributes listed in table 4.5-1 of the technical framework will be highlighted. There are the matching keys to be supported when querying a worklist for a particular patient.
- Keys for Broad Worklist Query: the attributes listed in table 4.5-2 of the technical framework will be highlighted. There are the matching keys to be supported when performing a query for a broad worklist.
Send message
Once the query is ready to be sent to your system, hit the "Execute" button.
View exchanged messages
A proxy catches all the messages sent and received by the tool. When the execution of the query is complete, the list of messages exchanged between your system under test and the Gazelle tool will be available.
- Log in to post comments
Using this tool for pre-connectathon tests
Pre-connectathon testing for systems implementing the LTW (Laboratory Testing Workflow) integration profile, plus Radiology, Cardiology & Eye Care workflow profiles, are perfomed against a Gazelle simulator named OrderManager. In this context we test actors independently of each other, that means that we do not take care of the workflow.
- The OrderManager tool is here: https://gazelle.ihe.net/OrderManager/home.seam
- Pre-Connectathon tests using the Order Manager are documented here: http://gazelle.ihe.net/content/order-manager-tests
- We recommend you read the OrderManager user manual here: http://gazelle.ihe.net/content/order-manager">http://gazelle.ihe.net/content/order-manager
Configuring the tool
Before starting your tests, please set up your system on the tool and give the correct information to the simulator in order to enable it to access your system under test. Note that this simulator emulates actors from various domain, consequently, before starting your tests, make sure to select the proper domain from the top-level menu, eg select the Laboratory domain.
Order Placers
Depending of the transaction in which it is involved, the Order Placer is either an HL7 initiator or an HL7 responder. Consequently, in order to be able to communicate with the simulator, you need to enter the configuration of your system under test (IP address, port, application, facility...) into the simulator, go to section entitled "SUT Configurations". In addition, you need to enter the configuration of the different actors emulates by the simulator and which the ones you will interact. Those pieces of information are available under the Configuration menu of each actor.
Order Fillers
Depending of the transaction in which it is involved, the Order Filler is either an HL7 initiator or an HL7 responder. Consequently, in order to be able to communicate with the simulator, you need to enter the configuration of your system under test (IP address, port, application, facility...) into the simulator, go to section entitled "SUT Configurations". In addition, you need to enter the configuration of the different actors emulates by the simulator and which the ones you will interact. Those pieces of information are available under the Configuration menu of each actor.
Image Managers
As an HL7 responder, the Image Manager must enter its configuration into the OrderManager simulator. Go to "SUT Configurations" section to do so.
Automation managers
Depending of the transaction in which it is involved, the Automation Manager is either an HL7 initiator or an HL7 responder. Consequently, in order to be able to communicate with the simulator, you need to enter the configuration of your system under test (IP address, port, application, facility...) into the simulator, go to section entitled "SUT Configurations". In addition, you need to enter the configuration of the different actors emulates by the simulator and which the ones you will interact. Those pieces of information are available under the Configuration menu of each actor.
Order result trackers
As an HL7 responder, the Order result tracker must enter its configuration into the OrderManager simulator. Go to "SUT Configurations" section to do so.
[Deprecated] External Validation Services
Warning: This documentation is out-dated, newest version of the documentation is available at https://gazelle.ihe.net/gazelle-documentation
Overview
Gazelle interoperability testbed offers a large set of validation services which enable the Healthcare IT developers and users to test the conformance to IHE specifications of the messages and documents produced by their systems. All those services are available all the year long through web services. In order to increase the ease-of-use of those services, IHE-Europe also offers, through the Gazelle portal, a web-based application named External Validation Service Front-End (aka EVSClient). The tool is accessible from the following URL.
It is the entry point for validating the following types of messages and documents:
- HL7 messages
- CDA documents
- SAML assertion
- Audit messages
- Certificates
- Dicom objects
- XDW documents
- PDF Validation
- XD* Metadata
- XDW document
- HPD messages
Concerning the messages, documents and assertions based on XML format, we use two mechanisms. Validation can be based on schematrons or based on model. An application namedSchematron-based Validatorhas been developed, it gathers all the schematrons used by the validation tool and provides a web service to validate documents. Both Schematron and Model Based Validation of XML documents also checks that the documents are well formed and valid according to the XSD.
The picture below illustrates how the EVS Client works.

[Deprecated] CDA Document Validation
Warning: This documentation is out-dated, newest version of the documentation is available at https://gazelle.ihe.net/gazelle-documentation
This section introduces the various engines the Gazelle team has put in place to validate the Clinical documents.
[Deprecated] CDA Validation using MIF
Warning: This documentation is out-dated, newest version of the documentation is available at https://gazelle.ihe.net/gazelle-documentation
Introduction
The following graph based on a slide from René Spronk (Ringholm bv), summarizes the CDA Validation options.

- We verify that the CDA is a well-formed XML Document. This corresponds to 1 on the graphic
- We verify that the CDA document is valid against the CDA Schema
- If we have a template specific schema, then we use that one to check the validity of the CDA document.
- From the CDA implementation guide (IHE technical framework, epSOS specs,...) some business rules are expressed into a schematron document that we use to validate the CDA document.
MIF : Model Interchange Format
René Spronk wrote an excellent white paper on MIF, we recommend its reading in order to better understand the concepts. The definition extracted from that white paper states : "The Model Interchange Format (MIF) is a set of XML formats used to support the storage and exchange of HL7 version 3 artefacts as part of the HL7 Development Framework. It is the pre-publication format of HL7 v3 artefacts used by tooling. It is also the formal definition of the HL7 metamodel. The MIF can be transformed into derived forms such as UML/XMI or OWL."
CDA Validation
We use the tool H3ET writen by JivaMedical (http://www.jivamedical.com/hl7-v3/h3et-product-overview-2.html). The jar can be downloaded from page Eclipse Instance Editor at the following URL :
[Deprecated] CDA Validation using Schematrons
Warning: This documentation is out-dated, newest version of the documentation is available at https://gazelle.ihe.net/gazelle-documentation
This page describes how to perform a CDA document validation using the SChematron Validator tool which have been developed for the gazelle project :
- How to perform a CDA document validation
- How to get the current CDA schematrons
- How does CDA validation works
- How to report a bug on CDA schematrons
- How to develop / correct a schematron
Overview
CDA documents validation is performed using Schematrons. A Schematrons defines the requirements to be tested in a CDA document. Note that there are some other ways to perform CDA content validation. For instance on can use the CDA Tools from OHT. More information about the CDA tool can be found here.
Due to limitation in time, we have not yet used the CDA Tools from OHT, however this tool is in our pipe line and we are investigating its use.
How to perform a CDA document Validation
There are different ways to validating CDA documents using the :
- Using the Gazelle External Validation Service Front End. This tool provide a GUI to access the different validation services configured in the Gazelle plateform. For CDA validation is one of the services proposed by that tool.
- Download the Schematrons source code on your computer and perform the validation using an XSLT Processor. The Schematrons used by the External Validation Service Front End can be downloaded from the GUI
- Using the Schematron Validation Webservice. This solution might not be the easiest to implement, however it presents the advantage that it can be integrated in an application.
How to get the current CDA schematrons
The Schematrons used by the EVS are available for download from the External Validation Service Front End GUI, under the menu : schematrons. The rest of this section is of interest for the readers who would like to understand the mechanism of creating a Schematron or reusing the templates that are available on the forge in order to develop validation Schematron for other CDA documents.
The sources of Schematrons are available on the INRIA forge. Note that
Importing the Schematron project
Here is the URL pointing the location of the Schematron project repository, you can use svn to import the project into your workspace.
Validation steps
To perform a validation of any of the documents which Schematron is available, you need to execute two actions :
- Generate the "dist" folder
- Validate the document
Generating the "dist" folder
To generate the "dist" folder you need to run the 'make-dist.sh' script, this shell script is classified under '/workspace/schematron/epSOS/tools'.
To run this script :
~/workspace/schematron/epSOS/tools$ ./make_dist.sh
After been generated the "dist" folder will contain the final preprocessed Schematrons which will be used to validate your documents.
You will notice that the CDA Schematrons are divided into two kind
- Pivot : The Schematrons in this folder uses epSOS pivot codes listed in the epSOS_MVC_V1_5.xls for the validation
- Friendly : The Schematrons in this folder doesn't use epSOS pivot codes for the validation
Validating the CDA document
Now that the Schematrons are available in the "dist", the validation of a document is done thanks to the 'validate.sh' script, this shell script is classified under '/workspace/schematron/epSOS/tools'.
To run this script :
~/workspace/schematron/epSOS/tools$ ./validate.sh ../dist/cda/pivot/ePrescription.sch ../src/cda/samples/ePrescription/ePSample.xml
The first argument of the 'validate.sh' script will be the preprocessed Schematron and the second argument will be the document to validate. The example above shows the command to validate an ePrescription sample with the ePrescription schematron.
Validation result
The result of the validation will figure in the "test-doc.svrl" file, you'll just need to open that file to see the result.
In order to make the result of the validation more readable, a transformation from 'svrl' to 'html' is done in the 'validate.sh' script which will out come with an html file : 'results.html'.
How does CDA validation works
Architecture
Here below the overall architecture of the project :

The main used folders are :
src:Contains the necessary files for the validation of CDA, SAML, ATNA and PRPA documents.

Each of these folders (cda, saml, audit...) is organized as follows :

- samples : Contains valid samples (.xml)
- sch : Contains the developed Schematrons (.sch)
- xsd : Contains the used schema (.xsd)
table_data : Contains xml files that list the codes used for the validation.
tools : Contains all the libraries used to perfom the preprocessing of the Schematrons and the validation of the documents.
'Make_dist.sh' script
This script is placed under '/workspace/schematron/epSOS/tools'.
The main goal of this script is to preprocess the developed Schematrons available under '/workspace/schematron/epSOS/src/*/sch' in order to build a consolidated one and make them available in the "dist" folder under '/workspace/schematron/epSOS/dist/'.
The preprocessing conssist mainly on :
- Resolving inclusion
- Reformating and indenting the schematrons
- Building xsl from schematrons
- Building the phases of the schematrons
- Building friendly and pivot Schematrons (just for CDA)
'Validate.sh' script
This script is placed under '/workspace/schematron/epSOS/tools'.
The main goal of this script is to validate an xml documents thanks to a schematron.
Schematron validation takes four XSLT stages :
- Process inclusions
- Process abstract patterns
- Compile the schema
- Validate
The result of the validation is placed in the 'test-doc.svrl' file under '/workspace/schematron/epSOS/tools'.
Inclusion
The main goal of inclusion is to merge a number of XML information sets into a single composite infoset. In this project the inclusion is used to merge all the required schematron for the validation of a document in one Schematron file.
For example : An epSOS ePrescription document like all the CDA documents, contains different set of clinical informations. Every set of informations is represented by a 'templateId'. Every 'templateId' plays the role of a reference for the schematrons.
Almost every set of informations represented by a 'templateId' have a Schematron able of validating it.
Knowing that the ePrescription document (templateId 1.3.6.1.4.1.12559.11.10.1.3.1.1.1) must contain a Prescription Section (templateId 1.3.6.1.4.1.12559.11.10.1.3.1.2.1), and the Prescription Section, for his turn, shall include a Prescription Item Entry Content Module (templateId 1.3.6.1.4.1.12559.11.10.1.3.1.3.2)...The ePrescription Schematron which will be able to validate an ePrescription document, must include the Prescription Section schematron, and that last shall include the Prescription Item Entry Content Module schematron.
Freemind map
A FreeMind map available in '/workspace/schematron/epSOS/docs' describe all the set up inclusion for the CDA documents.
How to report a bug on CDA schematrons
Issues on CDA Schematrons can be reported in the Gazelle issue tracker available here.
How to develop / correct a schematron
Schematron is a ...
- Well-formed XML document
- Technique to specify and test statements about your XML document
- Elements
- Attributes
- Content
A Schematron specifies the checks to be performed on the tested CDA document, those tests are in fact a set of declarations for a process, it act like (test this, tell me that!). To perform the schematron's specifications, a Schematron processor is necessary :
- It reads and interprets your Schematron tests
- Applies the tests to your documents
- Reports back with any messages
Schematron development environment
In order to get your Schematron up and running we propose two environments that you can download from Oxygen web site:
- Oxygen XML plugin for Eclipse
- Oxygen XML Editor
More informations about the Oxygen XML Editor are here.
Writing Schematron
The basic Schematronbuilding blocks are :
- Phases : Activate different families called patterns. (ex: There's two phases for the validation of the CDA documents, the "pivot" and the "friendly" )
- Patterns : Rules are grouped into families called Patterns.
- Rules : Tests are collected into rules, which apply to particular XML elements (context)
- Assertions : Conditions to test, and are divided into two kind
- assert : If the condition is true, fine! If it is not, you get your message
- report : If the condition is true, you get your message
- Messages : the log you get back if the condition fail (assert), or succeed (report). We defined four kind of messages in this project. Messages starting with :
- "Error:" are interpreted as error messages
- "Success:" are interpreted as success messages
- "Note:" are interpreted as note messages
- "Warning:" are interpreted as warning messages
Using Phases
A phase is used to activate patterns (templates) so that they can perform a validation. To activate a pattern you simply need to declare it in a phase.
ex: Activating the pattern which id = p-1.3.6.1.4.1.12559.11.10.1.3.1.1.2-errors.
<phase id="all"> <active pattern="p-1.3.6.1.4.1.12559.11.10.1.3.1.1.2-errors"/></phase>
In our case we create two kind of phases that we called 'all' and 'no-codes'. The phase we called 'all' is intended to perform a global validation, and so we have to declare in this phase all the patterns included by the Schematron (errors + warnings + notes + codes). On the other hand, the phase we called 'no-codes' is intended to perform a validation without using pivot codes, and so we have to declare in this phase all the patterns except the ones validating the pivot codes (errors + warnings + notes).
<phase id="all">
<active pattern="p-1.3.6.1.4.1.12559.11.10.1.3.1.1.2-errors"/>
<active pattern="p-1.3.6.1.4.1.12559.11.10.1.3.1.1.2-warnings"/>
<active pattern="p-1.3.6.1.4.1.12559.11.10.1.3.1.1.2-notes"/>
<active pattern="p-1.3.6.1.4.1.12559.11.10.1.3.1.1.2-codes"/>
</phase>
 <phase id="no-codes">
<active pattern="p-1.3.6.1.4.1.12559.11.10.1.3.1.1.2-errors"/>
<active pattern="p-1.3.6.1.4.1.12559.11.10.1.3.1.1.2-warnings"/>
<active pattern="p-1.3.6.1.4.1.12559.11.10.1.3.1.1.2-notes"/>
</phase>
The CDA templates performing pivot codes validation are placed under "schematron/epSOS/src/cda/sch/templates/codes".
The default Phase parameter "defaultPhase" defined in the Schematron is the one responsible of choosing which phase to perform while validation. We manipulate this parameter in the 'Make_dist' script in order to generate :
- Schematrons using pivot codes validation under 'schematron/epSOS/dist/cda/pivot' by setting the "defaultPhase" to "all"
- Schematrons not using pivot codes validation under 'schematron/epSOS/dist/cda/friendly' by setting the "defaultPhase" to "no-codes"
Using inclusion
The main goal of inclusion is to merge a number of XML information sets into a single composite infoset.
In our case we use inclusion to merge all included patterns into a one final Schematron.
<xi:include parse="xml" href="templates/errors/1.3.6.1.4.1.12559.11.10.1.3.1.1.1.sch" xpointer="xmlns(x=http://purl.oclc.org/dsdl/schematron) xpointer(//x:pattern)">
<xi:fallback>
<!-- xi:include error : file not found :  templates/errors/1.3.6.1.4.1.12559.11.10.1.3.1.1.1.sch -->
</xi:fallback>
</xi:include>
The example shows the syntaxe we use to include the patterns available in the template "1.3.6.1.4.1.12559.11.10.1.3.1.1.1.sch" into the Schematrons who initiated this command.
PS: In order to use inclusion, you shall declare the following name space : "xmlns:xi="http://www.w3.org/2003/XInclude"
[Deprecated] CDA model based validation
Warning: This documentation is out-dated, newest version of the documentation is available at https://gazelle.ihe.net/gazelle-documentation
Introduction
The CDA model based validation is a tool to validate CDA documents based on model specification. The validation can be done from the EVSClient or from a webservice of validation. Actual online validators are BASIC-CDA and XD-LAB validator. You can use the tool to validate the conformance of CDA document with various specifications.
- Basic CDA (conformance to HL7 CDA specifications)
- CCD
- IHE Pharmacy domains profiles :
- Laboratory Domain (LAB)
- IHE - XD-LAB : Sharing Lab Report profile
- Pharmacy Domain (PHARM)
- IHE - PHARM Prescription : Pharmacy Prescription profile
- IHE - PHARM Dispensation : Pharmacy Dispense profile
- IHE - PHARM Pharmaceutical Advice : Pharmacy Pharmaceutical Advice profile
- IT-Infrastructure Domain (ITI)
- IHE - XDS-SD : Cross-Enterprise Document Sharing of Scanned Documents profile
- IHE - BPPC : Basic Patient Privacy Consents profile
- Radiology domain (RAD)
- IHE - XDS-SD XDS-I.b : Cross-Enterprise Document Sharing for Imaging profile
- Patient Care Coordination Domain (PCC)
- IHE - PCC BASIC : validation according to the list of templates of PCC domain
- Cardiology Domain (CARD)
- IHE - CARD Cath Report Content (CRC) : Cath Report Content profile
- IHE - CARD Registry Content Submission (RCS-C) : Registry Content Submission profile
- epSOS CDA
- epSOS - Patient Summary Pivot
- epSOS - ePrescription Pivot
- epSOS - eDispensation Pivot
- epSOS - Patient Summary Friendly
- epSOS - ePrescription Friendly
- epSOS - eDispensation Friendly
- epSOS - eConsent
- epSOS - Scanned Document
- epSOS - HCER HealthCare Encounter Report
- epSOS - MRO Medication Related Overview
- ASIP
- ASIP - CDA Structuration minimale
- ASIP - Fiche de Réunion de Concertation Pluridisciplinaire (FRCP)
- ESANTE
- LUX - Header Specifications
Validation from EVSClient
Access to the tool
You can access to the validator from http://gazelle.ihe.net/EVSClient/home.seam. Then from the menu, you go to menu -->IHE -->CDA --> CDA Validation.
For ASIP or epSOS the path to the validation page are respectively :
- CI-SIS France --> CDA --> CDA Validation and
- epSOS --> CDA --> CDA Validation

The following screen capture shows the CDA document validation page. 
The tool offers the possibility to perform both a schematron and/or a model based validation. Here in this page we concentrate on the Model Based CDA Validation. For more information about Schematron validation of CDA document please refer to :
In order to validate a CDA document you first need to click on the Add.. button and upload the document to validate.
Then you need to select the validator to use in the listboxes. You need to select at least one of them.
To actually perform the validation you need to click on the "Validate" button.
Presentation of the GUI showing the results of the validation
The validation process checks that :
- the CDA is a well formed XML document.
- the CDA contains valid XML
- the CDA respect the rules defined in the specification.

To track the error, you can go directly to its location on the XML file by clicking on the picture link (green arrow), as it it shown on the figures above and below :

When you click there, you go directly to the XML view of the document CDA, and you can see the error, warning or notification message by setting the cursor on the picture that appear on the XML :

Access to all validated CDA document
You can access to all validated CDA document by going to the menu HL7--> CDA --> Validated CDA :

Here you can search for CDA validated using the model based tools. You have to use the attribute Model Based Validator, like this :

Validation using the webservice
The validation of CDA document based on model specification can be done using an online webservice. This web service is :
http://gazelle.ihe.net/CDAGenerator-CDAGenerator-ejb/CDAValidatorWS?wsdl.
This web service contains an important method for validation of CDA document, which is : validateCDADocument.
- Log in to post comments
[Deprecated] External Validation Service Front-end
Warning: This documentation is out-dated, newest version of the documentation is available at https://gazelle.ihe.net/gazelle-documentation
Access the External Validation Service Front-end
Introduction
This application has been developed with the purpose of aggregating in a same user interface, the access to all validation services developed for IHE. Services called are the following:
- Gazelle HL7 Validator for HL7v2.x and HL7v3 messages
- Schematron-based Validator (CDA, Audit messages, HL7v3, assertions...)
- Model-based validator for CDA
- Model-based validator for XD* messages
- Model-based validator for XDW
- Model-based validator for DSUB
- Model-based validator for SVS
- Model-based validator for HPD
- Certificates validation
- JHOVE for PDF files validation
- Dicom3Tools, DCMCHECK, Dcm4Che, Pixelmed for validating DICOM objects
In the menu bar of the user interface, we have chosen to sort the validators by affinity domains, currently to differents affinity domains are available: IHE and epSOS.
Contents which can be validated using this tool are: HL7v2.x and HL7v3 messages, CDA documents, SAML assertions, ATNA audit messages, certificates, XD* messages, XDW documents and DICOM object.
Schematrons section allows the user to download the schematrons which are used to validate XML files. Those schematrons are sorted according the type of object they validate.
Important notice
Note that when using the EVS Client application, if you are NOT logged in, every document/message that you validate is stored in our database, referenced and available to everybody. If you do not want to have your documents/messages public, then you need to log in using the "CAS login", it uses your Gazelle's (EU-CAT) credentials.
- Log in to post comments
[Deprecated] User Manual
Warning: This documentation is out-dated, newest version of the documentation is available at https://gazelle.ihe.net/gazelle-documentation
The application External Validation Service Front-End can be used for validating the following objects:
- HL7 CDA files
- HL7v2.x and HL7v3 messages
- HPD messages
- SVS messages
- DSUB metadata
- SAML assertions
- Audit messages
- Certificates
- DICOM objects
- PDF files
- XD* messages (metadata)
- XDW documents
Note about the privacy of validation results
If the user is not log on the application, his/her validation requests and results (that means the document/message submitted to the tool and the validation outcome) are available to everybody. We say that the result is "public"; it will be listed in the list of validation requests and everybody will be able to access and download both the validated file and the validation report.
If the user is logged on the application, by default, his/her validation requests and results will be set as "private". That means that he/she will be the only one to see the validation requests in the list and to access it. A permanent link is created for each validation request, the ones leading to a private request have restricted permissions; only the owner of the validation requests (the one who performed the validation) will be able to access this page.
A logged on user can choose to have a given validation request available to everybody. In this case, everybody will be able to list the request and to access both the validated file and the validation report. To do so, once the validation is performed (or at any moment from the result page), click on the "Make this result public" button. At any time, the owner of the request (and only him/her) will be able to change back the visibility of the result to private.
A logged on user can choose to keep his/her validation request (file + result) private but to allow certain users to access it also. In this case, clicking on the "share this result" button will generate a random key which, added to the URL will ensure that only the persons who know the permanent link (including the key) will be able to access the content of the validation request. The owner of the validation request will still be the only one to see the result in the list gathering all results but everyone knowing the link will be allowed to display the page.
Note that the admin and monitor users are able to access all the validation requests. It's obvious that they were use them only for verification purposes and will not publish neither use them for other purposes.
Validate an XML file
By XML file we mean all messages or documents based on XML (CDA, HL7v3 messages, XD* metadata ...) All those kinds of files can be validating using a schematron and/or a model-based validator. Once you have selected (in the top bar menu) the kind of XML object you want to validate, you will reach a page which ask you to upload the XML file to validate (be careful, the application allows only files with .xml extension) and to select the schematron and/or model-based validator to use.
Below is an example of the different steps for validating an XD-LAB report.
1. Select the menu CDA Validation in the IHE drop-down menu

2. Hit the "Add" button and select the XML file to validate in your system explorer

3. Select the schematron and/or a model-based validator to use in the drop-down list(s)

4. Finally, hit the "validate" button. After a while, the validation result will be displayed below the selection area.
The validation result panel is divided into differents panels :
"Download result" button enables you to download an XML file gathering the validation result. The relative stylesheet is provided here.
"Information" gives information about the validated file, the validation date, the schematron used and the result of the validation. In this part, you will also find a permanent link to the current validation result. If you have asked for both schematron and model-based validation, two tabs will be displayed, one by validation result.
Validate an HL7v2.x message
1. Select the menu HL7v2 menu in the IHE drop-down menu

2. Upload or paste your message
Enter your message in the box (paste your message, ER7 format) OR upload the file containing your message (be careful, the application allows only files with .hl7 or .txt extension).

Then, you must choose the HL7 message profile to use to validate your HL7 message. The "Guess profile" button, just below the box, can be used to guess automatically the HL7 message profile to use, it extracts fields MSH-9 and MSH-12 and filter on those values.
Finally, to launch the validation process, hit the ![]() on the right side of the line corresponding to the message profile to use.
on the right side of the line corresponding to the message profile to use.

How use Message Content Anaylzer
If you don't know the content of your file, or the validator you need to choose to validate your document you can use the Message Content Analyzer.

- Upload your file
- Click on analyze
- You should have the file description in result part (if you have any trouble, don't hesitate to write a Jira)

Now,
- You can click on each part of the tree or in the table to display the conten. You also can download each part.

- You can click on the green arrow or validate part (I'm lucky validation can directly send you to the result valitation of your part)
After you click on the refresh button, the validation permanent link is added to the table and the validation result is displayed in the tree.

This tool is still in developement, all remarks are accepted and you can open a Jira.
| Attachment | Size |
|---|---|
| 32.31 KB | |
| 109.13 KB | |
| 101.2 KB | |
| 101.86 KB |
[Deprecated] Gazelle HL7 Validator
Warning: This documentation is out-dated, newest version of the documentation is available at https://gazelle.ihe.net/gazelle-documentation
Application overview
GazelleHL7Validator is the part of the Gazelle platform dedicated to the validation of HL7 messages
- HL7v2.x messages are validating against HL7 conformance profiles. The validation engine is based on HAPI libraries and the conformance profiles are written by the Gazelle team (helped by NIST).
- HL7v3 messages are validating using a model-based engine
These validation services are available through a web service API so it can be integrated in your application. If you wish to validate messages occasionally you can use the Gazelle Validation Front-End called EVS Client which puts at your disposal a user interface to validate HL7 messages, CDA documents, XD* requests and so on.
Concerning HL7v2 validation: the application also gathers the HL7 conformance profiles and the HL7 tables (codes) which can be browsed by any user. For each conformance profile, you will find information about its issuer (actor, domain, transaction) and the message type and HL7 version. Each conformance profile can be bound to one or several HL7 tables which gather a list of allowed values for a given field of the message.
User interface
Browse validation requests
The User interface allows you to browse the validation requests received by the tool and the associated result. For each validation request, the tool keeps trace of the IP address of the caller. This is the way we choose to "protect" your work. That means that, using this IP address we can restrain the access to the data you have submitted (message content) and the results of those validations. The access rules are the following:
- Administrator users have access to all validation requests and are allowed to permanently delete some of them on user requests
- Not logged in users have only access to the validation requests coming from the same IP address as the one they are using when browsing the requests
- Logged in users (Gazelle CAS) can ask the administrator of the tool to register a set of IP addresses they are allowed to see.
Browse HL7 message profiles
All the HL7 message profiles available are gathered in the tool. You can either select a profile by its full OID (if known) or put filters on the table columns. Each profile is viewable inline and can also be downloaded.
Browse HL7 resources
An HL7 resource is an XML file gathering several HL7 tables. An HL7 table is uniquely defined by an ID and contains the set of allowed values. Those tables are referenced in the message profiles and at validation time, the validation engine can check that the value of a given field of the submitted message comes from the set of allowed codes for this field. As for the message profiles, you can see those tables inline or download them
Browse HL7v3 validation service documentation
The documentation of the constraints expressed in the model-based validation service is available through the user interface under the HL7v3 validation service menu.
Web service API
Gazelle HL7v2.x validation service
The web service API of the tool offers two methods:
- validate(): validates the given message against the given message profiles and sends back a validation report
- about(): gives information about the running version of the tool
The definition of the web service API is available at https://gazelle.ihe.net/GazelleHL7v2Validator-ejb/gazelleHL7v2ValidationWSService/gazelleHL7v2ValidationWS?wsdl.
The validate() method has the following prototype:
public String validate(String, String, String) throws SOAPException;
- The first parameter is xmlValidationMetadata, it is an XML formatted String respecting the XSD schema given at http://gazelle.ihe.net/xsd/MessageMetadata.xsd. By now, this parameter is not used but our intent is to add custom validation. That means that, in addition of the basic Hapi validator, the user will be able to put additionnal validation requests as constraints on field usage, component value...
- The second parameter is xmlValidationContext, it is an XML formatted String respecting the XSD schema given at https://gazelle.ihe.net/xsd/ValidationContext.xsd. This parameter is mandatory since it gives information about the HL7 message profile to use for the validation process.
- Finally, the third String stands for the message to validate itself. The message must use ER7 syntax (ie. pipe-based syntax)
As we also need the client side of this validation service, we have created some useful projects listed below.
- SOAPui project example
- Gazelle web service client API (version 1.19.0 and higher)
Note that this validation tool is also available through the simulators based on HL7v2.x (the messages sent and received by the simulator can be validated) and the EVSClient.
Gazelle HL7v3 validation service
see : https://gazelle.ihe.net/content/model-based-validation-web-services
Bug tracking
Error is human. We try to maintain the message profiles and HL7 tables doing our best but we may do mistakes. If you think there are errors in one/several of our message profiles, please report an issue in our bug tracking system with mention of the profie OID, error location, appropriate fix and reference to the documentation.
Bug tracking URL is https://gazelle.ihe.net/jira/browse/HL7VAL
- Log in to post comments
[Deprecated] HL7 Conformance profiles and HL7 tables management
Warning: This documentation is out-dated, newest version of the documentation is available at https://gazelle.ihe.net/gazelle-documentation
This part of the documentation is dedicated to the manager/administrator of the GazelleHL7Validator tool.
The validation of HL7v2 messages within the Gazelle platform is based on
-
HL7 conformance profiles : XML files which describe the structure of the HL7 messages, they are constrainable. For each segment, field, component and subcomponent, the usage (required, optional, not allowed...), the cardinality and the datatypes are defined.
-
HL7 resources : XML files which declare a set of HL7 tables (kind of value sets). HL7 conformance profiles may reference HL7 table for a field, component or subcomponent, in order to constrain the set of allowed values for this element of the message
Both HL7 conformance profiles and HL7 resources are stored in the database of the tool along with an OID as well as the links between the conformance profiles and the resources. Note that the conformance profile file only reference the number of the the HL7 table, that means that, for a given conformance profile, the tool must be able to know in which HL7 resources looking for the table.
For each HL7 conformance profile, we need to know to which part of the technical framework, which message it applies. That's why, the HL7 conformance profiles are actually referenced in Gazelle Master Model. This enables us to link a conformance profile to a tuple (Domain, Actor, Transaction, HL7 version, message type [, order control code]). GazelleHL7v2Validator and Gazelle Master Model are two tools which have independent databases; as a consequence, the OID is used as a foreign key and two web services offered by Gazelle Master Model allow us to exchange data between those two applications:
- IHEConcepts: This web service lists the different concepts (domain, actor, transaction) based on other parameters. For instance, you can get the list of all domains, the list of actors involved in a given domain and so on.
- Hl7MessageProfile: This web service offers methods to retrieve the complete list of conformance profiles registered in GMM, a subset of these profiles which match certain parameters (actor, message type, HL7 version...). This web service also offers a method to add a new conformance profile reference into the database of GMM.
The URL of the Gazelle Master Model web services are configurable within the application preferences part of GazelleHL7v2Validator. Make sure to reference the correct instance of Gazelle Master Model.
The following sections detail the different actions you may need to perform to maintain the set of conformance profiles available in your instance of GazelleHL7v2Validator. In order to keep a consistency between the references in Gazelle Master Model and the conformance profiles actually available in GazelleHL7v2Validator, only one instance of GazelleHL7v2Validator must be used per instance of Gazelle Master Model.
OID assignments
HL7 conformance profiles and HL7 tables are assigned OIDs. Remember that an OID must be unique through the world; that means that, the first thing to do when you install a new instance of GazelleHL7v2Validator is to update the root of the OIDs which will be generated by the application. Three OIDs are used which are defined in oid_generator table:
- One for the conformance profiles
- One for the HL7 resources
- One for the validation results (messages)
Currently, no user interface is available to perform this update, you will need to modify those values, manually, in the database.
Add a new conformance profile
Adding a new conformance profile consists in two things:
- Creating a new reference in Gazelle Master Model
- Importing the XML file representing the conformance profile to the database of GazelleHL7v2Validator
When you have just developing a new conformance profile, make sure that the transaction for which it is defined is registered into your instance of Gazelle Master Model (also check the actor and domain). Then, in GazelleHL7v2Validator, go to Administration --> Register new profiles (you must be logged on as an administrator).
A form is displayed (see screenshot below). Fill out this form with the information that match the conformance profile you are working with. Note that, first, only the domain drop-down list is displayed, then the list of actors is computed depending on the domain you have selected and finally the transactions will be available depending on the actor/domain pair previously selected.

As you can notice it on the screenshot, a button is available on the right of the "Profile OID" field. Clicking on this button will ask the application to automatically assign an OID to this conformance profile.
GazelleHL7Validator uses HAPI as validation engine. At validation time, message to validate is converted to a java object. Although all the message structures defined by HL7 are available in HAPI, in some cases, you will need to generate your own java class describing the message and tell the application in which java package it will find it. That is the case when IHE defines a new segment or change the structure of a message.
A project called gazelle-hl7-messagestructures available on Gazelle's forge and based on HAPI libraries is available to generate the java classes from the conformance profiles.
Finally, upload the XML file representing the conformance profile. As soon as the form is filled and the file is uploaded a "Submit" button is available. Hit this button, the file will be stored in database and the reference to the profile will be sent to Gazelle Master Model.
In order to facilitate the management of the registered profiles, we recommand to rename the XML file (on your file system) with the OID assigned to the conformance profile.
Add a new resource
Basically, one HL7 resource is registered for each version of HL7. In some cases, you will need to customize a table for a given conformance profile or for a set of conformance profiles. In that case, you may need to register a new resource.
Go to Administration --> Register new resources. A new form is displayed (see screenshot below).

As for the conformance profile, you can ask the application to generate an OID. Once the form is filled out and the XML file is uploaded, hit the "Submit" button and the HL7 resource will be stored in database.
Tip for filling out the weight attribute
When the tool initializes a validation, it retrieves all the HL7 resources linked to the selected conformance profile. Then, at validation time, for each reference to an HL7 table, it browses the selected resources to extract the set of allowed values. We have defined a mechanism of weight which allow us to tell the application in which order it must browse the resources. Actually, it may happen that you have overriden a table defined in several of the selected resources. The resource is the higher weight will be processed first. HL7 resources defined by HL7 have usually a weight equals to 1.
In order to facilitate the management of the registered resources, we recommand to rename the XML file (on your file system) with the OID assigned to the resource.
Link conformance profiles to resources
Go to Administration --> Link profiles to resources.
This page is composed of four parts:
- he list of available HL7 resources
- The list of selected HL7 resources
- A panel to select a set of conformance profile or a profile knowing its OID
- A panel which lists the selected conformance profiles
To link HL7 resources to conformance profiles, process as follows:
- First select the HL7 resource(s) you want to link to a set of profiles. Click on the blue plus icon of each row.
- Then, select a set of conformance profile (use filters)
- Finally hit the button "Link the profiles displayed below to the selected profiles"
Update conformance profiles and resources
This section assumes that you have renamed your XML files according to the previous advices; that means that on your file system, you have a set of files named [profile_oid|resource_oid].xml. Maintenance will be easier if you store the profiles and resources in two different directories.
To update the content of a conformance profile or a resource, go to Administration --> Configure application.
In this page, a section is entitled "HL7 message profiles and tables import".
To update the conformance profiles, configure the "Path to HL7 message profiles" and hit the Import/Update profiles. The path must point to a directory on the server.
To update the conformance profiles, configure the "Path to HL7 tables" and hit the Import/Update tables. The path must point to a directory on the server.
In both cases, the application browses the given folder and lists all the XML files. For each file, it tries to retrieve the relative conformance profile / resource and compare the date of the file with the date of the last changed. If the file on disk is newer than the last changed, then, the file will be imported into the database to replace the old content.
How conformance profiles and resources are organized on Gazelle's forge
This section describes how we have chosen to organize the conformance profiles and resources on Gazelle's forge and how they are maintained and managed.
Currently, both IHE Europe development team and the NIST contribute to maintain profiles.
A project is called Data and is available at https://gforge.inria.fr/scm/viewvc.php/Data/?root=gazelle. This project is made of two main folders:
- HL7MessageProfiles: In this folder, conformance profiles are organized by firstly actor keyword then transaction keyword and finally message type (messageType_triggerEvent). For instance, you will find the conformance profile for validating the ADT^A28^ADT_A05 message issued by the Patient Demographic Supplier actor in the context of the ITI-30 transaction at the following location: PDS/ITI-30/ADT_A28/profile/ADT_A28.xml. A sub-directory of HL7MessageProfiles is named ProfilesPerOid and contains a symbolic link to each profile. Name of the link is the OID assigned to the targeted message profile. In this way, when you want to update a profile you do not have to know its OID and in the same way, when updating the message profiles in the database of the tool, the mapping is correctly performed thanks to the symbolic links.
- HL7Tables contains the HL7 resources all with a meaningful name and a child directory named TablesPerOid which contains a symbolic link to each resource. Name of the link is the OID assigned to the targeted resource.
Finally, this project has been checked out on the server hosting GazelleHL7v2Validator application and is periodically updated; which allows us to easily perform the update of the profiles and resources in the application.
Manage HL7v3 Constraints file
The list of HL7v3 constraints is available under the administration tab, by going to the “Manage HL7v3 constraints file” menu. From there, it’s possible to delete individually each HL7v3 constraint by clicking on the trash icon. It’s also possible to import an XML file with the constraints written inside. This file must be generated with “Topcased” software from the OCL constraints. Be careful when using the “Delete and Generate” button, because all the existing HL7v3 constraints are first deleted before the new ones are imported.
Manage users' accesses
You can restrict the messages an user is allowed to see in the logs page by editing the user preferences from the Administration -> Manage users’ accesses page. By adding an user, you can restrict the allowed IP addresses to constraint this user to see only the messages coming from this IP address. You can add many IP addresses for a single user.

- Log in to post comments
[Deprecated] HL7v3 Validation Service
Warning: This documentation is out-dated, newest version of the documentation is available at https://gazelle.ihe.net/gazelle-documentation
Gazelle HL7 Validator embeds a web service interface to query the HL7v3 validation service. This validation service has been developed using the model-based engine. All model-based validation service exposes a web service which uses the same definition. Refers to the general documentation if you want to use this service from your application.
This service can be easily called using the EVS Client application. Start from IHE --> HL7v3 --> Validation.
The model has been generated from the HL7v3 schema available at ftp://ftp.ihe.net/TF_Implementation_Material/ITI/schema/HL7V3/NE2008/. Constraints have been written in accordance with the IHE specifications available in ITI Technical Framework Appendix O and the section from the ITI Technical Framework volume 2 which deals with the HL7v3 protocol.
The following messages can be validated using this service :
- PDQv3 Accept Acknowledgement
- PDQv3 Patient Demographic Query
- PDQv3 Patient Demographic Query Cancellation
- PDQv3 Patient Demographic Query Continuation
- PDQv3 Patient Demographic Query Response
- PIXV3 Patient Identity Feed HL7V3 (Add Patient Record)
- PIXV3 Patient Identity Feed HL7V3 (Revise Patient Record)
- PIXV3 Patient Identity Feed HL7V3 (Patient Identity Feed)
- PIXV3 Patient Identity Feed HL7V3 (Acknowledgement)
- PIXV3 Query
- PIXV3 Query Response
- PIXV3 Update Notification
- PIXV3 Update Notification Acknowledgement
- XCPD Cross Gateway Patient Discovery Request
- XCPD Cross Gateway Patient Discovery Request (Deferred option)
Two additional messages can be validated with this tool though they are not HL7v3 based (but defined in the context of XCPD):
- XCPD Patient Location Request
- XCPD Patient Location Response
[Deprecated] Model-based validation web services
To increase the code maintainability and the power of the validation of XML documents and messages, we chose to develop model-based validation services. Those services are available through the External Validation Service Front-end (aka EVSClient) of the Gazelle platform but you can also implement your own client to the web services of validation. All of them are built on the same model so you will only need to develop the client once and then "play" with the WSDL location.
Documentation
Below, we describe the methods offered by the web services and the expected parameters.
- about : Gives information about the called web service
- validateDocument : Validates an XML document using the given model-based validator
- @param document : the XML document to be validated
- @param validator : the name of the validator kind
- @return : an XML based structure of the result of the validation
- validateBase64Document : Validates an XML document using the given model-based validator based on a B64 description of the document
- @param base64Document : base64 encoded document
- @param validator : the name of the validator kind
- @return : an XML based structure of the result of the validation
- getListOfValidators : Returns the list of available validators
- @param descriminator: in some cases we may need to use the descriminator in order to select the validators to return (example : IHE, EPSOS, etc)
- @return : a list of string containing allowed validators' name
Web service client
We have develop a web service client for our proper needs to access these services. It's a Maven based project available in our Nexus repository. The latest release is available at http://gazelle.ihe.net/nexus/index.html#nexus-search;gav~~gazelle-ws-client*~~~
WSDL locations
| Validation Service | Location | Descriminators |
| CDA documents |
https://gazelle.ihe.net/CDAGenerator-ejb/ModelBasedValidationWSService/ModelBasedValidationWS?wsdl |
|
| ATNA logging messages |
|
IHE, epSOS |
| XD* metadata |
https://gazelle.ihe.net/XDStarClient-ejb/ModelBasedValidationWSService/ModelBasedValidationWS?wsdl |
IHE, epSOS |
| DSUB messages |
https://gazelle.ihe.net/XDStarClient-ejb/DSUBModelBasedWSService/DSUBModelBasedWS?wsdl |
IHE |
| HPD messages |
https://gazelle.ihe.net/HPDSimulator-ejb/ModelBasedValidationWSService/ModelBasedValidationWS?wsdl |
IHE |
| SVS messages | ||
| HL7v3 messages |
IHE |
|
| XDW documents |
https://gazelle.ihe.net/XDWSimulator-ejb/ModelBasedValidationWSService/ModelBasedValidationWS?wsdl |
IHE |
| SAML assertions |
https://gazelle.ihe.net/gazelle-xua-jar/ModelBasedValidationWSService/ModelBasedValidationWS?wsdl |
IHE |
| WADO queries |
https://gazelle.ihe.net/XDStarClient-ejb/WADOModelBasedWSService/WADOModelBasedWS?wsdl |
IHE |
[Deprecated] SAML Assertion Validation
Warning: This documentation is out-dated, newest version of the documentation is available at https://gazelle.ihe.net/gazelle-documentation
This tutorial consist on the following steps :
- Overview
- How to perform an SAML document validation
- How to get the current SAML schematrons
- How does SAML validation works
- How to report a bug on SAML schematrons
Overview
SAML documents validation is performed using Schematrons. Those schematrons define the requirements to be tested in an SAML document.
How to perform an SAML document Validation
There is two ways of validating your SAML document :
- Using the Gazelle External Validation Service here.
- Importing schematrons source code to your workspace and process the validation in local.
Importing the schematron project
Since the SAML and the CDA schematrons are part of the same project, please see Importing of the schematron project in the CDA section here.
Validation steps
as for the CDA Document validation based on schematron, the SAML validation steps are :
- verify the assertion is valid XML
- verify the assertion is welformed (XSD validation)
- verify the assertion pass the schematron checks
How to get the current SAML schematrons
The current SAML schematron are the final schematrons used for the SAML documents validation in the Gazelle External Validation Service. Those schematron are available in :
How does SAML validation works
Architecture
Here below the source schematrons available for the SAML validation.

'Make_dist.sh' scipt
Details about the processing of this scrip, please see here.
Since the developed SAML schematrons doesn't use inclusion, nor phases,and all the requirements fits into one file, the 'makedist' script preprocessing consists mainly on :
- Reformating and indenting the schematrons
- Building xsl from schematrons
'Validate.sh' script
The validation thanks to this script remains the same as for the CDA validation.
How to report a bug on SAML schematrons
Issues on SAML schematrons can be reported in the Gazelle issue tracker available here.
- Log in to post comments
[Deprecated] WADO validator
Warning: This documentation is out-dated, newest version of the documentation is available at https://gazelle.ihe.net/gazelle-documentation
Gazelle WADO Validator
Gazelle WADO Validator is dedicated to the validation of WADO request message through SOAP web service calls.
The validation of WADO request can be performed against DICOM PS 3.18 or IHE RAD TF-3 (RAD-55 transaction) standards. Notice that perform a validation against IHE RAD TF-3 includes the validation against DICOM PS 3.18.
This validation service is available through a web service API so it can be integrated in your application. If you wish to validate messages occasionnaly you can use the Gazelle Validation Front-End called EVS Client which puts at your disposal a user interface to validate WADO requests, HL7 messages, CDA documents, XD* requests and so on.
Web Service
The web service API of the tool offers three methods:
- validateDocument(): validates the given message and sends back a validation report
- about(): gives information about the running version of the tool
- getListOfValidators() : return the list of validator names. Each validator represent a standard against the message can be validated.
The definition of the web service API is available here.
The validateDocument() method has the following prototype:
public String validateDocument(String, String) throws SOAPException ;
- The first parameter stands for the message to validate itself.
- The second parameter is the validator to use for validation. The available names list can be retreive using getListOfValidators().
EVSClient Validation
EVSClient use the webservice to offer a GUI for validation the WADO requests.
To access to the validation page you go to http://gazelle.ihe.net/EVSClient/ and from the menu -> IHE -> DICOMWeb -> Validate, you will access to this page :

Select the validator "IHE - WADO", and then copy and past the WADO URL to validate.
Example :

Click then on the button validate.
The result of validation will then displayed. It contains checks about the structure of the WADO request entered :
- checks of the parameters entered
- the structure of each attribute (the OID, etc)
- check of mandatory parameters
- etc
- checks of the consistencies between the parameters
Here an example of a result of validation of a wado request.
Access to existing WADO validation results
You can access to the results of already validated WADO requests using the menu -> IHE -> WADO -> Validation logs

[Deprecated] XDS Metadata Validator
Warning: This documentation is out-dated, newest version of the documentation is available at https://gazelle.ihe.net/gazelle-documentation
XDS Metadata Validator
XDS Metadata validator is a module developped to validate metadatas on XDS / XCA / XDR / epSOS transactions. he validation is done throw two methods : web service validation, and validation from the GUI using EVSClient.
This validator is under test, this is actually the first version of XDS Metadata validator.
Summary of the validation process
As it was done for XDW validator, the validation of XDS metadata was based on a model driven validation. The principle is the same : we create a model driven description of the content of the XML Metadata, then we write constrains through the model, and from the technical framework.
Webservice validation
The webservice of validation is installed on XDStarClient (http://gazelle.ihe.net/XDStarClient/home.seam). The URL to the webservice is : http://131.254.209.20:8080/XDStarClient-XDStarClient-ejb/XDSMetadataValidatorWS?wsdl. This webservice contains two principal methods :
- validateXDStarMetadataB64 : validation of metadata document by sending a base 64 content to the webservice
- validateXDStarMetadata : validation of a structured XML document
We advice you to use the first method : validateXDStarMetadataB64, this can prevent from errors due to encoding, white spaces, etc.
Here are an example of a SOAPUI project that uses this webservice to validate an XDS-epSOS metadata Document as XML, and to validate a base64 XDS file. The soapui used is soapUI-3.5.
User interface validation
EVSClient offers a user interface to validate directly XDS Metadata. So you can upload an XDx metadata, then you can validate it, or you can directly write your metadata to the GUI of the tool. To access to EVSClient you have to go to this link : http://gazelle.ihe.net/EVSClient/. On EVSClient, we have divided the XDS metadata to two kind : epSOS and IHE.
- epSOS metadata validation
To access to epSOS metadata validation, you have to go first to EVSClient GUI, the you have to select the menu : XDS --> epSOS --> epSOS Metadata Validation :

When accessing to the validation page, you are able to upload a metadata document, a soap request or response, or the body of the soap message, the two kind are accepted by the validator. Also you can write the content of the metadata by selecting the radio button "write-doc".
 The reset button allow you to initialize the upload area.
The list of validators available for epSOS are :
- epSOS DispensationService:initialize - request
- epSOS DispensationService:initialize - response
- epSOS DispensationService:discard - request
- epSOS DispensationService:discard - response
- epSOS ConsentService:put - request
- epSOS ConsentService:put - response
- epSOS ConsentService:discard - request
- epSOS ConsentService:discard - response
- epSOS OrderService:list - request
- epSOS OrderService:list - response
- epSOS PatientService:list - request
- epSOS PatientService:list - response
These validators are conform to V2.2 of the document WP34_D342. For the validators of OrderService:list and PatientService:list, they are conform to the V2.2, so the validation is done for the version conform to XCF and not to XCA. The validation generate a list of errors, warning and notes.
To access directly to the epSOS validator GUI, you can go directly to http://gazelle.ihe.net/EVSClient/xds/epsos/validator.seam.

- IHE metadata validation
To access to IHE metadata validation, you have to go first to EVSClient GUI, the you have to select the menu : XDS --> IHE --> IHE Metadata Validation :
 The IHE XDS validation has the same GUI components : an upload area and a selectOneMenu item, to select what validator to use for the validation. Actual validators for IHE metadatas are :
- IHE Provide and Register Set-b - request
- IHE Provide and Register Set-b - response
- IHE Registry Stored Query - request
- IHE Registry Stored Query - response
- IHE Retrieve Document Set - request
- IHE Retrieve Document Set - response
- IHE Cross Gateway Query - request
- IHE Cross Gateway Retrieve - response
List of validated XDS Metadata
for each of epSOS and IHE metadata, a page that list all validated metadatas was created. To access to list of validated epSOS metadata, you have to go to the menu : XDS --> epSOS --> Validated epSOS Metadatas
- Log in to post comments
[Deprecated] XDS-SD Document validation
Warning: This documentation is out-dated, newest version of the documentation is available at https://gazelle.ihe.net/gazelle-documentation
This page explains how to check that the PDF embedded in an XDS-SD document is a valid PDF/A document. The IT-Infrastructure technical framework requires that XDS-SD document embedding a PDF, that the PDF shall be conform to PDF/A ISO 19005-1b
In order to validate the embedded PDF, first the PDF needs to be extracted from the CDA document. Then it needs to be validated.
Extract the PDF from the CDA
When validating CDA documents that contains embedded PDF documents, the EVS Client now proposes a link to validate the embedded PDF.
Use the HL7 -> Validate CDA tool , validate your CDA. If you click on the HTML tab to render the document. Then the embedded PDF will be displayed. You can then save it on your disk. Otherwize you can click on the link on the top of the document to access the PDF/A validation of the document.
PDF/A document validation
Validation of PDF/A document is challenging topic and many tools are available to perform that task. More information about validation can be found in the following report :
Please find in that PDF/A Competence Center a list of PDF/A validation tool of interest. We are describing here how to perform the validation using two of the tool listed in the PDF/A Competence Center site : pdfaPilot2 from Callas. The tool is available for windows and mac platform. You can ask for a 7 day evaluation license.
- Start the callas pdfaPilot2 tool.
- Drag the pdf in the application window
- Generate the report
An alternative tool : http://www.validatepdfa.com/fr/ will to validate a PDF/A per email. The report is sent to your mailbox.
You might as well use the JHOVE tool for the validation of your documents. See in the following example the output for a valid PDF/A-1 Level B document.
~$ jhove -m PDF-hul Inconnu-16.pdf
Jhove (Rel. 1.4, 2009-07-30)
Date: 2011-03-28 23:10:58 CEST
RepresentationInformation: Inconnu-16.pdf
ReportingModule: PDF-hul, Rel. 1.8 (2009-05-22)
LastModified: 2011-03-28 23:10:47 CEST
Size: 284080
Format: PDF Version: 1.3
Status: Well-Formed and valid
SignatureMatches: PDF-hul MIMEtype: application/pdf Profile: Linearized PDF, ISO PDF/A-1, Level B PDFMetadata: Objects: 37 FreeObjects: 1 IncrementalUpdates: 1 DocumentCatalog: PageLayout: SinglePage PageMode: UseNone Info: ...
Generate valid PDF/A 1b documents
Note that OpenOffice is able to generate valid PDF/A documents
Please see also the C# and Java use of iText to generate PDF/A documents : there
[Deprecated] XDW Validation Service
Warning: This documentation is out-dated, newest version of the documentation is available at https://gazelle.ihe.net/gazelle-documentation/
Project Overview
The XDW validation service has been developed to validate XDW documents generated by XDW actors (Content Creator and Content Cpdater). The validation is done through two methods : web service validation, and validation from the GUI using EVSClient.
This validator is under test, this is actually the first version of XDW validator.
Summary of the validation process
This validation was based on a model driven validation. The content of XDW Document was presented as an UML model, each specification on the technical framework was writen as a constraint on this model. After that, a code generator was used to generate a java model, and a java validator classes. The code generated has an XML binding, using jaxb annotations. This binding allow to read XDW documents, to convert them to java instances, and then to validate them. The code of templates can be uploaded from the svn repository :
https://scm.gforge.inria.fr/svn/gazelle/branches/simulators/XDW-parent/net.ihe.gazelle.xdw.model/
Here there are an explanation of how to do the checkout of sources from the svn sources repository.
Webservice validation
A webservice was implemented to validate XDW document. The webservice contains two methods of validation, the first one is for the XDW document content, the second is a validation for XDW document encoded on base64. We recommand to use the second validation method, because some problems oN THE validation can occure when copying the content of the XML to the webservice.
The webservice used is :
Here are an example of a SOAPUI project that uses this webservice to validate an XDW Document as XML, and to validate a base64 XDW file. The soapui used is soapUI-3.0.1
User interface validation
EVSClient offers a user interface to validate directly XDW files. So you can upload an XDW file, then you can validate it. To access to EVSClient you have to go to this link : http://gazelle.ihe.net/EVSClient/. The tools for the validation of XDW documents is in this link : http://gazelle.ihe.net/EVSClient/xdw/validator.seam. You can access to this link from the menu on the EVSClient project : XDW --> XDW Validation.

The result of validation is like this :
 The validation contains three types of validation :
- XML validation, to see if we have a well formed XML
- XSD validation, to validate the XDW document using the schema of XDW.
- model driven validation, using the model of XDW containing contraints writen from the TF of XDW.
For each validation, we generate a summary with the Validation Date and the Validation Status. Also for each validation we generate a unique permanent link, that we can refer to it when we need. The permanent link is like this : http://gazelle.ihe.net/EVSClient/xdwResult.seam?id=XXX. From this link, we can revalidate the document, or we can download the entire XDW file. Also we can view on this link the content of the XDW file, on the bottom of the html page.
XSL presentation
This tool offers the possibility to visualize the content of the XDW document using a stylesheet. The result of the view is generally like this :
 This representation contains many informations from the XDW documents :
- General information : instanceId, status, WD reference
- Patient informations
- List of authors
- List of tasks
- List of document histories
List of validated documents
We can access to the list of XDW documents validated by users, using the menu XDW --> Validated XDWs.
 In this page, we can view all XDW documents, or we can perform an advanced search of documents. The seach can be done using attributes like validation status, user, and validation date. Each document has an unique ID.
[Deprecated] Gazelle Proxy - Installation & configuration
Warning: This documentation is out-dated, newest version of the documentation is available at https://gazelle.ihe.net/gazelle-documentation/Proxy/installation.html
Proxy is the part of the Gazelle testbed which is used to capture the messages exchanged between two systems under test. This tool is also bind to the EVSClient in order to validate the messages stored in the Proxy in a very simple way.
As for the other tools, the proxy is an open source project and its sources are available at https://scm.gforge.inria.fr/svn/gazelle/Maven/gazelle-proxy/. You can either download the latest tagged version or the current trunk.
Compilation
Gazelle testbed tools are built using Maven 3, when you have download the sources, go to the gazelle-proxy folder and execute
mvn -P public clean package
You will get an EAR in the gazelle-proxy-ear/target folder.
Installation
You can download the latest gazelle-proxy.ear in nexus http://gazelle.ihe.net/nexus/index.html#nexus-search;quick~gazelle-proxy.ear
/!\ BE CAREFUL /!\
We have ported the proxy to Jboss 7. The Jboss 5 version is maintained for bug fixes, but new features will only be added to the Jboss 7 version. If you are using the Jboss 5 version, use EAR 3.X.X, for Jboss 7 use version 4.0.0 or above.
To Summarize :
- Jboss 5 : from version 0.1 to 3.X.X
- Jboss 7.2.0 (download link): from version 4.0.0 and above
/!\ BE CAREFUL /!\
Then, follow the instructions below:
- In your database (postgresql 8.4 or higher) create a database named "gazelle-proxy", using UTF-8 encoding and owned by the user gazelle
createdb -U gazelle -E UTF8 gazelle-proxy
- On your file system, create a directory /opt/proxy/DICOM
- Put the ear in the deploy folder of your Jboss AS
- Start Jboss AS
- Execute the sql script available in your workspace at gazelle-proxy-ear/src/main/sql/init.sql
psql -U gazelle gazelle-proxy < init.sql
- Open your favorite browser (we recommand Chrome or Firefox) and go to http://yourServer:8080/proxy
- The proxy is now up and running, see the next section for information on the configuration.
This new instance of the proxy is running without the CAS feature, that means that anyone accessing the tool has the administrator privileges.
If you rather want to use a single-sign one authentication, configure the application in this way. Edit the preference application_works_without_cas to set it to false,
Called tools
Check that dcmtk is installed on the machine. Actually, the proxy uses dcmdump to render the dicom files.
Configuration
There is a set of properties that you can configure on the Configuration page, the table below describes the various properties defined and their default values.
| Property name | Description | Default value |
| application_documentation |
The link to the user manual. |
http://gazelle.ihe.net/content/proxy-0 |
| application_issue_tracker | The link to the section of the issue tracker where to report issues about the Gazelle Proxy tool | http://gazelle.ihe.net/jra/browse/PROXY |
| application_release_notes | The link to the application release notes of the tool | http://gazelle.ihe.net/jira... |
| application_works_without_cas | Specifies if the CAS should be used or not, if no CAS is used, property shall be set to true otherwise, it's set to false | true |
| application_url | The URL used by any user to access the tool. The application needs it to build permanent links inside the tool | http://localhost:8080/proxy |
| cas_url | If you intent to use a CAS, put its URL here | https://gazelle.ihe.net/cas |
| evs_client_url | The URL of the EVSClient application. This is required to validate the messages captured by the proxy. If you install your own instance of the proxy, you also need your own instance of the EVSClient tool. (Do not forget the tailing slash) | http://gazelle.ihe.net/EVSClient/ |
| ip_login | if the application is not linked to a CAS, you can choose to restraint the access to the administration sections of the application to a subset of IP addresses | false |
| ip_login_admin | regex to be matched by IP address of the users granted as admin | .* |
| max_proxy_port |
Specifies the high limit for the opened ports |
11000 |
| min_proxy_port | Specifies the low limit for the opened ports | 10000 |
| proxy_ip_addresses | This property is used to inform the users of the IP address(es) to use to contact the proxy | 131.254.209.16 (kujira.irisa.fr), 131.254.209.17 (kujira1.irisa.fr), 131.254.209.18 (kujira2.irisa.fr), 131.254.209.19 (kujira3.irisa.fr) |
| proxy_oid | For each tool, we need an OID which uniquely identify the instance of the tool and the URL used to send back results. | 1.1.1.1.1 |
| storage_dicom | Absolute path to the system folder used to store the DICOM datasets | /opt/proxy/DICOM |
| time_zone | The time zone used to display the timestamps |
Europe/Paris |
[Deprecated] PatientManager
Warning: This documentation is out-dated, newest version of the documentation is available at https://gazelle.ihe.net/gazelle-documentation
Click here to enter the PatientManager
Introduction to the Patient Manager tool
The Patient Manager tool emulates the actors involved in the management of the patient demographics and visits. It can act as a test partner that supports the following actors:
| Integration profile | Actor | Option | Affinity Domain | development status |
|---|---|---|---|---|
|
PAM |
Patient Demographic Supplier |
Merge |
IHE |
available for testing |
|
PAM |
" |
Link/Unlink |
IHE |
available for testing |
|
PAM |
Patient Demographic Consumer |
Merge |
IHE |
available for testing |
|
PAM |
" |
Link/Unlink |
IHE |
available for testing |
|
PAM |
Patient Encounter Supplier |
Basic subset |
IHE |
available for testing |
|
PAM |
" |
Inpatient/Outpatient Encounter Management |
IHE |
available for testing |
| PAM | " | Pending Event Management | IHE | pending |
| PAM | " | Advanced Encounter Management | IHE | pending |
| PAM | " | Temporary Patient Transfers Tracking | IHE | pending |
| PAM | " | Historic Movement Management | IHE | pending |
|
PAM |
Patient Encounter Consumer |
basic subset |
IHE |
available for testing |
|
PAM |
" |
Inpatient/Outpatient Encounter Management |
IHE |
available for testing |
| PAM | " | Pending Event Management | IHE | pending |
| PAM | " | Advanced Encounter Management | IHE | pending |
| PAM | " | Temporary Patient Transfers Tracking | IHE | pending |
| PAM | " | Historic Movement Management | IHE | pending |
| PDQ | Patient Demographics Consumer | Patient Demographics and Visit Query | IHE | available for testing |
| PDQ | " | Pediatric demographics | IHE | available for testing |
| PDQ | Patient Demographics Supplier | Patient Demographics and Visit Query | IHE | available for testing |
| PDQ | " | Pediatric demographics | IHE | available for testing |
| PDQv3 | Patient Demographics Consumer |
Continuation Pointer Pediatric demographics |
IHE | available for testing |
| PDQv3 | Patient Demographics Supplier |
Continuation Pointer option Pediatric demographics |
IHE | available for testing |
| PIX | Patient Identity Source | IHE | available for testing | |
| PIX | Patient Identifier Cross-Reference Consumer | PIX Update Notification | IHE | available for testing |
| PIX | Patient Identifier Cross-Reference Manager | IHE | available for testing | |
| PIXV3 | Patient Identity Source | Pediatric demographics | IHE | available for testing |
| PIXV3 | Patient Identifier Cross-Reference Manager | Pediatric demographics | IHE | available for testing |
| PIXV3 | Patient Identifier Cross-Reference Consumer | PIX Update Notification | IHE | available for testing |
Release Notes
Change logs for the simulator can be found here
Roadmap
Information about the roadmap of the PatientManager project can be found in the jira page.
[Deprecated] Patient Manager - FAQ
Warning: This documentation is out-dated, newest version of the documentation is available at https://gazelle.ihe.net/gazelle-documentation
My SUT configuration does not appear in the drop-down menu
Two things can be the reason of this issue:
- According the actor you are testing, the listed configurations are not the same. Consequently, if you are testing against the PDS, check that your SUT is set as a PDC and if you are testing against the PES, check that you have configured your SUT as a PEC. Solution: edit the configuration and select the appropriate actor.
- If you are not logged in and your configuration has been set to private (You have uncheck the "Do you want this configuration to be public?"), you are not allowed to see it because the application can not identify you. Solution: logged in using CAS.
I do not understand the messages received by my SUT
In order to be compliant with the highest number of systems, we have chosen to ask the user which encoding character set is supported by his/her SUT. This option can be chosen in the "SUT configuration" page. If none is given, the default one is UTF-8.
In another hand, if you try to send a patient with european characters using the ASCII character set for example, it is trivial that some characters cannot be "translated" and consequently not understood by your SUT.
HL7 validation says my message contains errors but I think it's wrong
Two answers:
- Only the international Technical Framework is taken into account by now, if you are developing a national extension, there might be some differences
- We do our best to maintain the HL7 message profile files as the new versions of the Technical Framework are released, we may have missed some changes, so please, be kind, and report those issue into JIRA under the PAMSimulator project so that we can take your remark into account and, if needed, update the message profile.
- Log in to post comments
[Deprecated] Patient Manager - User Manual
Warning: This documentation is out-dated, newest version of the documentation is available at https://gazelle.ihe.net/gazelle-documentation
Click here to access the Patient Manager tool
- Introduction
- What is this simulator able to do?
- How to add your system as a receiver
- How to do HL7 validation
- How to create a patient & share it with the Order Manager tool
- Log in to get more features
Introduction
The Patient Manager tool is developed in conformance with the IHE Technical Framework. This tool is also conformant with the French national extension for the PAM profile. This simulator is expected to act as an initiator or as a responder depending on the emulated actors.
As an initiator, this simulator is aimed to send messages to a responder. Consequently, if your system (named SUT or System Under Test) is ready to listen to an HL7 initiator and reachable from the Internet, you will be able to receive messages from the simulator.
The table below gathers the supported transactions and SUT actors.
| Simulated actor | Transaction | Option | Affinity Domain | System Under Test |
|---|---|---|---|---|
|
Patient Demographic Supplier |
ITI-30 |
Merge |
IHE |
Patient Demographic Consumer |
|
Patient Demographic Supplier |
ITI-30 |
Link/Unlink |
IHE |
Patient Demographic Consumer |
|
Patient Demographic Supplier |
ITI-47 |
Continuation Pointer Pediatric demographics |
IHE |
Patient Demographic Consumer |
|
Patient Demographic Consumer |
ITI-30 |
Merge |
IHE |
Patient Demographic Supplier |
|
Patient Demographic Consumer |
ITI-30 |
Link/Unlink |
IHE |
Patient Demographic Supplier |
| Patient Demographic Consumer | ITI-21 | Pediatric demographics | IHE | Patient Demographic Supplier |
| Patient Demographic Consumer | ITI-22 | Pediatric demographics | IHE | Patient Demographic Supplier |
| Patient Demographic Consumer | ITI-47 | Continuation pointer Pediatric demographics |
IHE | Patient Demographic Supplier |
|
Patient Encounter Supplier |
ITI-31 |
Basic subset |
IHE |
Patient Encounter Consumer |
|
Patient Encounter Consumer |
ITI-31 |
Basic subset |
IHE |
Patient Encounter Supplier |
| Patient Encounter Supplier | ITI-31 | Inpatient/Outpatient encounter management | IHE | Patient Encounter Consumer |
| Patient Encounter Consumer | ITI-31 | Inpatient/Outpatient encounter management | IHE | Patient Encounter Supplier |
| Patient Encounter Consumer | ITI-31 FR | All | IHE-FR | Patient Encounter Supplier |
| Patient Identity Source | ITI-30 / ITI-8 / ITI-44 | IHE | Patient Identifier Cross-reference manager | |
| Patient Identity Cross-Reference Consumer | ITI-10 / ITI-9 / ITI-46 / ITI-45 | PIX Update Notification | IHE | Patient Identifier Cross-reference manager |
| Patient Identity Cross-Reference Manager | ITI-8 / ITI-30 /ITI-44 | IHE | Patient Identity Source | |
| Patient Identifier Cross-Reference Manager | ITI-10 / ITI-9 / ITI-46 / ITI-45 | IHE | Patient Identitfier Cross-Reference Consumer | |
| ADT | RAD-1 / RAD-12 | IHE | ADT Client (MPI, OF/DSS, OP ...) |
What is this simulator able to do?
This simulator has been developed with the purpose of helping developers of IHE systems to test their systems with another IHE compliant system for pre-Connectathon testing or during off-connectathon periods. We try to manage most of the cases, that means that, step by step, we planned to offer you all the events defined in the Technical Framework. We also plan to implement national extensions if requested by the different organizations.
For more details regarding an actor in particular, follow one of the links below:
- PAM Patient Demographic Supplier
- PAM Patient Demographic Consumer
- PAM Patient Encounter Supplier
- PAM Patient Encounter Consumer
- PDQ Patient Demographic Consumer
- PDQ Patient Demographic Supplier
- PIX Patient Identity Source
- PIX Patient Identifier Consumer
- PIX Patient Identifier Cross-Reference Manager
- PDQv3 Patient Demographic Consumer
- PDQv3 Patient Demographic Supplier
- SWF ADT
- PIXV3 Patient Identity Source
- PIXV3 Patient Identifier Cross-Reference Manager
- PIXV3 Patient Identifier Cross-Reference Consumer
- PAM Automation
How to add your system as a receiver
The Patient Manager has been designed to send HL7V2/HL7V3 messages to your system under test (eg if you are testing PAM/PDC, PIX Manager, Order Placer, Order Filler, or others).
In order to send messages to your system under test, the Patient Manager tool needs the configuration (IP address/listening port, endpoint, receiving facility/application and no on) of your receiving system. This configuration has to be stored in the database of the application, so that you can re-use this configuration without creating it each time you need to perform a test. The procedure is different depending on the version of HL7 your system is implementing.
In both cases, if you are logged in when creating the configuration, you will be set as the owner of the configuration. If you do not want other testers to send messages to your SUT you can uncheck the box "Do you want this configuration to be public?" and you will be the only one to be able to select your system in the drop-down list (if logged in !).
HL7V2 Systems Under Test
Go to "System Configurations-->HL7 Responders" and hit the "Create a Configuration" button. You can also copy ![]() or Edit
or Edit ![]() an existing configuration.
an existing configuration.
In both cases, the simulator needs to know:
- A name for your configuration (displayed in the drop-down list menus)
- The actor played by your system under test
- The receiving facility/application
- The IP address
- The port the system is listening on
- The charset expected by your SUT
If you are logged in when creating the configuration, you will be set as the owner of the configuration. If you do not want other testers to send messages to your SUT you can uncheck the box "Do you want this configuration to be public?" and you will be the only one to be able to select your system in the drop-down list (if logged in !).
If your system implements several actors, you are expected to create a configuration for each of them.
HL7V3 Systems Under Test
Go to "System Configurations-->HL7V3 Responders" and hit the "Create a Configuration" button. You can also copy ![]() or Edit
or Edit ![]() an existing configuration.
an existing configuration.
In both cases, the simulator needs to know:
- A name for your configuration
- The name of the tested system
- Its endpoint location
- Its device id root OID
- Its organization OID
- The list of transactions which are supported by your system
If the same endpoint is used by several actor, you only need to register your system once with the supported transaction correctly set.
How to do HL7 validation
The simulator communicates with our HL7 validator which performs validation of HL7V2.x messages (based on HL7 message profiles developed by the Gazelle team and the NIST) and validation of HL7V3 messages (model-based engine developed by Gazelle team). For each received and sent messages, you can ask the simulator to validate the messages. Below is the meaning of the different icons you can meet in the Test Report section of each page or under the HL7 messages menu (gathers all the messages received and sent by the simulator).
|
Open the pop-up containing the received and sent messages beside their validation results. The validation service is automatically called each time you hit this button. Consequently, the validation result you see is always the one matching the newest version of the message profile. |
|
|
The message has not been validated yet. Hitting this button leads to the same action as the previous icon (magnifying glass). |
|
|
The message has been successfully validated. Hitting this button leads to the same action as the previous ones. |
|
|
The message has been validated but the message contains errors. |
|
|
Open a pop-up containing the list of SUT which can received this message. Enables the user to send again a specific message. Be aware that the simulator can only be asked to replay a message sent by it (not received from another SUT) |
How to create a patient & share it with the Order Manager tool
Patients created within the Patient Manager can be sent to an external SUT. These patients can also be used with the Order Manager tool, so that a patient in the Patient Manager database can be used by the Order Manager to create HL7 orders and DICOM Modality Worlist.
Here's how:
- Create a new patient in the Patient Manager (eg in the "ADT" or "PAM-->Patient Demographics Supplier" menu)
- Then, select menu "All patients"
- Use the filters and column headings on that page to find your patient.
- In the "Action" column for that patient, select the
 icon to 'Create a worklist or order for an existing patient'. This button will launch the Order Manager application, and you can proceed to create an Order or Worklist.
Logging in to get more features
The login link ("cas login") is located in the top right corner of the page.
Note that, like the other applications from Gazelle testing platform, PatientManager is linked to our CAS service. That means that, if you have an account created in the European instance of Gazelle Test Management, you can use it, if you do not have one, you can create one now by filling the form here. Note that if you only have an account for the North Americal instance of Gazelle, it will not work with the PaatientManager; you will need to create a new account.
Once you are logged in, you are set as the "creator" of all the patients you create or modify and then (still logged in) you can choose to see only those patients. Another important feature is that you can decide to be the only one to be allowed to send messages to the SUT you have configure in the application (see next section).
- Log in to post comments
[Deprecated] PAM Test Automation
Warning: This documentation is out-dated, newest version of the documentation is available at https://gazelle.ihe.net/gazelle-documentation
The Patient Manager tool has an automation feature named PAM Test Automation. It is available through the PAM section, under the Automation menu. This automaton aims to handle all events of the ITI-31 transaction, sequentially following an order described by a state diagram. The accepted diagram must be in the graphml format and edited with the yEd software.

3 pages are defined in this tool:
-
Execution logs: Display logs results of a graph execution
-
Available automated tests: graphs that are used in an automaton execution
-
Run automaton: Graph execution
-
Execution logs

The logs page displays the results of the various executions done with the automaton. You can filter with the search criteria on the top of the page.
To display a graph execution, click on the corresponding view icon.
From this page, you can visualize the HL7 message request and response in different views (XML, Tree, ER7, RAW) and display the validation details.

-
Available automated tests
This page is dedicated to the display and edit of graph. In the list page, you can see all the graphs. You can create a new graph by clicking on the “Create new graph” button or edit an existing one by clicking on the pencil icon.
As an admin, if you click on the green circle, the graph will be disabled, that means that you can’t use it in a new graph execution. If the disabled graph is never used, he can also be deleted by clicking on the trash icon. A disabled graph which has already be used can’t be deleted. If you want to do it, you first need to delete execution logs related to this graph.

When you create a new graph, you need to import a graphml file describing the PAM events you want to support from a list of authorized events which is displayed at the top of the page; basically, they are those supported by the Patient Encounter Supplier section of the tool.
The graph needs to be edited with the yEd software, otherwise it’s not guaranteed that the imported file will work properly.
Moreover, the patients statuses must be named from the following list :
-
No_Encounter
-
Outpatient
-
Inpatient
-
Preadmit
-
Preadmit_R
-
Preadmit_I
-
Preadmit_O
-
Temporary_Leave
-
Emergency
The easiest way to create your own working graph is to download an already working one, and edit it with yEd by changing the events.
You also have to add a image to help people with understanding how the state diagram is done. One solution is to take a screenshot of the diagram from the yEd software.
-
Run automaton
The last page is devoted to the execution of the automaton. You need to complete these differents steps to run the automaton properly :
-
Select a graph under the Workflow panel. It defines which events will be executed and from which patient’s statuses they can be processed. When selected, a preview of the automaton is available in the right-sided panel. You can zoom on the preview by clicking on the full-screen icon, By default, the automaton stops running when all the patients statuses are reached at least once. However, you can tick the Full movements coverage checkbox to ensure the automaton only stops when all events are processed.

-
The second step is to select the System Under Test (SUT). You can refer to the section 2.3 to configure a SUT.

-
You then need to generate a new patient with the DDS tool. You can select information or let the automaton randomly fill patient data. If you are not satisfied with some information generated by the automaton, you can still click on the “Edit Patient Informations” button to manually change patient data.

-
Select the encounter associated with the patient, as for the patient information, you can either manually fill the encounter or click on the “Fill the encounter with random data” to let the automaton fills the encounter.
-
Click on the Run automaton button

The tests results are displayed in real time. When the automaton is processing, you don’t have to stay on the page, you can leave it, the tests results will appear on the “Execution logs” page when the process will be over. This process can be quite long and obviously depends on how many messages are needed to stop the automaton. Moreover, if you use the full movements coverage mode, it is even longer.
For example, this graph above with 9 patient statused and 38 movements needs an average of 400 messages for the automaton to stop with the Full movements coverage mode. The time between 2 messages being process being approximately of 1,75s, you need to wait 12 minutes for the process to be done, in average.
-
Editing graph with YED Software
To generate a valid graphml file you need to use Yed. It’s quite simple to edit it. You can add edges from a state to another state. The labels must be named with the event name (ex : A21). The initial event which link the start state to another state must be called “ini”.
 As stated before, the easiest way to make a valid graph is to edit a valid one and change the edges, then save the graph.
Your graph can be oriented with what are called “guards”. Guards are parameters which can be set or evaluated when passing into an edge.
Here is the way of affecting a value to a variable when passing through an edge :

Here is the way of saying that the A11 edge can be reached only under conditions :

If your graph is not valid because of unsupported events, a message will be displayed when you try to upload it in Patient manager. However, be careful, it’s not impossible that your graph is invalid for another reason but is accepted by Patient manager and still can be uploaded.
[Deprecated] Patient Manager - ITI-30 initiator
Warning: This documentation is out-dated, newest version of the documentation is available at https://gazelle.ihe.net/gazelle-documentation
The Patient Manager tool implements the Patient Demographic Supplier actor of the PAM integration profile as well as the Patient identity Source actor of the PIX integration profile. Both actors are involved in the ITI-30 transaction. This page of the documentation explains how to send demographics information to your system under test which acts either as a PAM Patient Demographics Consumer or either as a PIX Patient Identity Source.
This simulated actor implements both the Merge and Link/Unlink options. Consequently, the application is able to send the following events for the ITI-30 transaction:
- Create new patient (ADT^A28^ADT_A05)
- Update patient information (ADT^A31^ADT_A05)
- Change Patient Identifier List (ADT^A47^ADT_A30)
- Merge two patients (ADT^A40^ADT_A39)
- Link Patient Information (ADT^A24^ADT_A24)
- Unlink Patient Information (ADT^A37^ADT_A37)
Two starting points
![]()
We try, at the most as we can, to keep a consistency between the different sections. As a consequence, the way you select the system under test and the patient to send is almost the same for each event, as well as the display of the test result, although some specifities can appear.
PAM Patient Demographics Supplier
To access the page dedicated to the PAM Patient Demographic Supplier actor, go to Patient Administration Management --> Patient Demographic Supplier; then you will be able to select which event you want to send to your system under test.
PIX Patient Identity Source
To access the page dedicated to the PAM Patient Demographic Supplier actor, go to PIX/PIXV3 --> Patient Identity Source --> [ITI-30] Patient Identity Management; then you will be able to select which event you want to send to your system under test.
Select the system under test
If your system under test has been properly created in the "System Configuration" section, that means that you have associated it to the right actor (Patient Demographic Consumer or Patient identity Source), you should be able to see it in the drop-down menu. As soon as you have selected it, check that it is the right configuration that is displayed in the panel beside the sequence diagram.
Select the patient
If you are not logged in, the application offer you two way to choose a patient:
"all patients" will display all the patients created in the context of the PAM/PDS or PIX/PAT_IDENTITY_SRC and still active*. You can apply a filter if you want to restrain the search to a certain period.
"generate patient" will display a panel which will enable you to create a patient using our DDS application. You are expected to select at least a country from the drop-down list before hitting the "Generate patient" button.
Note that in some instance of the tool which are not linked to the Demographics Data Server, it is not possible to generate new patients. If you have the administration rights, consult the administration section to read how to import patients from a CSV file.
If you are logged in, a third option is displayed entitled "my patients". By picking this choice, only the active* patient you have created (you were logged in when you create them) are displayed. You can apply a filter if you need to restrain the search to a certain period.
* A patient is active until he/she is merged with or update to another one.
Patient history
All the actions performed on a patient are logged into the application. Consequently, for each patient we can say who has created it, to which systems it has been sent (enclosing in which message), whose patient is updated from he/she and so one. To retrieve all the patients created by the simulator or received from a system under test, go to the All patients menu and filter on the simulated actor.
Configure the message to be sent to your system
 Create a new patient
In this section of the simulator, you can send a message to your system under test to create a patient. This message can contain a patient you have just created using the DDS generation option or an existing patient.
In the first case, several options are offered for the patient generation; you can modify the generated data of the patient, just hit the "Modify patient data" to edit them. If you need specific patient identifiers, go to the "Patient 'sIdentifiers" tab and edit, add or remove identifiers.
In the second case, you only have to select your system configuration and hit the ![]() button on the line of the patient you want. The message is automatically sent and the result of the test is displayed at the bottom of the page.
button on the line of the patient you want. The message is automatically sent and the result of the test is displayed at the bottom of the page.
To send another message, only hit the "select another patient" button.
 Update patient information
In this section of the simulator, you can send a message to your system under test to update a patient. You can either create a new patient using the "generate new patient" option or use an existing one by hitting the ![]() button on the line of the patient you want. In the second case, you will be able to change the information of the patient before sending the update message. Internally, the application create a new patient with the new values and deactive the selected patient.
button on the line of the patient you want. In the second case, you will be able to change the information of the patient before sending the update message. Internally, the application create a new patient with the new values and deactive the selected patient.
Change patient identifier list
This part of the tool enables you to send a message to your system under test to change the value of one of the identifiers of a patient. You can choose to create a new patient and to change his/her identifiers before sending it or to select an existing one. When you choose the second option, a new patient with the new identifier list is created and the "old" one is deactivated. Note that, according to the IHE technical framework, you can change only one identifier at a time. That means that as soon as you validate the new identifier, you cannot change it again or change another one. If you did a mistake, hit the "select another patient" button.
 Merge patients
In this part of the simulator you can send a message to your system under test to notify it about the merging of two patients. In order to create this message, you need to select two patients. The one called "incorrect patient" is used to populate the MRG segment (this patient will be deactivated in the simulator); the other one, called "correct patient" is the patient who remains and is used to populate the PID segment of the message.
Patients can be dragged from the table (using the green frame containing the id) and dropped to the appropriate panel or you can choose to generate one or both patient(s) using DDS.
The message can be sent (button is available) only if two patients are selected.
 Link/Unlink patients
The "link/unlink patients" part of the simulator is used to send unlink/unlink messages to your system under test. As for the "merge patients" section, you can drag and drop patients and/or generate them using DDS. Once you have selected two patients, choose if you want to link them or unlink them. The selected option is highlighted in orange and the sequence diagram at the top of the page is updated according this option, as well as the label of the button you have to hit to send the message.
- Log in to post comments
[Deprecated] Patient Manager - PAM Patient Encounter Consumer
Warning: This documentation is out-dated, newest version of the documentation is available at https://gazelle.ihe.net/gazelle-documentation
The Patient Manager tool implements the Patient Encounter Consumer actor of the PAM profile defined by the IHE technical framework. Currently, this simulator only supports the basic subset of messages and the Inpatient/Outpatient encounter management option. The supported trigger events are:
- Admit patient (ADT^A01^ADT_A01)
- Register patient (ADT^A04^ADT_A01)
- Cancel admit/register patient (ADT^A11^ADT_A09)
- Discharge patient (ADT^A03^ADT_A03)
- Cancel discharge (ADT^A13^ADT_A01)
- Merge patient identifier list (ADT^A40^ADT_39)
- Update patient information (ADT^A08^ADT_A01)
- Pre-admit patient (ADT^A05^ADT_A05)
- Cancel pre-admit (ADT^A38^ADT_A38)
- Change Patient class to inpatient (ADT^A06^ADT_A06)
- Change Patient class to outpatient (ADT^A07^ADT_A06)
- Transfer patient (ADT^A02^ADT_A02)
Two sections (pages) of the Patient Manager application are dedicated to the use of the Patient Encounter Consumer actor. You can reach them going to Patient Administration Management --> Patient Encounter Consumer.

Configuration and messages
When the simulator acts as a PEC, it is only a responder; that means that it is listening on a specific port and sends acknowledgements for the messages it receives. As a consequence, you are not expected to give to the simulator the configuration of the PDC part of your SUT. At the contrary, your SUT needs the configuration of the simulator in order to send it messages. When you go to the page "Configuration and Messages" you can see that various configurations are offered. Actually, in order to be able to properly understand the messages it receives, the simulator needs to open a socket using the appropriate encoding character set. The IP address and the receiving application and facility do not differ from a configuration to another, only the port number should change. Note that if the Character set given in the message (MSH-18) is not the one expected, the message is application rejecting. In the same way that if the receiving application or receiving facility does not match the expected one, the message will be reject with an AR acknowledgment.
In this same page, you can see the list of messages received by the PEC actor. The more recent ones are at the top of the list.
Received Patients
When the simulator receives a message, it tries to integrate it, if it is not able to do it, it sends back an error message. It means that each time it can, it performs the appropriate action on the patient and its encounter. The resolution of patients is done on their identifiers, the resolution of encounters is done using the visit number (PV1-19). For each patient, the list of encounters and movements received are available under the "Patient's encounter" tab.
- Log in to post comments
[Deprecated] Patient Manager - PAM Patient Encounter Supplier
Warning: This documentation is out-dated, newest version of the documentation is available at https://gazelle.ihe.net/gazelle-documentation
The Patient Manager tool implements the Patient Encounter Supplier actor of the PAM profile defined by the IHE technical framework. Currently, the following options are available:
-
Basic subset of messages
-
Inpatient/outpatient encounter management
-
Advanced encounter
-
Historic movement
Moreover, the French extension is supported, so the specific French events are included in Patient Manager and the user can choose to send messages compliant with this national extension.
That means that the events listed below are available:
-
Admit patient (ADT^A01^ADT_A01)
-
Register patient (ADT^A04^ADT_A01)
-
Cancel admit/register patient (ADT^A11^ADT_A09)
-
Discharge patient (ADT^A03^ADT_A03)
-
Cancel discharge (ADT^A13^ADT_A01)
-
Merge patient identifier list (ADT^A40^ADT_39)
-
Update patient information (ADT^A08^ADT_A01)
-
Pre-admit patient (ADT^A05^ADT_A05)
-
Cancel pre-admit (ADT^A38^ADT_A38)
-
Change Patient class to inpatient (ADT^A06^ADT_A06)
-
Change Patient class to outpatient (ADT^A07^ADT_A06)
-
Transfer patient (ADT^A02^ADT_A02)
-
Cancel transfert patient (ADT^A12^ADT_A12)
-
Cancel register patient (ADT^A11^ADT_A11)
-
Change attending doctor (ADT^A54^ADT_A54)
-
Cancel Change of attending doctor (ADT^A55^ADT_A55)
-
Change of conditions of the medico-administrative management (ADT^Z88^ADT_Z88)
-
Cancel change of conditions of the medico-administrative management (ADT^Z89^ADT_Z89)
-
Change of medical ward (ADT^Z80^ADT_Z80)
-
Cancel change of medical ward (ADT^Z81^ADT_Z81)
-
Change of nursing war (ADT^Z84^ADT_Z84)
-
Cancel change of nursing war (ADT^Z85^ADT_Z85)
-
Leave of absence (ADT^A21^ADT_A21)
-
Cancel leave of absence (ADT^A52^ADT_A52)
-
Return from leave of absence (ADT^A22^ADT_A22)
-
Cancel return from leave of absence (ADT^A53^ADT_A53)
-
Move account information (ADT^A44^ADT_A44)
A section (page) of the application is dedicated to this actor, to access it go to Patient Administration Management --> Patient Encounter Supplier.

We have chosen to gather all the events in a same page. In that way, the selection of your SUT, the creation of a new event, its update or its cancellation works in the same way. As soon as a new event is implemented by the simulator it will appear in the drop-down box "Category of event".
-
Select the system under test
If your system under test has been properly created in the "System Configuration" section, which means that you have associated it to the right actor (Patient Encounter Consumer), you should be able to see it and select it in the drop-down menu. As soon as you have selected it, check that it is the right configuration that is displayed in the panel beside the sequence diagram.
Note that if you are logged in, you are set has the "creator" of the patients you create and in that way, by default, the owner filter will be set with your username to see your patients.
-
Sending a message for notifying a new event
In order to set the appropriate action you want to perform, you have to select first the "Category of event" and then the "Action to perform". In the case of the notification of a new event, the action to perform is "INSERT"; make sure the trigger event mentioned between brackets is the one you want.
The following steps differ depending on the category of event you have chosen.
-
Admit/Register a patient
The next step is the selection of the patient:
-
By picking up a patient from the displayed list (this list gathered the patients sent by the PES part of the simulator and ones received by the PDC part of the simulator)
-
Create a patient with random demographics (select the "generate a patient" option.
As described in the Technical Framework, a patient can have only one Inpatient encounter at a time; as a consequence, you will not be able to create a second Inpatient encounter for a given patient until the first encounter is closed (sending of discharge event).
Once the patient is selected, you are asked to fill out the form about the encounter. If you want the application to fill out this form for you, click the "Fill the encounter with random data" button. As soon as you are happy with the values, click on the "Send" button at the bottom of the page to send the message to your SUT.
-
Update patient information
According the Technical Framework, this event is only allowed for a patient with an open encounter.
-
Select the patient for which you want to update the patient demographics
-
Update the fields you want
-
Click on the "Send" button at the bottom of the page.
-
Merge patient identifier list
This event requires two patients, the one with incorrect identifiers and a second one which will be the "good" one, this second one will remain.
-
Drag and drop the ID (in the green box) of the incorrect patient to the "Patient with incorrect identifiers" box.
-
Drag and drop the ID (in the green box) of the correct patient to the "Target patient" box.
-
Click on the "Send" button at the bottom of the page.
-
Other events
Depending of the event you want to insert, you will be asked to fill out some fields, the ones differ from an event to the other but the main principle remains the same.
-
Select the patient for which you want to insert a new event. If the new event requires the patient to have an open encounter, you will not be able to select a patient which has no opened encounters.
-
The list of encounters relative to the patient is displayed; select the encounter for which you want to insert a new event. Note that if you are logged, you will be set as the creator of the encounter and by selecting the "My encounters" option, only "your" encounters will be displayed.
-
Fill out the form (if asked)
-
Click on the "Send" button at the bottom of the page.
-
Sending a message for notifying the cancellation of an event
According the Technical Framework, not all but some of the events can be cancelled. Only the current (last entered) event can be cancelled. To send a notification to cancel an event, follow the steps given below.
-
Select the category of event to cancel in the drop-down list.
-
Select "CANCEL" in the drop-down list entitled "action to perform". Check the trigger event given between brackets is the one you want to send.
-
Select the movement to cancel (only the current one can be cancelled according to the Technical Framework).
-
A pop-up raises, check the information given and click on the "Yes" button.
- Log in to post comments
[Deprecated] Patient Manager - PDQ Patient Demographics Supplier
Warning: This documentation is out-dated, newest version of the documentation is available at https://gazelle.ihe.net/gazelle-documentation
The PatientManager is able to act as a Patient Demographics Supplier for the Patient Demographic Query integration profile. Both the Pediatric Demographics and Patient Demographic and Visit Query options are implemented. As a consequence, the simulator can be used as a responder for the following transactions:
- ITI-21: Patient Demographics Query
- ITI-22: Patient Demographics and Visit Query
ITI-21: Patient Demographics Query
The table below gathers the parameters the simulator is able to map to its database to perform the query and send back the batch of corresponding patients. Note that when several parameters are provided, the AND operator is used to build the database query; the "*" wildcard is supported to substitute zero or more characters. The returned patients are those owned by the Patient Demographic Supplier actor. To consult the list of available patients, see http://gazelle.ihe.net/PatientManager/patient/allPatients.seam?actor=PDS . Note that only the subset of active patients is queried.
Table-1 : PQD-3 fields supported by the PDQ/PDS simulator for ITI-21 transaction
|
HL7 FIELD |
ELEMENT NAME |
JAVA OBJECT / ATTRIBUTE (indicative) |
SQL CLAUSE |
EXTRA INFO |
|
PID.3 |
Patient Identifier List | patient.patientIdentifiers | like (ignores case) | also filter according to QPD-8 |
| PID.3.1 | Patient Identifier List (ID Number) | patientIdentifer.fullPatientId | like (ignores case), MatchMode = START | |
| PID.3.4.1 | Patient Identifier List (Assigning Authority - namespace ID) | patientIdentifier.domain.namespaceID | domain namespaceID like (ignores case) | |
| PID.3.4.2 | Patient Identifier List (Assigning Authority - universal ID) | patientIdentifier.domain.universalID | domain universal ID like (ignores case) | |
| PID.3.4.3 | Patient Identifier List (Assigning Authority - universal ID Type) | patietnIdentifier.domain.universalIDType | domain universal ID type like (ignores case) | |
| PID.3.5 | Patient Identifier List (Identifier Type Code) | patientIdentifier.identifierTypeCode | like (ignores case) | |
| PID.5.1.1 | Patient Name (family name/surname) | patient.lastName | like (ignores case) | |
| PID.5.2 | Patient Name (given name) | patient.firstName | like (ignores case) | |
|
PID.7.1 |
Date/Time of Birth | patient.dateOfBirth | between 'date 0:00 am' to 'date 11:59 pm' | date format : yyyyMMddHHmmss |
|
PID.8 |
Administrative Sex | patient.genderCode | equals | Gender code (F, M ...) |
|
PID.11.1 |
Patient Address (Street) | patient.street | like (ignores case) | |
| PID.11.3 | Patient Address (City) | patient.city | like (ignores case) | |
| PID.11.4 | Patient Address (State) | patient.state | like (ignores case) | |
| PID.11.5 | Patient Address (Zip Code) | patient.zipCode | like (ignores case) | |
| PID.11.6 | Patient Address (Country Code) | patient.countryCode | like (ignores case) | iso3 |
|
PID.18 |
Patient Account Number | patient.accountNumber | like (ignores case) | |
| PID.18.1 | Patient Account Number (ID Number) | patient.accountNumber | like (ignores case), MatchMode = START | |
| PID.18.4.1 | Patient Account Number (Assigning Authority - namespace ID) | patient.accountNumber | like (ignores case) %^^^value, MatchMode = START | |
| PID.18.4.2 | Patient Account Number (Assigning Authority - universal ID) | patient.accountNumber | like (ignores case) %^^^%&value, MatchMode = START | |
| PID.18.4.3 | Patient Account Number (Assigning Authority - universal ID Type) | patient.accountNumber | like (ignores case) %^^^%&%&value, MatchMode = START | |
|
PID.6.1.1 |
Mother's maiden name (last name) | patient.mothersMaidenName | like (ignores case) | |
|
PID.13.9 |
Phone Number - Home (any text) | patient.phoneNumber | like (ignores case) |
ITI-22: Patient Demographics and Visit Query
The table below gathers the parameters the simulator is able to map to its database to perform the query and send back the batch of corresponding patients. Note that when several parameters are provided, the AND operator is used to build the database query; the "*" wildcard is supported to substitute zero or more characters. The returned patients are those owned by the Patient Encounter Supplier actor. To consult the list of available patients, see http://gazelle.ihe.net/PatientManager/patient/allPatients.seam?actor=PES. Note that only the subset of open encounters for active patients is queried.
The parameters gathered in table Table-1 are also supported for this transaction. In addition, you can provide the following parameters (see Table-2).
Table-2 : PQD-3 fields supported by the PDQ/PDS simulator for ITI-22 transaction
|
HL7 FIELD |
ELEMENT NAME |
JAVA OBJECT / ATTRIBUTE (indicative) |
SQL CLAUSE |
EXTRA INFO |
| PV1.2 | Patient class | encounter.patientClassCode | equals | Patient class code (I, O ...) |
| PV1.3.1 | Assigned Patient location (Point of care) | movement.assignedPatientLocation | like (ignores case), MatchMode = START | |
| PV1.3.2 | Assigned Patient location (Room) | movement.assignedPatientLocation | like (ignores case) %^value, MatchMode = START | |
| PV1.3.3 | Assigned Patient location (Bed) | movement.assignedPatientLocation | like (ignores case) %^%^value, MatchMode = START | |
| PV1.3.4 | Assigned Patient location (Facility) | movement.assignedPatientLocation | like (ignores case) %^%^%^value, MatchMode = START | |
| PV1.7 | Attending doctor | encounter.attendingDoctor | like (ignores case) | |
| PV1.8 | Referring doctor | encounter.referringDoctor | like (ignores case) | |
| PV1.10 | Hospital service | encounter.hospitalServiceCode | like (ignores case) | |
| PV1.17 | Admitting doctor | encounter.admittingDoctor | like (ignores case) | |
| PV1.19.1 | Visit number (ID number) | encounter.visitNumber | like (ignores case) | |
| PV1.19.4.1 | Visit number (Assigning authority namespaceID) | encounter.visitNumberDomain.namespaceID | like (ignores case) | |
| PV1.19.4.2 | Visit number (Assigning authority universalID) | encounter.visitNumberDomain.universalID | like (ignores case) | |
| PV1.19.4.3 | Visit number (Assigning authority universal ID Type) | encounter.visitNumberDomain.universalIDType | like (ignores case) |
QPD-8: What domains returned
The list of the domains known by the Patient Demographics Supplier actor is available under Patient Demographics Query / Patient Demographics Suppliers. It is built up from the list of different assigning authorities for which the simulator owned patient identifiers.
Continuation pointer persistence and Query Cancellation
As defined in the technical framework, the Patient Demographics Supplier is able to send results in a interactive mode using a continuation pointer. The list of pointers is regularly cleaned up, a pointer for which no request has been received within the previous hour is destroyed.
When querying the supplier in interactive mode, the Patient Demographics Consumer can send a cancel query message (QCN^J01^QCN_J01) to inform the supplier that no more result will be asked. At this point, the supplier destroys the pointer associated to the provided query tag.
- Log in to post comments
[Deprecated] Patient Manager - PDQ/PDQv3 Patient Demographic Consumer
Warning: This documentation is out-dated, newest version of the documentation is available at https://gazelle.ihe.net/gazelle-documentation
The Patient Manager tool implements the Patient Demographic Consumer for the Patient Demographics Query (PDQ) and Patient Demographics Query HL7V3 integration profiles.
That means that it can send
- the message defined by the ITI-21 and ITI-22 transactions
- QBP^Q22^QBP_Q21
- QBP^ZV1^QBP_Q21
- QCN^J01^QCN_J01
- the messages defined by the ITI-47 transaction
- PRPA_IN201305UV02
- QUQI_IN000003UV01
- QUQI_IN000003UV01_Cancel
Patient Demographics Query (PDQ)
Access the page to create the query to send to your system from menu PDQ/PDQv3 --> Patient Demographic Consumer --> [ITI-21/ITI-22] Patient Demographics (and visits) Query.
Patient Demographics Query HL7V3 (PDQV3)
Access the page to create the query to send to your system from menu PDQ/PDQv3 --> Patient Demographic Consumer --> [ITI-47] Patient Demographics Query HL7v3.
Step by Step
1. Select your system under test
From the drop-down list "System under test", select your system under test. The sequence diagram at the top of the page is updated with the connection information of your system at right, review them.
2. [PDQ only] Select the transaction
From the PDQ PDC page, you can select if you want to test the ITI-21 or ITI-22 transaction. Selected the "Patient demographics and visits query" option will add a panel to configure the query parameter specific to the visit.
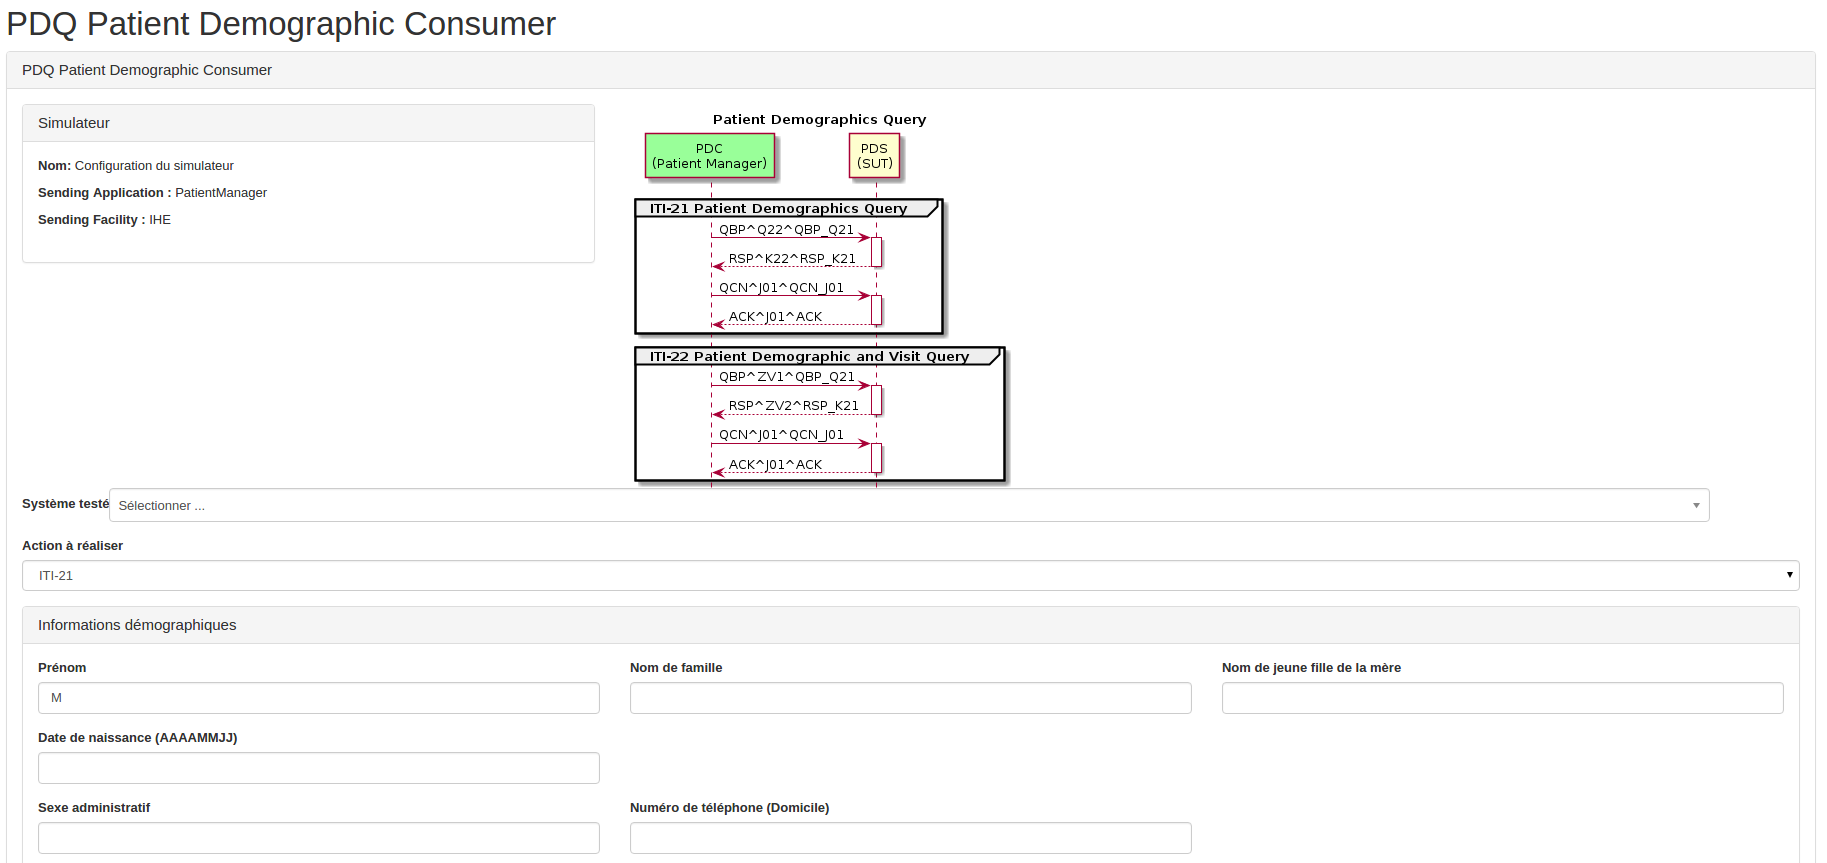
3. Configure the query
Both screens (PDQ/PDQV3) are similar. Only the way to enter the patient identifier is different.
As soon as your query is complete, push the "Send message" button. The query is sent to your system and the exchanged messages are then displayed at the bottom of the page. From there, you will be able to call the Gazelle HL7 validator tool to check the correctness of the response produced by your system.
The response from the supplier is parsed and you are allowed to ask the tool to store the patients for future use (for instance of ITI-31 transaction), use the 'plus' button. To see the details of a given patient (or encounter in the context of ITI-22 transaction), use the magnifying-glass icon.
If you used the "limit value" option, the tool allows use to send the Query continuation message as well as the Query cancellation message.

First limit the number of hints to be returned by the supplier.
The first batch of patients/visits is parsed and displayed.

Then you can send the continuation pointer message (Get next results) and send the query cancellation message (Cancel query).
If you choose to cancel the query, the following message is displayed.
![]()
A new button appears which allows you to send the cancellation query again to make sure that your system took the message into account.
![]()
[Deprecated] Patient Manager - PDQv3 Patient Demographic Supplier
Warning: This documentation is out-dated, newest version of the documentation is available at https://gazelle.ihe.net/gazelle-documentation
The PatientManager is able to act as a Patient Demographics Supplier for the Patient Demographic Query HL7v3 integration profile.
- ITI-47: Patient Demographics Query HL7v3
ITI-47: Patient Demographics Query
The table below gathers the parameters the simulator is able to map to its database to perform the query and send back the batch of corresponding patients. Note that when several parameters are provided, the AND operator is used to build the database query; the "*" wildcard is supported to substitute zero or more characters. The returned patients are those owned by the Patient Demographic Supplier actor. To consult the list of available patients, see http://gazelle.ihe.net/PatientManager/patient/allPatients.seam?actor=PDS . Note that only the subset of active patients is queried.
Table-1 : Query parameters supported by the PDQv3/PDS simulator for ITI-47 transaction
|
Parameter |
JAVA OBJECT / ATTRIBUTE (indicative) |
SQL CLAUSE |
EXTRA INFO |
|
livingSubjectId (extension) |
patientIdentifer.fullPatientId |
like (ignores case), MatchMode = START |
|
|
livingSubjectId (root) |
patientIdentifier.domain.universalID |
domain universal ID like (ignores case) |
|
|
livingSubjectName (family) |
patient.lastName |
like (ignores case) |
by now, only the first occurence is used |
|
livingSubjectName (given) |
patient.firstName |
like (ignores case) |
by now, only the first occurence is used |
|
livingSubjectBirthTime |
patient.dateOfBirth |
between 'date 0:00 am' to 'date 11:59 pm' |
date format : yyyyMMddHHmmss |
|
livingSubjectAdministrativeGenderCode |
patient.genderCode |
equals |
Gender code (F, M ...) |
|
patientAddress (streetAddressLine) |
patient.street |
like (ignores case) |
|
|
patientAddress (city) |
patient.city |
like (ignores case) |
|
|
patientAddress (state) |
patient.state |
like (ignores case) |
|
|
patientAddress (postalCode) |
patient.zipCode |
like (ignores case) |
|
|
patientAddress (country) |
patient.countryCode |
like (ignores case) |
iso3 |
|
mothersMaidenName (family) |
patient.mothersMaidenName |
like (ignores case) |
|
|
patientTelecom |
patient.phoneNumber |
like (ignores case) |
|
Other IDs Scoping organizations
If the otherIDsScopingOrganization parameter is transmitted to the supplier, the simulator behaves as stated in the Technical Framework. To list the identifier domains known by the tool, go to PDQ/PDQV3 --> Patient Demographics Supplier --> HL7v3 Configuration.
Continuation pointer persistence and Query Cancellation
The simulator is able to handle the continuation pointer protocol. If no cancellation messages is received within the 24 hours, the pointer and the associated results are deleted from the system.
[Deprecated] Patient Manager - PIX/PIXV3 Identity Cross-Reference Consumer
Warning: This documentation is out-dated, newest version of the documentation is available at https://gazelle.ihe.net/gazelle-documentation
The PatientManager tool integrates the Patient Identifier Cross-Reference Consumer actor defined by the Patient Identifier Cross-Referencing (PIX) and Patient Identifier Cross-Referencing (PIXV3) integration profiles.
That means that it can
- send Q23 events in the context of the PIX Query (ITI-9) transaction
- receive A31 events in the context of the PIX Update Notification (ITI-10) transaction
- send PRPA_IN201309UV02 messages in the context of the PIXV3 Query (ITI-45) transaction
- receive PRPA_IN201302UV02 messages in the context of the PIXV3 Update Notification (ITI-46) transaction
PIX Update Notification
For this transaction, the Patient Identifier Cross-Reference Consumer actor plays the role of a responder. In this configuration we are not interested in testing the behaviour of the consumer but rather the conformance of the messages sent by the PIX Manager. As a consequence, the PIX Consumer will simply acknowledge the ADT^A31^ADT_A05 and PRPA_IN201302UV02 messages but no other action will be taken.
To send PIX Update Notification messages to our Patient Identifier Cross-Reference Consumer actor, review the configuration of this part of the tool.
This page is reachable from the following menus
- PIX/PIXV3 --> Patient Identity Consumer --> HL7V2 Configuration (for ITI-10/PIX)
- PIX/PIXV3 --> Patient Identity Consumer --> HL7V3 Configuration (for ITI-46/PIXV3)
PIX Query
The Patient Identifier Cross-Reference Consumer actor plays the role of the initiator in the PIX Query (ITI-9) and PIXV3 Query (ITI-45). In this configuration, the tool needs some information concerning your system under test in order to be able to send messages to it. If it is your first time in this application, do not forget to register your system under test as a PIX Manager or PIXV3 Manager, respectively under the SUT Configurations-->HL7 responders or SUT Configurations --> HL7V3 Responders menu.
Step by Step
1. Start your test
From menu
- PIX/PIXV3 --> Patient Identity Consumer --> [ITI-9] PIX Query
- PIX/PIXV3 --> Patient Identity Consumer --> [ITI-45] PIXV3 Query
2. Select your system under test
Select the system under test to query from the drop-down menu entitled "System under test". Look at the connection information displayed at right of the sequence diagram and make sure they meet your system configuration.
3. Configure the query parameters
PIX and PIXV3 screens slightly differs because of the format of the patient identifiers in HL7V2 and HL7V3 but the main purpose is similar.
Fill out the person identifier you want to query your system for. Optionally add one or more domains to be returned in the response.
Finally hit the send message button.
4. Response
The received response is parsed to extract the identifiers returned by your system (if some).
5. Validate the messages
Finally, in the test report section, the messages exchanged for the test are logged and you can ask the tool to validate them; the Gazelle HL7 Validator will be called to do so.
- Log in to post comments
[Deprecated] Patient Manager - PIX/PIXV3 Identity Cross-Reference Manager
Warning: This documentation is out-dated, newest version of the documentation is available at https://gazelle.ihe.net/gazelle-documentation
The Patient Manager tool integrates the Patient Identifier Cross-Reference Manager actor as defined in the PIX (Patient Identifier Cross-Referencing) and PIXV3 (Patient Identifier Cross-Referencing HL7V3) integration profiles.
That means that the tool is able to act
- as a receiver in the context of the Patient Identity Feed (ITI-8), Patient identity Feed HL7V (ITI-44), and Patient Identity Management (ITI-30) transactions
- as a responder of the PIX Query (ITI-9) and PIXV3 Query (ITI-45) transactions.
- as a sender of PIX Update Notification (ITI-10) and PIXV3 Update Notification messages
HL7v2 and HL7v3 endpoints
The configuration of the HL7V2 endpoint of the tool is available from menu PIX/PIXV3 --> Patient Identifier Cross-Reference Manager --> HL7v2 Configuration
The configuration of the HL7V2 endpoint of the tool is available from menu PIX/PIXV3 --> Patient Identifier Cross-Reference Manager --> HL7v3 Configuration
Patient Identity Feed / Patient Identity Management
If your system under test is a Patient Identity Source, it can send messages to our Patient Identifier Cross-Reference Manager. For each new patient received, the tool computes the double metaphone for its first name, last name and mother's maiden name. Then, it looks for similar patients. In our cases patients are similar if
- levenstein distance between first names is strictly lower than 2
- levenstein distance between last names is strictly lower than 2
- levenstein distance between mother's maiden names is strictly lower than 2
- Patients are of the same gender
- Patients are born the same month in the same year
If all those criteria are met, then, the two patients are cross-referenced.
PIX Manager
On ADT message reception, the tool will perform the following actions:
- Parse message and extract patient's demographics data
- Create, update, merge ... the patient according to the received event
- If necessary, automatically references (or unreferences) patients
- Send the acknowledgement
PIXV3 Manager
Currently, the manager only acknowledges the messages received in the context of the ITI-44 transaction. They are not yet integrated, this will come with a future version.
PIX/PIXV3 Query
The Patient Identifier Cross-Reference manager actor integrated into the PatientManager implements the responder part of the PIX Query and PIXV3 Query transactions.
That means that it is able to answer to
- QBP^Q23^QBP_Q21
- PRPA_IN201309UV02
You can consult the list of available patients here (go to PIX/PIXV3 --> Patient Identity Cross-reference Manager --> Cross-References Management)
PIX/PIXV3 Update Notification
If your Patient Identifier Cross-Reference consumer supports the PIX/PIXV3 Update Notification option, you can send ADT^A31^ADT_A05 or PRPA_IN201302UV02 messages from the PatientManager.
Enter your system's configuration
If this is your first time in the application, you need to register your system under test in the tool.
Go to
- SUT Configurations --> HL7 responders, for PIX Update Notification (HL7V2)
- SUT Configurations --> HL7V3 Responders, for PIXV3 Update Notification (HL7V3)
and register your system as a Patient Identifier Cross-Reference Consumer actor.
Starting points
For PIX profile
Go to PIX/PIXV3 --> Patient Identity Cross-Reference Manager --> [ITI-10] PIX Update notification
For PIXV3 profile
Go to PIX/PIXV3 --> Patient Identity Cross-Reference Manager --> [ITI-46] PIXV3 Update notification
Configure the update notification
First, select your system under test in the drop-down list and check the configuration (at the right of the sequence diagram)
Then, select the list of domains you want to be sent by the tool.

Finally, select the patient you want to receive and hit the ![]() button. The message will be automatically sent to your system, including all the cross-referenced identifiers which match the set of domains you have selected.
button. The message will be automatically sent to your system, including all the cross-referenced identifiers which match the set of domains you have selected.
Manually cross-reference patients
Although the tool automatically performs a cross-referencing of patients received from the patient identity sources, you may want to complete or correct the cross-references made to a patient. The tool offers a section to manage those referencies manually.
Starting point
Go to PIX/PIXV3 --> Patient Identity Cross-Reference Manager --> Cross-references management.
Send notifications to a system under test
At the top of the page, you can choose to send PIX/PIXV3 update notifications to a system under test, each time you change the list of identifiers of a patient.

Each time you will add create/remove a cross-reference, the sending of a message will be triggered if the domains you have selected are concerned. At the bottom of the page will be displayed the messages exchanged with your system so that you can call the validation service to check the conformance of your acknowledgements with the specifications.
Cross-Reference patients
Clicking on the magnifying glass icon on a patient row will display that patient's information. The table at right lists all the patients which are referenced together with that patients.

To cross-reference other patients with the selected one, drag and drop their identifiers to the panel "selected patient".
To remove the reference between two patients hit the red minus icon.
- Log in to post comments
[Deprecated] Patient Manager - PIX/PIXV3 Patient Identity Source
Warning: This documentation is out-dated, newest version of the documentation is available at https://gazelle.ihe.net/gazelle-documentation
The PatientManager tool integrates the Patient Identity Source actor as defined in the Patient Identifier Cross-Referencing profile (PIX) and Patient Identifier Cross-Referencing profile HL7V3 (PIXV3) integration profiles.
That means that the tool is able to initiate the following transactions:
- Patient Identity Management (ITI-30)
- Patient Identity Feed (ITI-8)
- Patient Identity Feed HL7V3 (ITI-44)
Pre-requisites
Before sending your first message to your system under test, do not forget to register it as a Patient Identifier Cross-Reference Manager in the tool. To do so, go to
- SUT Configurations --> HL7 Responders (for PIX)
- SUT Configurations --> HL7V3 Responders (for PIXV3)
Patient Identity Management (ITI-30)
Refer to the following section of the documentation Patient Manager - ITI-30 initiator.
Patient Identity Feed (ITI-8)
The pages dedicated to this transaction is available from the menu PIX/PIXV3 --> Patient Identity Source --> [ITI-8] Patient identity Feed.
For more detailed information on how to generate and send an ADT message, read the page of this user manual dedicated to the PAM Patient Encounter Supplier actor. The same page layout is shared by those actors and the process flow is the same. Only the choice of events differs.
Patient Identity Feed HL7V3 (ITI-44)
The pages dedicated to this transaction is available from the menu PIX/PIXV3 --> Patient Identity Source --> [ITI-44] Patient identity Feed HL7V3.
![]()
For documentation, refer to Patient Manager - ITI-30 initiator with the following differences:
- Only three events are available
- Add Patient Record (= Create new patient)
- Revise Patient Record (= Update patient information)
- Patient Identity Merge (= Merge patients)
- Messages sent are those defined in the ITI-44 transaction (HL7V3)
- PRPA_IN201301UV02 (Add Patient Record)
- PRPA_IN201302UV02 (Revise Patient Record)
- PRPA_IN201304UV02 (Patient Identity Merge)
- Patient Identity Merge
- incorrect patient is used to populate the InReplacementOf element of the PRPA_IN201304UV02 message
- correct patient is the survival patient and is transmitted in the Patient element.
- Log in to post comments
[Deprecated] Patient Manager - SWF ADT
Warning: This documentation is out-dated, newest version of the documentation is available at https://gazelle.ihe.net/gazelle-documentation
The PatientManager tool integrates the ADT actor as defined in the context of the Scheduled Workflow of Radiology profile. That means that the tool is able to send Patient Registration (RAD-1) and Patient Update (RAD-12) messages to your ADT client.
The following events are available for message sending:
- Patient Registration (RAD-1)
- Admission of an in-patient (A01)
- Registration of an out-patient (A04)
- Cancellation of admission/registration (A11)
- Pre-admission of an in-patient (A05)
- Cancellation of pre-admission (A38)
- Patient Update (RAD-12)
- Change Patient Class to in-patient (A06)
- Change Patient Class to out-patient (A07)
- Discharge Patient (A03)
- Cancel discharge (A13)
- Transfer patient (A02)
- Cancel transfer (A12)
- Merge patient - Internal ID (A40)
- Update patient Information (A08)
Before sending your first message to your system under test, do not forget to register it as an ADT Client in the tool. To do so, go to SUT Configurations page and create a new configuration.
The ADT features are available under the ADT menu at http://gazelle.ihe.net/PatientManager
For more detailed information on how to generate and send an ADT message, read the page of this user manual dedicated to the PAM Patient Encounter Supplier actor. The same page layout is shared by both actors and the procedures are the same.
- Log in to post comments
[Deprecated] Patient Manager - [ADMIN] import patients from CSV
Warning: This documentation is out-dated, newest version of the documentation is available at https://gazelle.ihe.net/gazelle-documentation
Users with role admin_role will be able to create patients from a CSV file.
Start from menu Administration --> Import patients from CSV. You will find the list of attributes which can be put in your CSV file. The order of the attributes does not matter since you will have to select how your file is formatted.
Once you have set the format of your file, upload the CSV file (only .csv extension is allowed).
The tool will parse the CSV and display the list of patients found. If you do not want to import some of them, you can remove them from the list using the red cross button.
Choose the simulated actor which will own the patients, you can also ask the tool to generate local OID (PatientManager namespace ID defined in the preferences will be used) and also to compute the double metaphones for the names (used in the context of the PIX profile).
Finally, hit the "Save patients" button and go to All Patients page, your patients should be available there.
[Deprecated] Patient Simulator - PAM Patient Demographic Consumer
Warning: This documentation is out-dated, newest version of the documentation is available at https://gazelle.ihe.net/gazelle-documentation
The Patient Manager tool implements the Patient Demographic Consumer actor defined by the IHE technical framework for the PAM profile. This simulated actor implements both the Merge and Link/Unlink options. Consequently, the application is able to receive and integrate the following events for the ITI-30 transaction:
- Create new Patient (ADT^A28^ADT_A05)
- Update patient Information (ADT^A31^ADT_A05)
- Change Patient Identifier List (ADT^A47^ADT_A47)
- Merge two patients (ADT^A40^ADT_39)
- Link Patient Information (ADT^A24^ADT_A24)
- Unlink Patient Information (ADT^A37^ADT_A37)
Three sections (pages) of the Patient Manager tool application are dedicated to the use of the Patient Demographic Consumer Actor. You can reach them going to Patient Administration Management --> Patient Demographic Consumer. The 3 pages are available through the related icons.
The first icon is to access to the configuration and messages
The second icon is to access the received patients page
The third one gives you an access to the patient links page
Configuration and messages
When the simulator acts as a PDC, it is only a responder; that means that it is listening on a specific port and sends acknowledgements for the messages it receives. As a consequence, you are not expected to give to the simulator the configuration of the PDS part of your SUT. At the contrary, your SUT needs the configuration of the simulator in order to send it messages. When you go to the page "Configuration and Messages" you can see that various configurations are offered. Actually, in order to be able to properly understand the messages it receives, the simulator needs to open a socket using the appropriate encoding character set. The IP address and the receiving application and facility do not differ from a configuration to another, only the port number should change. Note that if the Character set given in the message (MSH-18) is not the one expected, the message is application rejecting. In the same way that if the receiving application or receiving facility does not match the expected one, the message will be reject with an AR acknowledgment.
In this same page, you can see the list of messages received by the PDC actor. The more recent ones are at the top of the list.
Received Patients
When the simulator receives a message, it tries to integrate it, if it is not able to do it, it sends back an error message. It means that each time it can, it performs the appropriate action on the patient. The resolution of patients is done on their identifiers.
Create new Patient
A new patient is created if none of the given identifiers is already used by another active patient. If one of the identifiers is in use, the PDC application-rejects the message with error code 205 (duplicate key identifier). The creator of the patient is set to sendingFacility_sendingApplication.
Update Patient information
If one of the given identifiers matches an existing patient, the latter is updated with the new values. If the patient does not exist yet, a new patient is created.
Change Patient identifier
If more than one identifier is mentionned in PID-3 or in MRG-1 fields, the message is application-rejected. In the contrary, we get different cases:
- if both correct and incorrect identifiers are used for an active patient; an error message is sent because a merge action should have been performed instead of the change id.
- If the incorrect identifier identifies an active patient but the correct identifier is unknown, the list of identifiers of the retrieved patient is updated.
- if both correct and incorrect identifier are unknown, a new patient is created using values given in PID segment.
Merge two patients
If more than one PATIENT group is contained in the message, the latter is application-rejected. Otherwise, we get four cases:
- both correct and incorrect patient exist, patients are merged and only the correct one remains.
- the incorrect patient is known but not the correct one, a change patient id action is performed.
- both correct and incorrect patient do not exist, a patient is created using the data contained in PID segment.
- the incorrect patient is unknown but the correct has been retrieved, we do nothing.
Link/Unlink patients
For link case: if both identifiers exists, link them. If one or both of them are missing, create them and link them.
For unlink case: if both identifiers exists and are linked, unlink them. otherwise nothing is done.
Received patient links
When displaying the full information about a patient, you can ask the application to show you the possible links between the patient and the other ones. But in some cases, the PDC may have received a message to link two or more identifiers, the ones do not identify patients. In order to check that the messages you have sent have been taken into account, you can go to this page (Received patient links) and you will see the list of links and their creation date. When two identifiers are unlinked, the link between them is deleted so you are not able to view it anymore.
- Log in to post comments
[Deprecated] HPD Simulator - Installation & Configuration
Warning: This documentation is out-dated, newest version of the documentation is available at https://gazelle.ihe.net/gazelle-documentation
The HPD Simulator has been developed in order to help users with testing their implementations of the Healthcare Provider Directory integration profile published by IHE as trial implementation. This page explains how to install the tool and the underlying LDAP directory. For a full description of the architecture of the tool, please refer to the user manual available in the Gazelle user guides section.
As mentioned in the user guide, the LDAP directory has not been fully developed by the team, it makes use of a 3rd party tool named ApacheDS. This server is open source, certified LDAPv3 and supports DSMLv2. It also embeds a Kerberos Server (which can be useful later if we need to provide tools for the EUA profile). We currently use ApacheDS 2.0.0-M14.
The sources of the projects are available on Inria's Forge at svn://scm.gforge.inria.fr/svnroot/gazelle/Maven/simulators/HPDSimulator.
Pre-requisite
Install ApacheDS
Before installing the HPDSimulator, you will need to install and configure ApacheDS, below are the steps to follow.
In a terminal, enter the command lines below:
$> wget http://archive.apache.org/dist/directory/apacheds/dist/2.0.0-M14/apacheds-2.0.0-M14-amd64.deb
$> sudo dpkg -i apacheds-2.0.0-M14-amd64.deb
When the installation is complete, you can start the server using the command line :
$> sudo service apacheds-2.0.0-M14-default start
The application can start automatically at start-up, run
$> sudo update-rc.d apacheds-2.0.0-M14-default defaults
Install Apache Directory Studio
The Apache Directory Project offers an Eclipse-based tool that you can use as a human-friendly interface for configuring and managing your LDAP Server remotly. It’s called Apache Directory Studio and it is available at http://directory.apache.org/studio/downloads.html.
Configure the connection to the directory
Access the directory from Apache Directory Studio and follow the steps below
-
Start Apache Directory Studio and switch to the LDAP perspective.
-
On the bottom-left corner, a window is displayed with a tab “Connections”, go to this tab and click on “new connection..." button, a dialog box appears.
-
In a first time, you only need to fill out the first tab concerning the network parameters. Note that the default port used by ApacheDS is 10389, there is no encryption needed by default and the Provider to use is “Apache Directory LDAP Client API”.
-
Hit “OK” button when you have finished with this tab. You may now be connected. If not, double-click on the newly created connection. The DIT (Directory Information Tree) of your LDAP server will be displayed in the LDAP Browser window located on the left-hand side of the tool.
-
To log in as an admin, default credentials are :
-
username : uid=admin,ou=system
-
password : secret
Configure the directory
First you need to import the LDIF files which describes the missing LDAP scheme : hpd (defined by IHE), hc (defined by ISO 21091) and rfc2985. This will allow you to access all the object classes and relative attributes defined by these scheme.
To proceed, firrst, download the three following files, they are available in the EAR module of the HPDSimulator maven project at src/main/ldif
- hc.ldif
- hpd.ldif
- rfc2985.ldif
Then, import those three files in your LDAP server, process as follows:
-
In Apache Directory Studio, in the “LDAP browser” window, right-click on ‘Root DSE’ and select Import → Import LDIF...
-
Select your file and “Finish”
-
Do the same for the other files.
Finally, check that the schema has been updated. You shall see three new nodes under ou=schema: cn=hc, cn=hpd, cn=rfc2985
Create nodes subordinate to dc=HPD
According to the HPD integration profile, three nodes are subordinate to dc=HPD:
-
ou=HCProfessional
-
ou=HCRegulatedOrganization
-
ou=Relationship
Each of this three nodes will be represented by an LDAP partition on our server. To create such a partition, double-click on the connection you have previously created to open a page entitled “Your connection name - Configuration”. Go to the “Partitions” tab.
On that page, all the existing partitions are listed. To create a new partition, click on the “Add” button. Do not forget to regularly save this configuration file (Ctrl-S) while adding partitions.
Node HCProfessional
ID: HCProfessional
Suffix: ou=HCProfessional,dc=HPD,o=gazelle,c=IHE
Check the box to have the context entry automatically generated from the DN suffix.
Node HCRegulatedOrganization
ID: HCRegulatedOrganization
Suffix: ou=HCRegulatedOrganization,dc=HPC,o=gazelle,c=IHE
Check the box to have the context entry automatically generated from the DN suffix.
Node Relationship
ID: Relationship
Suffix: ou=Reliationship,dc=HPD,o=gazelle,c=IHE
Check the box to have the context entry automatically generated from the DN suffix.
Additional nodes
We can also add the following nodes (suffix will be built on the same pattern as previous ones):
-
HPDProviderCredential
-
HPDProviderMembership
-
HPDElectronicService
Note that you may have to reset your connection to your server to see the newly created partitions under the RootDSE node. You can now start to add entries into your LDAP server.
Install the HPD Simulator
Requirements
The HPD Simulator tool is a Maven 3 project, sources are available on Inria’s GForge at https://gforge.inria.fr/scm/viewvc.php/Maven/simulators/HPDSimulator/trunk/?root=gazelle.
This application runs under JBoss 5.1.0-GA and uses a postgreSQL 9 database.
Components
HPD Simulator integrates the three actors defined by the Healthcare Provider Directory integration profile of IHE:
-
Provider Information Source
-
Provider Information Consumer
-
Provider Information Directory
Configure the HPD Simulator
Representation of the LDAP schema
In order to help the users with creating the requests to send to Provider Information Directory actor, we need to know the schema of the LDAP server (object classes, attribute types) in the database of the simulator. In this way, we can offer the right list of attributes for a selected object class and make sure that the request will be correct regarding the HPD profile.
LDAPStructure
To make easier the process of populating the database with the LDAP schema, we have chosen to export some informations contained in the LDAP server to the database using an home-made structure. Actually, Apache Directory Studio allows us to export a node of the Directory Information Tree as a DSML searchResponse. That means that we can save on disk an XML file containing a batchResponse with a unique searchResponse which gathered several searchResultEntry elements (one per leaf of the selected node). As the DSML schema is very basic and that it would not have been very convenient to save the schema using this representation, we have defined a new model. The XML schema is available at the following location: HPDSimulator-ear/src/main/xsl/LDAPStructure.xsd. From this XML schema, we have generated the Java classes and as a consequence, we are able to upload an XML file into the application and saving its content in the database of the tool.
Generated the XML files to import
This section describes how to generate the XML files which will be then imported into the tool.
You first need to export as DSML response the nodes/leaves listed below. Each node/leaf will be exported separately:
-
right-click on the node/leaf, select Export → Export DSML...
-
Click on “Next >”
-
Select the location where to store the file and give it a name
-
Check that “DSML Response” is selected
-
Click on Finnish
List of nodes/leaves to export
-
ou=schema,cn=hpd
-
ou=schema,cn=hc
-
ou=schema,cn=rfc2985
-
ou=schema,cn=inetorgperson
-
ou=schema,cn=core,ou=objectClasses,m-oid=2.5.6.7
-
ou=schema,cn=core,ou=objectClasses,m-oid=2.5.6.9
-
ou=schema,cn=core,ou=objectClasses,m-oid=2.5.6.6
-
ou=schema,cn=system,ou=objectClasses,m-oid=2.5.6.0
-
ou=schema,cn=system,ou=objectClasses,m-oid=1.3.6.1.4.1.1466.101.120.111
-
ou=schema,cn=system,ou=attributeTypes
-
ou=schema,cn=core,ou=attributeTypes
-
ou=schema,cn=cosine,ou=attributeTypes
Generate LDAPStructure files
Transform the generated XML files into other XML files (valid against the LDAPStructure.xsd schema) using the XML stylesheet located here: HPDSimulator-ear/src/main/xsl/dsml2LDAPStructure.xsl.
You can perform the transformation using Oxygen or the following command line in the directory where your XML files are located:
&> find . -name '*.xml' -exec saxon-xslt -o '{}' '{}_new.xml' XSL_LOCATION\;
Upload files in HPDSimulator
-
Logged on HPDSimulator with admin_role role, go to Administration → Manage LDAP Server → Upload LDAP Structure.
-
Select the files to upload, you upload ten files at once.
-
Click on the “Upload” button.
When it’s done, you will be redirected to the page gathering the list of object classes.
Browse object classes and attribute types
Logged on the application with admin_role role, you can browse the object classes and attribute types registered in the database of the simulator:
-
Administration → Manage LDAP Server → Object classes
-
Administration → Manage LDAP Server → Attribute types
Definition of LDAP Partitions
In order to access the LDAP server from the simulator, we need to know its IP address and the port on which it is listening. In addition, we do not want users to access all the partitions defined in our server. They shall only be able to modify and make searches on the nodes dedicated to the HPD profile. As a consequence, we use an entity named LDAPPartition which allows us to get the information on the various partitions defined on the server and how to access them.
As we have seen when we have created the partitions on the ApacheDS server, the suffix DN is based on the same ‘root’ for each subordinate node to dc=HPD. As a consequence, in the simulator, an LDAPPartition object stands for the base DN. That means that we have only one LDAPPartition entry for the LDAP partitions we have previously created; it’s base DN is dc=HPD,o=gazelle,c=IHE. This LDAPPartition entry has subordinate nodes which are HCRegisteredOrganization, HCProfessional and Relationship.
A subordinate node is reprensenting by the LDAPNode object which is composed of a name (HCProfessional for instance) and a list of object classes (eg. HCProfessional, naturalPerson, HPDProviderCredential, and HPDProvider).
Create a new LDAPNode
-
Go to Administration → Manage LDAP Server → Manage LDAP Nodes
-
Click on “Create a new node”
-
Enter the name of this node, give a brief description and select the object classes
-
Click on “Save”
Create a new LDAPPartition
-
Go to Administration → Manage LDAP Server → Manage LDAP Partitions
-
Click on “Create a new partition”
-
Fill out the form, select the subordinate nodes
-
Click on “Save”
Application preferences
|
Prefence name |
Description |
Default value |
|
application_name |
The name of the application |
HPD Simulator |
|
application_url |
URL to reach the tool |
http://gazelle.ihe.net/HPDSimulator |
|
application_works_without_cas |
Indicates whether the users are authenticated using the CAS service or another mechanism |
false |
|
assertion_manager_url |
Link to the Assertion Manager tool |
http://gazelle.ihe.net/AssertionManagerGui |
|
dsml_xsl_location |
URL of the stylesheet used to display DSMLv2 messages |
http://gazelle.ihe.net/xsl/dsmlStylesheet.xsl |
|
ldap_password |
Password used to log onto the LDAP server (if authentication is required) |
N/A (no authentication put in place) |
|
ldap_user |
Username used to log onto the LDAP server (if authentication is required) |
N/A (no authentication put in place) |
|
message_permanent_link |
Link to directly access simulator logs |
http://gazelle.ihe.net/HPDSimulator/messages/messageDisplay.seam?id= |
|
NUMBER_OF_ITEMS_PER_PAGE |
How many lines to display in tables |
20 |
|
prov_info_dir_wsdl |
URL to contact the Provider Information Directory endpoint (to be displayed to the user) |
http://gazelle.ihe.net/HPDSimulator-ejb/ProviderInformationDirectory_Service/ProviderInformationDirectory_PortType?wsdl |
|
results_xsl_location |
URL to access the stylesheet to display HPD validation results |
http://gazelle.ihe.net/xsl/hl7v3validatorDetailedResult.xsl |
|
SeHE_mode_enabled |
Is the application configured for MoH needs |
false |
|
svs_repository_url |
Used for the validation of codes in the validation engine |
http://gazelle.ihe.net |
|
time_zone |
To display time in the appropriate time zone |
Europe/Paris |
|
xsd_location |
URI to access the DSMLv2 schema (used by validation service) |
/opt/hpd/xsd/IHE/DSMLv2.xsd |
Upload of the documentation of the validation engine
see http://gazelle.ihe.net/content/configuration-documentation-mbv
[Deprecated] SVS Simulator
Warning: This page is no more maintained by the team. Read new documentation at https://gazelle.ihe.net/gazelle-documentation/
Introduction
The SVS Simulator emulates the Value Set Consumer and Value Set Repository actors defined in the IT-Infrastructure technical framework.
The table below gathers the supported transactions by the simulator:
| Simulated actor | Transaction | Type |
| SVS Consumer | ITI-48 | HTTP / REST |
| SVS Consumer | ITI-60 | HTTP / REST |
| SVS Consumer | ITI-48 | SOAP |
| SVS Consumer | ITI-60 | SOAP |
| SVS Repository | ITI-48 | HTTP / REST |
| SVS Repository | ITI-60 | HTTP / REST |
| SVS Repository | ITI-48 | SOAP |
| SVS Repository | ITI-60 | SOAP |
What is this simulator able to do ?
This simulator has been developed with the purpose of helping developers of IHE systems to test their systems with another IHE compliant system off connectathon periods.
You will be able to use four different components in the SVS Simulator:
- SVS Browser
- SVS Consumer
- SVS Repository
- SVS Validator
Logged in to get more features
As some others applications from the Gazelle testing platform, SVS Simulator application includes the CAS system. That means that you can logged in into the application using your "European" Gazelle account (the one created on the European instance of TestManagement). Once you are logged in, you can decide to be the only one to be allowed to send messages to the SUT you have configure in the application (see next section).
SVS Validator
The SVS Simulator contains a module dedicated to the validation of requests and responses exchanged within SVS transactions. This validator is model-based and its core as been generated using the XML schemas provided by IHE, that is to say:
The validator performs three levels of checks:
- Is the document a well-formed XML document
- Is the document valid against the XSD (SVS.xsd or ESVS.xsd depending the cases)
- Is the document valid against the model and does it respect the constraint defined in the technical framework
The SVS Validator is available through a SOAP web service, you can find the definition of this service at the following location:
A Java client to call this web service is available in the gazelle-ws-clients module deployed on our Nexus repository.
Our EVS Client application contains a user friendly interface to access this validation service. You will only have to upload the XML file to validate and choose the validator to apply (ITI-48 request/response, ITI-60 request/response) . See http://gazelle.ihe.net/EVSClient/svs/validator.seam
Value Set Repository actor
The SVS Simulator is able to act as a Value Set Repository. It currently supports both HTTP and SOAP binding.
The information about the repository (endpoint, details, …) is available on the home page of the application and in the “Value Set Browser” page.
Since you send a request to our repository the transactions will be save in our database. You can consult them in the “Messages” page (see more details in the associate section).
Before sending a request to our repository you can browse the available value sets contained in the simulator's database under the menu “SVS Browser” (see more details in the associate section) to know which request will return result.
You can consult the documentation: IHE ITI Technical Framework Supplement - Sharing Value Sets (SVS) available here for the parameters to use.
Value Set Consumer actor
Adding your system (SUT) in SVS Simulator
In order to send messages to your system under test, the SVS Simulator tool needs the configuration (Name, Endpoint, BindingType) of your system. This configuration is stored in the simulator, so that you can re-use it each time you need to perform a test. In order to register the configuration of your system under test, go to "SUT Configurations" and hit the "Add new SUT" button. You can also see  or Edit
 ![]() an existing configuration.
an existing configuration.
When you add a new system configuration the simulator needs to know:
- A name for your configuration (displayed in the drop-down list SUT)
- The endpoint where requests will be sent
- The Binding Type of your SUT
If you are logged in when creating the configuration, you will be set as the owner of the configuration. If you do not want other testers to send messages to your SUT you can untick the box "Shared" and you will be the only one to be able to select your system in the drop-down list (if logged in !) and see it in the SUT Browser.
If your system implements several Binding Type, you are expected to create a configuration for each of them.
If you’re logged in admin mode, an additional icon is available on the “SUT Configuration” page (![]() ) which allow you to deactivate a SUT. Once, a SUT is deactivated, only admin user can see him and activate it again.
) which allow you to deactivate a SUT. Once, a SUT is deactivated, only admin user can see him and activate it again.
How to use SVS Consumer
The SVS Simulator is able to act as a Value Set Consumer. It currently supports both HTTP and SOAP binding.
You will be able to send a request to a SUT previously registered.
First select the request type (HTTP / SOAP) and the “System Under Test” list will be loaded. If you can't see your system, you may have set it as "not shared" and you are not logged in, log onto the application to see it.
Next, select the SVS transaction you want to perform (ITI-48 or ITI-60)
Fill the form with the parameters and click the “Send” button, your system under test may receive the request generated by the simulator.
If your SUT is listening and sends back a response, the messages sent and received by the simulator will be displayed at the bottom of the page. You can see the content of both the request and the response and validate them. This will call the validator embedded in the simulator, as described before.
All the transactions instances are stored in the database simulator and available to the community. If you rather prefer not to have those messages publish, contact the administrator of the application and provide him/her with the ids of the messages to hide.
Messages
All the transactions played against the simulator are stored in the simulator's database. You can consult the whole list of transactions under the "Messages" menu.
All those transactions can be validated by the SVS Validator, which allows you to know if the request and the response respect the technical framework defined by IHE.
If you click one the ![]() icon it will call the validator for both the request and the response (if they are XML formatted).
icon it will call the validator for both the request and the response (if they are XML formatted).
In the Message Display page (after you click on the glass), you can see the request and the response in XML or HTML.
The Detailed Result of the validation is also display if you have already validated the transaction.
Below are the icons you can find in the "Messages" page:
| |
Open the details of the transaction |
| The message has not been validated yet. | |
| The message has been successfully validated. | |
| The message has been validated but contains errors. |
SVS Browser - Value Sets
The Value Set Repository actor uses the simulator's database to reply to the SVS requests it receives. To populate the database, a user interface is available. Here is a tutorial on how to browse value set.
If you click on the “SVS Browser” menu you will be redirect on the browser value set page which allows browse the content of our value set repository.
You can use filter to search for a specific ValueSet.
If you click on the ![]() icon you will be able to see more details about the value set, all its concept list and associates concepts.
icon you will be able to see more details about the value set, all its concept list and associates concepts.
You can click on a Value Set OID to be redirect in another tab to the REST request for this value set (ITI-48 request).
If you need to add specific value set, contact an admin.
[ADMIN] Manage value sets
The Value Set Repository actors uses the simulator's database to reply to the SVS requests it receives. To populate the database, a user interface is available. Here is a tutorial on how to create/update value sets.
If you’re logged as admin you can see more options in the Browser page.
There are additional buttons available:
- “Add a new value set”, can be used to reach the "Add value set" page. Value set will be created from scratch.
- “Import Value Set from file”, can be used to import value set from SVS formatted files. That means that files must be XML file representing a RetrieveValueSetResponse or RetrieveMultipleValueSetsResponse.
You can also see two more icons in the datatable rows, ![]() to edit a value set, and
to edit a value set, and ![]() to delete the value set (functionnality available on the edit page too).
to delete the value set (functionnality available on the edit page too).
Add a value set
If you want to add a value set click on the associate button and fill the form with general information about the value set. Once you finished this part click on the “Save Value Set” button to save modification and now be allowed to add lists of concepts with the button “Add new ConceptList” or “Add new Translation” (if you have already defined at least one concept list in the Value Set).
When you click on the button “Add Concept List” a pop-up will raised asking you the language of the concept list you will create. Fill the input and click on “Add” button.
Now the Concept List is created, you can click on “Add Concept” to set a new Concept for all Concept List of the value set. You can also translate the existing concept in the new language.
You can click on the “Translation panel” button to open a specific module which allows you to compare two or more concept lists in order to translate them more easily.
You can delete concepts in the main concept list and it will delete it for all concept lists of the value set. If you edit a code in the main concept list it will update it for all concept lists.
If you edit “codeSystem”, “codeSystemName” or “codeSystemVersion” it will update it for all the concepts of the Value Set.
Link anchor are available to navigate more comfortably when there’s a lot of concept lists.
Import value sets
If you want to import a value set click on the associate button.
You can select xml file or zip file (contains xml) to import value set.
Your xml files need to represents RetrieveValueSetResponse or RetrieveMultipleValueSetsResponse to be use by our import system.
When you select a file it will be downloaded and the application will extract the value set(s) from it.
A detailed report will be display once the importation is done.
It is recommended not to gather more than 100 xml files in one zip archive, otherwise the import may not complete successfully.
[ADMIN] Manage group
Value sets can be organized in groups. That means you can create a group for a specific domain (for example epSOS), and put all the value set related to epSOS in this group. A group is also identified by an OID.
Managing groups is done by going to Value Set Browser Group Browser. From there – as an administrator – you can create a new group by clicking on the “Add new group” button.Link a value set to a group
To add a value set in a group, you need to go to the group edit page. From there, you will find a button named “Add new Value Set to group”. When you click on it, a new panel must appears, letting you the possibility to filter to find the value set you are looking for. Then, just click on the  icon to link the value set to the selected group.
[DEVELOPERS] Use of codes in simulator
In addition of the functionalities defined by the technical framework, the simulator is able to provide codes to other tools (from Gazelle platform or external tools).
This Repository give the ability to use more parameters:
- “random” : returns only one concept randomly extracted from the given value set.
- “code” : returns concept defined by this code and the provided value set.
- “id”: still available and mandatory for retrieving the value set
- “lang” (optional): still available to retrieve specific concept list according to its language.
- Log in to post comments
[Deprecated] Gazelle Test Management - Installation & Configuration
Warning: This documentation is out-dated, newest version of the documentation is available at https://gazelle.ihe.net/gazelle-documentation/Test-Management/installation.html
Thanks for having chosen Gazelle !
Here is a guide to help you with installing Test Management.
Quick start
Install Debian squeeze 64bits with an Internet access. As root :
wget http://gazelle.ihe.net/jenkins/job/gazelle-public-release/ws/gazelle-tm-ear/src/main/scripts/setup.sh
chmod +x setup.sh
./setup.sh
When you see the line
[ServerImpl] JBoss (Microcontainer) [5.1.0.GA (build: SVNTag=JBoss_5_1_0_GA date=200905221634)] Started in ...
it means that TM is started. You can configure/access it using http://server:8080/gazelle. Once server is started, you can continue to step 6.
1. Requirements
Gazelle has been developed using Java under Eclipse. You will find below the list of applications you need to compile and run Test Management.
- Compilation : Apache Maven 3.0.4
- Database : PostGresql 8.4
- Java virtual machine : JDK 1.6 or other
- Application server : Jboss 5.1.0-GA
2. Sources
Test Management is an open source project under Apache2 licence. The sources are available on the INRIA's Forge:
svn checkout svn://scm.gforge.inria.fr/svn/gazelle/Maven/gazelle-modules/trunk/ gazelle-modules
svn checkout svn://scm.gforge.inria.fr/svn/gazelle/Maven/gazelle-tm/trunk/ gazelle-tm
3. Database creation and initialization
The name of the database is defined in the pom.xml file. Create this database using the command :
su postgresql
psql
postgres=# CREATE USER gazelle;
postgres=# CREATE DATABASE "your_database" OWNER gazelle ENCODING UTF-8;
postgres=# ALTER USER gazelle WITH ENCRYPTED PASSWORD 'password';
postgres=# \q
exit
Download the file containing all the data required by the application to properly work at : http://gazelle.ihe.net/jenkins/job/gazelle-public/ws/gazelle-tm-ear/src/main/scripts/tm-first-import.data and import it into the newly created database using the pg_restore function as shown below.
pg_restore -U gazelle -h 127.0.0.1 -d your_database tm-first-import.data
4. Compile
Before compiling, go to the directory gazelle-tm and edit the file pom.xml. Open this file and adapt the properties of profile prod to your case :
- basename : root of application. Ex : gazelle → http://server/gazelle
- jdbc.connection.url : replace the last segment with your database name
- jdbc.connection.user / jdbc.connection.password : credentials for database access
Then, create the EAR archive with the command line:
cd gazelle-modules; mvn clean install
cd gazelle-tm; mvn clean package -P prod,distribution
The archive (EAR) and the distribution file are created and placed into gazelle-tm/gazelle-tm-ear/target directory.
5. Deployment
Test Management requires JBoss to have some additional libraries. Stop your Jboss server and copy the postgresql-8.4-702.jdbc4.jar from ditribution file in lib/endorsed JBoss directory. Copy the gazelle-tm.ear into the "server/default/deploy" directory of your JBoss server. Finally, start your server. When the application is deployed, open a browser and go to http://yourserver/TM. If the deployment and the database initialization are successful you should see the home page.
6. Configuration
This instance of Test Management you have just deployed is free of organization, user and testing session. Consequently, the next step will be to create your organization, your account (as an administrator of the application) and the testing session. A testing session is used to hold one event, for example a Connectathon, a showcase or whatever requiring the use of Test Management. If the first part of the installation is successful, you should see the Gazelle home page (see fileentitled Home page before installation).

By hitting the "Start installation" button, you will reach a page dedicated to the different steps of the installation, for each step, a screen capture has been attached (see at the bottom of the page).
- Create your Organization: In Test Management, each user is linked to an organization. Before creating your personal account, you have to register your Organization by providing its name. You are also asking for a keyword, the one will be used in the application to find out your organization and to build the keyword of the various systems you will register.
- Create your Account: Provide the application with your first name, last name, email and password. This account will have the administration rights (admin_role).

- Create the testing session: The testing session is mandatory for using Test Management. You can run several sessions in parallel. For each session you have to provide a long list of informations...

- Configure the application: This part of the installation, is dedicated to the preference settings.
- The application URL is required to build permanent link, the admin name and admin email are used when the application sends emails to the users
- The application home path is the path to the directory where all files required or created by Test Management will be stored. If this folder does not exist, the application creates it (if it has sufficient rights).
- The photos directory is the path to store users' photos; this directory should be accessible through the internet by the application.

- End: Once you have performed those 4 steps, you can hit the Start button. You will be redirect to the Home page, if everythink worked fine during the configuration, you should see the testing session you have just created. Now, you can log in using your newly created account. The application can be published on-line and users will be able to create their own organization and their own account. Then, they should be able to register systems for the domains you have linked to the testing session until the registration deadline you have set.

7. Customize the Home page
The home page is built of two blocks the administrators can customize when they are logged in.
- The main panel is the one which is always displayed and with a header, by default, set to "Main Panel".
- The secondary panel is displayed only if it is not empty. It can be located above or below the main panel. To create it, hit the "create a second panel" button located at the bottom of the main panel.
Each of those two blocks depend on the selected language. That means that, you have to edit those panels in all languages supported by the application. For each panel, you can edit its header title. 
- Log in to post comments
[Deprecated] Gazelle Security Suite
Warning: This documentation is out-dated, newest version of the documentation is available at https://gazelle.ihe.net/gazelle-documentation/Gazelle-Security-Suite/user.html
Overview
Gazelle Security Suite (GSS) gathers several tools dedicated to the testing of the ATNA profile. It embeds :
- A Public Key Infrastructure to share trusted certificates and associated key pairs for testing purpose.
- A SSL/TLS simulator that will simulates clients and servers that can establish secured connection with your system under test (SUT), especially for ATNA profile.
- The ATNA Questionnaire.
This user manual covers each mode.
Location of the Tools
Access the tool at http://gazelle.ihe.net/gss. This instance allows you to request certificates for the European or North American connectathons and perform other ATNA-related pre-Connectathon & Connectathon tests.
Log in
In mostly cases, you will have to be logged in to perform actions in Gazelle Security Suite.
Click on the login link (top right) and select the authentication of your choice, depending of your registration region (European connecthaton or North-American Connectathon).
- For European Connectathons, please use the same username & password as for https://gazelle.ihe.net/EU-CAT.
- For North American Connectathons, use the same credential as for http://ihe.wustl.edu/gazelle-na.
Connectathon testing
In the context of your pre-connectathon and connectathon testing, you will be asked to perform the test ATNA_Authenticate_with_TLS_Tool. It consists to verify that your system is able to perform a correct negotiation during secured connections. Please read the test description, every needed information is provided.
All useable results of secured connection in the tool (like connection or test instance) have a permanent link that can be paste into the corresponding test step in Gazelle Test Management. Please, use it to make easier the monitor graduation.
[Deprecated] Public Key Infrastructure
Warning: This documentation is out-dated, newest version of the documentation is available at https://gazelle.ihe.net/gazelle-documentation/Gazelle-Security-Suite/user.html
Gazelle platform offers its own public key infrastructure : Gazelle PKI. The main use case of this tool is the delivery of signed certificates (and its associated key pair) to all registered participant for a testing session. All thoses certificates are issued by a common certification authority (CA), and participant will just have to add this CA to their trust-store. It is the easier way to set up a trusted cluster dedicated to secured connection testing. Out of this cluster, certificates have no value. Also, PKI provide certificates to the TLS simulator that can be used in any other testing purpose. Finally, PKI comes with a certificate validator accessible trough the user interface and through a Web Service.
In the case of the European connectathon, generated certificates are signed by the IHE Europe certification authority.
Certificate request
Users can request a certificate for testing :
- Once logged, go to "PKI" > "Request a certificate"
- Fill out the form, following fields are required to be provided :
- Certificate type : basic
- the country (from the drop-down list)
- the organization
- the common name (system keyword is OK)
- Finally, hit the "request" button.
Then tool administrators are informed and will process it shortly. To retrieve your request and check its status, go to "Certificates" > "List Certificate requests".
If the request is accepted, the certificate will be generated and signed by the certificate authority of the tool. Finally a notification will be sent to your profile in Gazelle Test Management. You will be able to found the certificate in the list of all certificates "PKI" > "List Certificates", or associated with the request in the list of all requests "PKI" > "List certificate requests".
Depending of the configuration of the tool, certificates can also be immediately signed without administration review. Whether it's the case, you will be redirected to the newly created certificate.
Certificates can be downloaded in various format: PEM and DER. The key pair (private and public) of the certificate you have request for is also available in PEM.
Note that you can also generate a keystore in p12 and JKS (java keystore) formats.
Certificate Validator
Gazelle PKI tool also embeds a certificate validator. You can thus check the conformity of your certificates against several profiles.
- Go to "PKI" > "Certificate validation".
- Load the certificate in PEM/CRT format,
- then select a context and a validator.
Each available validator use the basic certificate validator first and then validate the certificate against specific rules.
- Revokation can also be verified.
- Click on "Validate" to execute the validation.
The result will be displayed on the page. Gazelle Security Suite does not store any validation result.
Certificate validation can also be used from EVSClient. Certificate validators are filtered by context and are dispatch over the menu. The advandage of using EVSClient is the generation of a validation report and its permanent storage.
Request a certificate for Gazelle Single-Sign on service
Gazelle platform has a single-sign on service in order to prevent the user to create a new login in each of the tools offered by the testbed. Read more about this service at : http://gazelle.ihe.net/content/gazelle-single-sign-authentication-users
In each of the tools offered by Gazelle platform, when you use the "CAS login" link, you are asked to provide your CAT credentials. In order to bypass the entering of your credentials, you can, in some Internet browser, import a certificate which will be used to silently authenticate yourself.
To generate this certificate, go to "PKI" > "Install browser certificate for CAS auto-login". Also read http://gazelle.ihe.net/content/cas-autologin
[Deprecated] SSL / TLS Simulators
Warning: This documentation is out-dated, newest version of the documentation is available at https://gazelle.ihe.net/gazelle-documentation/Gazelle-Security-Suite/user.html
The TLS mode gathers two functionnality : the simulators and the connection testing. While simulators can be used to perform exploratory testing, the connection testing provide a more rigorous environnement where test cases are defined and expect specifics results.
Simulators
The simulator is used to effectively test the establishement of a secured connection. It can simulate both side of a connection : client or server. And those simulators are fully tuneable by the administrator of the tool. Here is some example of parameters :
- supported protocols
- supported ciphersuites
- Client side authentication required or not.
- Certificate used
- Trusted certificate authorities
- Revokation checking
Once the simulators are set up, They can be used by any logged user for testing. Running a client is equivalent to do a "secured" ping on a target, while server is a listening channel for connection attempts.
The TLS simulator rely on a dedicated instance of the Gazelle Proxy to intercept messages. It offers a shortcut to validate the message content with EVSClient tool.
Each time a connection attempt is done, whatever the client side or server side it is, a secured connection summary is recorded and is added to the connection list. It informs users about the security negociation result. A blue circle indicates the negociation has succeed, and a red circle the negociation has failed. Details on this connection can be displayed for a better understanding.
Using clients simulators
To initiate a secured connection with a SUT that act as server, simulated clients can be used. Go to "SSL / TLS" > "Simulators" > "Clients". You will see the list of all available clients. Chose one of them and click on "Start a test". On this new page all TLS parameters for this simulator will be sum up. Verify it adress your needs. Simulated client are not dependent on the application message, so you can select the desired kind of message to send. Here is the list of supported application protocol :
- DICOM_ECHO
- HL7
- WEBSERVICE
- SYSLOG
- RAW
Finally input the targeted host and port of your SUT and click on "Start client". The connection attempt will be recorded and displayed below the "Start client" button.
Sometimes connection takes a bit more time than expected and are not immediately displayed. In this case, try to refresh the page.
Using server simulators
Server simulators are permanently listening. To test your SUT acting as a client, you just have to choose one of the availabled and running servers in the list "SSL / TLS" > "Simulators" > "Servers", note its IPaddress (or host) and port and send a message to it with your system. Connections will be recorded, go to "Access logs" or in the "View" page to list them.
In fact, server simulators are just channels that forward the message to a real server. If an answer is expected to your message, pay attention to select a server that forward to a system that can effectively understand the content of your message. It is usually indicated in the keyword of the simulator.
Sometimes connection takes a bit more time than expected and are not immediately displayed. In this case, try to refresh the page.
Secured connection testing
Since EU-CAT 2015, a set of test scenario has been set up to increase the TLS negociation testing part. There is two goals :
- Make easier the graduation of the Authentication testing for the monitors
- Perform error case scenarios to stress the system under test and get a better trust level.
For now, only the systems acting as responder (servers) can run these scenarios.
Test cases overview
go to "SSL / TLS" > "Testing" > "Test Cases". You will see the list of available test cases. For each test, a short description presents the goal of the scenario. In the detailed view, all the parameters that will be used during the test and its expected result are summarized.
At the bottom of the page, all the test instances are recorded. You can apply filters on the list to help you to find your results. To view the detail of a test run, click on the magnifying glass.
Run a test
To run a test, you must previously add the IHE Europe CA certificate to your trust-store.
Click on the "Run" button of the test of your choice. The TLS negociation tests are not dependent on the application message, so you can select the desired kind of message to send. Here is the list of supported application protocol :
- DICOM_ECHO
- HL7
- WEBSERVICE
- SYSLOG
- RAW
Finally input the targeted host and port of your SUT and click on "Run the test". The test instance will be recorded and displayed below.
Sometimes, the TLS Simulator is not initiated and the test instance is marked "NO RUN". In this case, re-launch the test.
Understand the verdict
The verdict of a test is determined according to 3 sub-verdict : the handshake verdict, the alert level verdict, and the alert description verdict. Some of theses sub-verdict can be declared as optional while the others are required. To be PASSED, a test must have all its required verdict to PASSED.
An optional element wiill not be taken into account to calculate the final test verdict and you can consider this element as a warning. Here is an example, where the alert received was a 'certificate_unknown' :

In error test cases, the Handshake is usually expected to be FAILED. However it is not the only requirement ! The simulator expect to receive a fatal/warning alert or a close_notify from the targeted system. If the connection is closed without recieving those alert messages, the Handshake verdict will be failed. For more information about ending a TLS negociation and error alerts, see RFC 2246 section 7.2.
Tips
TLS renegociation
Mostly with IIS servers (Microsoft HTTP server), some resources may be protected. So other a single TLS connection, not authenticated at first, the client request a specific resource (like “GET /secret”). Before responding, server starts a renegociation of the connection. This was a cause of several security failures, mostly fixed now with TLSv1. The renegociation asks a certificate to the client for mutual authentication. Even if it is over a single TLS connection, TLS tools record two connections in the logs. The first one is not valid as it is not requesting a certificate, the second one can be valid if it requests for a certificate issued by the CAT certificate authority.
TLS Administration
Simulators
How to create a client
Only one client is needed.
How to create a server
TLS tools must provide one TLS server per protocol. Each server must be started to record connections, on a fixed port accessible from SUTs. TLS server is “dumb” as it can’t provide content to the clients tested. It acts as a proxy to a real server, using an unencrypted connection. For each protocol, an available server must be found. However, it can be simplified as follows :
- DICOM : OrderManager DICOM server
- HL7v2 : OrderManager HL7v2 server
- HTTP, Syslog, Raw : any HTTP server (Gazelle one for simplicity)
How to update server parameters
Once a server it's created, we can only change its connection parameters (listening port, remote host/port)
[Deprecated] Patient Manager - Installation & Configuration
Warning: This documentation is out-dated, newest version of the documentation is available at https://gazelle.ihe.net/gazelle-documentation
The PatientManager project was firstly named PAMSimulator since it was only dedicated to the testing of the actors defined in the Patient Administration Management (PAM) integration profile. Later we need to implement the PIX and PDQ actors and decided to have all the tools concerning the management of patient demographics, identifiers and encounters in a same place and the PAMSimulator became the PatientManager. However, the maven project has not been renamed and is still named PAMSimulator.
Sources & binaries
To get the name of the latest release, visit the PAM project in JIRA and consult the "Change log" section.
If you intent to you the CAS service provided by Gazelle at https://gazelle.ihe.net or if you choose to not use the CAS, you can download the last release of the tool, available in our Nexus repository.
Note that
- if you use the CAS service provided by Gazelle, you will have access to the administration tasks only if you have the admin priviledges in Gazelle
- if you do not use a CAS service, users will not be able to authenticate theirselves and any user can access the administration tasks (see the Configuration section for an overview of those tasks)
If you have your own CAS service, you need to package your own version of the tool. Proceed according the following steps:
- Checkout the last tagged version available in Gazelle sources repository ($versionName will depend of the release you want to checkout)
svn co https://scm.gforge.inria.fr/svn/gazelle/Maven/simulators/PAMSimulator/tags/PAMSimulator-$versionName
- Edit PAMSimulator/pom.xml file and in the public profile section, update the cas.url properties to match your CAS service URL
- Package the project
mvn -P public clean package
- The binary will be available in PAMSimulator/PAMSimulator-ear/target folder
Database configuration
The PDQ part of the simulator uses fuzzystrmatch extension of postgreSQL. Follow the instructions below to enable this module in your database:
- Install the contrib module of postgreSQL
sudo apt-get install postgresql-contrib
- Restart postgreSQL (if an application is using it, first close it)
sudo /etc/init.d/postgresql restart
- Login as postgres user
sudo su postgres
- Enable the fuzzystrmatch module
# for psql 9.1 and above
psql
postgres# CREATE EXTENSION fuzzystrmatch;
# for psql 8.4
psql -U postgres -d pam-simulator -f fuzzystrmatch.sql
Installation
- Check the General considerations page, it will inform you about the prerequisites for installing Gazelle tools.
- Create a new database named pam-simulator, using encoding UTF-8 and owned by gazelle
createdb -U gazelle -E UTF8 pam-simulator
- Copy the EAR in your JBoss server and start it.
- Connect to the database and execute the initialization script. If you have checkout a copy of a tagged version, this file is available at PAMSimulator/PAMSimulator-ear/src/main/sql/import.sql
- If you do not intent to use any CAS service, execute the following SQL command
update app_configuration set value = 'true' where variable = 'application_works_without_cas';
- Finally, open your favorite browser (please avoid usage of IE), and go to http://yourJbossInstance/PatientManager
Configuration
Application preferences
User the Administration menu, you will find a sub-menu entitied "Configure application preferences". The following preferneces must be updated according to the configuration of your system. The table below summarizes the variables used by the PatientManager tool.
| Variable | Description | Default value |
|
application_url |
The URL used by any user to access the tool. The application needs it to build permanent links inside the tool |
http://publicUrlOfJboss/PatientManager |
|
application_namespace_id |
Defines the namespaceID of the issuer of the identifiers generated by the tool |
IHEPAM |
|
application_universal_id |
Defines the universal ID of the issuer of the identifiers generated by the tool. It's formatted as an OID and shall be unique across all instances of PatientManager tool |
a uniquely defined OID |
|
application_universal_id_type |
Defines the type of universal id |
ISO |
|
cas_url |
URL of the SSO service |
https://gazelle.ihe.net/cas |
|
create_worklist_url |
The URL of the OrderManager instance you may use to create DICOM worklists |
|
|
default_pdq_domain |
For PDQv3, defines if we use SeHE or ITI rules |
ITI |
|
hl7v3_organization_oid |
OID of the organization issuing/receiving HL7v3 messages |
a uniquely defined OID |
|
hl7v3_pdq_pdc_device_id |
Identifies the PDQv3/PDC actor of the tool |
a uniquely defined OID |
|
hl7v3_pdq_pds_device_id |
Identifies the PDQv3/PDS actor of the tool |
a uniquely defined OID |
|
hl7v3_validation_xsl_location |
Stylesheet for displaying HL7v3 validation service reports |
http://gazelle.ihe.net/xsl/hl7v3validatorDetailedResult.xsl |
|
hl7v3_validator_url |
URL of the web service exposed by Gazelle HL7 Validator for validating HL7v3 messages |
http://sake.irisa.fr:8080/GazelleHL7v2Validator-GazelleHL7v2Validator-ejb/GazelleHL7v3ValidationWS?wsdl |
|
pdqv3_pds_url |
Endpoint of the PDQv3/PDS embedded in the tool (for display to the user) |
http://ovh1.ihe-europe.net:8180/PAMSimulator-ejb/PDQSupplier_Service/PDQSupplier_Port_Soap12?wsdl |
|
sending_application sending_facility |
Used to populate MSH-3 and MSH-4 fields of the HL7 messages produced by the tool |
PAMSimulator IHE |
|
time_zone |
Defines which time zone to use to display dates and timestamps |
Europe/Paris |
|
application_works_without_cas |
Tells the application how users are authenticated |
True: all users are granted as admin False: uses a CAS service to authenticate users |
|
ip_login |
whether to enable or not the authentication by IP address |
false |
|
ip_login_admin |
if ip_login = true, a regex to grant users with admin role according to their IP addresses |
.* |
|
dds_ws_endpoint |
Location of the Demographic Data server WSDL |
|
|
gazelle_hl7v2_validator_url |
URL of the Gazelle HL7 Validator tool |
http://gazelle.ihe.net/GazelleHL7Validator |
|
svs_repository_url |
URL of the Sharing Value Set Repository actor of the SVSSimulator |
http://gazelle.ihe.net |
|
timeout_for_receiving_messages |
How long must the HL7 initiator wait for a response (in ms) |
10000 |
|
url_EVSC_ws |
URL of the Gazelle HL7 Validator wsdl (the one for HL7v2.x validation) |
|
|
use_ids_from_dds |
DDS generates patient identifiers, the PatientManager can use them or generate its own using the application_namespace_id and application_universal_id. This value is used as the default choice on patient generation panel |
true |
|
xsl_location |
URL to access the XML stylesheet used to display HL7v2.x validation results |
HL7v2.x responders
From the Administration/HL7 Responders configuration page, you will be able to configure each actor of the tool playing the role of a responder in a HL7-based transaction. A configure consists in the receiving application and facility and the port on which it listens to incoming messages. The IP address is not used by the server but must be set properly so that the users can configure their systems under test to communicate with the tool. DO NOT update the other parameters, it would prevent the tool from working correctly.
Note: When you update a configuration, do not forget to restart it.
Home page
The first time you access the application, you may notice that the home page of the tool is not configured. To set a title and a welcome message, log into the application with admin rights (every user can update this if you are not using CAS).
Note that you will have to set up this page for all the languages supported by the application.
[Deprecated] Schematron-based Validator
This version of the documentation is deprecated. Up-to-date version can be found at https://gazelle.ihe.net/gazelle-documentation
Project Overview
This application is part of the External Validation Service provides by the Gazelle project. This project is made of two parties:
- A Web interface enables the administrator of the application to register new schematrons
- A Web Service enables the user and other Gazelle applications to validate objects using those schematrons.
- A GITB Web Service enables the user and other Gazelle applications to validate objects using those schematrons.
By now, schematrons have been writen for the following kinds of documents:
- CDA documents (epSOS and/or IHE compliant)
- HL7v3 messages (epSOS and IHE compliant)
- SAML Assertions (epSOS compliant)
- ATNA log messages (epSOS compliant)
The list of available schematrons is likely to become richer in the future. One can access the webservice using the EVS Client Front-end, access to the schematrons used for the validation of documents is available from this same application.
Unless a user would like to perform mass document validation using the webservice functionality of that tool, the Schematron validation should be performed using the GUI provided by the EVS Client Front-end. The rest of this page is mainly for the users interested in learning more about the validation process and the methodology to call the webservice.
Validation based on Schematron
The validation based on schematron can be performed for any kind of XML files (CDA, HL7v3 messages, SAML Assertions and so on). The XML document is processed three times before the tool can give the validation result.
- We first check the document is a well-formed XML. If it is not the case, the validation stopped and the FAILED result is sent back.
- Then, if the invoked schematron is linked to an XSD schema, we check the document is valid according to the schema. If it is not the case, the validation will go on but the result will be FAILED. Concerning CDA documents, we distinguish IHE CDA from epSOS CDA. At XSD validation step, the first ones are validated against CDA.xsd and the second ones against CDA_extended.xsd.
- Then, if the document is of type CDA, we validate against the abstract CDA model specification (CDA validation details)
- Finally, the XML document is validated against the selected schematron. Validation is performed using Saxon 9HE.
Web Service
The wsdl describing the service is available here. (https://gazelle.ihe.net/SchematronValidator-SchematronValidator-ejb/GazelleObjectValidatorWS?wsdl) You can also download a soapui sample project to have an example of how to use each offered method, see the attachment section of this post or download it from here.
Functionnalities
Schematron-based Validator implements various web service methods which are:
- aboutThisApplication: returns the information about current application release running on server.
- getAllSchematrons: returns the list of all Schematron objects stored in the database. See javadoc for more information about the Schematron object attributes.
- getSchematronByName: returns a Base64-encoded String reprensenting the content of the schematron file selected by its name.
- getSchematronForAGivenType: returns the list of schematrons which are linked to the given object type (CDA, HL7v3 ...)
- validateObject: validate the given XML document against the given schematron.
- getAllAvailableObjectTypes: returns the list of object type that can be validated using this validator.
Validation results are format as an XML document, the XSLT stylesheeet which can be used to pretty display the results is available here, the associated CSS file is available here.
The javadoc documenting all these methods will be soon available.
Static WS Client for Schematron-based Validator Web Service
We have generated a Static Web Service client using Axis 2. This related jar is stored in our maven repository and is easy to use. You only have to make a dependency to the artifact as shown below.
<dependency>
<groupId>net.ihe.gazelle.maven</groupId>
<artifactId>SchematronValidatorWSClient</artifactId>
<version>1.0</version>
<packaging>jar</packaging>
</dependency>
GITB Web Service
The wsdl describing the GITB service is available here. (https://gazelle.ihe.net/SchematronValidator-SchematronValidator-ejb/GazelleObjectValidatorWS?wsdl) You can also download a soapui sample project to have an example of how to use each offered method, see the attachment section of this post or download it from here.
Functionnalities
Schematron-based Validator implements various web service methods which are:
- getModuleDefinition: returns the information about current application release running on server.
- validate: validate the given XML document against the given schematron.
[Deprecated] Order Manager - Installation & Configuration
This documentation is out-of-date, we are now maintaining this page: https://gazelle.ihe.net/gazelle-documentation/Order-Manager/installation.html
Sources & binaries
To get the name of the latest release, visit the Order Manager project in JIRA and consult the "Change log" section.
A maven artifact is published in our Nexus repository each time we release the application. You can use it, but be aware that the link to the database is hardly expressed within the artifact so you will have to use the same database name, owner (and password).
To get the artifact on Nexus browse: http://gazelle.ihe.net/nexus/index.html#nexus-search;gav~~OrderManager-ear~~~ and download the latest version.
If you rather want to build the project by yourself, you must checkout the latest tag and package it. You may want to create a new profile to customize your build.
1. Checkout the latest tag available on Inria’s forge: svn co https://scm.gforge.inria.fr/svn/gazelle/Maven/simulators/OrderManager/tags/OrderManager-$versionName
2. [Optional] Edit the pom.xml file and create a new profile
3. Package the application: mvn [-P profile] clean package
4. The EAR is available at OrderManager/OrderManager-ear/target/OrderManager.ear
Database configuration
If you use the artifact available on Nexus or if you have not change this parameter in the pom.xml file, create a database named order-manager, owned by the user gazelle.
createdb -U gazelle -E UTF8 order-manager
Dcmtk
Installation
The OrderManager tool makes use of the OFFIS Dicom toolkit to manage its DICOM worklist. You need to locally installed the latest version of dcmtk in your environment. If you run a Debian-like operating system, execute:
sudo apt-get install dcmtk
We recommand to use version 3.6.0 of the toolkit, you can verify the version with the following command line: wlmscpfs --version
Configuration
DCMTK operation is based on file-based, it thus requires the creation of a folder to store and retrieve the worklists. The path to the root folder can be configured in the database (see Application Configuration section), the sub folders shall be created as follows
$ROOT = /opt/worklists
Sub-folders: RAD_OF, EYE_OF, _DISABLED, exchanged
To enable the worklist to look into directories, you also have to create empty files named “lockfile” in RAD_OF and EYE_OF folders.
Finally, change owner and give writing access to jboss:
sudo chown -R dcmtk:jboss-admin worklists
sudo chmod -R g+w worklists
Deploy the application
Copy EAR to the deploy folder of JBoss (do not forget to change its name to OrderManager.ear)
Start Jboss ⇒ sudo service jboss start
Wait until the application has been completly deployed and configure the database running:
Initialize the application
You first need to initialize the database with some data available in a SQL script. If you have checked out the project, the script is available in OrderManager-ear/src/main/sql/import.sql
Otherwise, download it from Inria’s forge at: ???
Before executing the script, open the file and checked the various preferences to be inserted in the app_configuration table, especially the cas_url, application_url and other preferences relative to the user authentication (see Application configuration section)
Finally, execute the script: psql -U gazelle order-manager < import.sql
To take those parameters into account, you need to restart either the whole Jboss ($>sudo service jboss restart), either only the application ($>touch OrderManager.ear in the deploy folder of Jboss)
Application configuration
Use the Administration menu, you will find a sub-menu entitied "Configure application preferences". The following preferences must be updated according to the configuration of your system. The table below summarizes the variables used by the OrderManager tool.
|
Variable |
Description |
Default value |
|
application_url |
The URL used by any user to access the tool. The application needs it to build permanent links inside the tool |
http://publicUrlOfJboss/OrderManager |
|
cas_url |
If you intent to use a CAS, put its URL here |
https://gazelle.ihe.net |
|
application_works_without_cas |
Tells the application how users are authenticated |
True: all users are granted as admin False: uses a CAS service to authenticate users |
|
ip_login |
if the application is not linked to a CAS, you can choose to restraint the access to the administration sections of the application to a subset of IP addresses |
true: only users whom IP address matches the regex set in ip_login_admin are granted as admin false: no IP address check |
|
ip_login_admin |
regex to be matched by IP address of the users granted as admin |
.* will grant every one as admin |
|
analyzer_serial_number |
OID used to populate OBX-18 in the messages sent by the analyzer in the context of the LAW profile |
OID formatted string |
|
time_zone |
Defines which time zone to use to display dates and timestamps |
Europe/Paris |
|
xsl_location |
URL to access the XML stylesheet used to display HL7v2.x validation results |
|
|
dds_ws_endpoint |
Location of the Demographic Data server WSDL |
|
|
gazelle_hl7v2_validator_url |
URL of the Gazelle HL7 Validator tool |
http://gazelle.ihe.net/GazelleHL7Validator |
|
svs_repository_url |
URL of the Sharing Value Set Repository actor of the SVSSimulator |
http://gazelle.ihe.net |
|
timeout_for_receiving_messages |
How long must the HL7 initiator wait for a response (in ms) |
10000 |
|
url_EVSC_ws |
URL of the Gazelle HL7 Validator wsdl (the one for HL7v2.x validation) |
|
|
dicom_proxy_port |
The port on which the Order Manager listens to to forward the worklist queries to dcmtk |
|
|
proxy_port_low_limit |
the lowest value of port the tool tries to use |
10130 |
|
dcm_data_set_basedir |
where to store the DICOM dataset exchanged between the SUT and the simulator |
/opt/worklists/exchanged |
|
dicom_proxy_ip |
The IP address shows to user to contact the worklist through the Order Manager |
basically, the IP address of the server the JBoss AS is running on |
|
documentation_url |
Url of the user manual in Drupal (link displayed in the footer of the application) |
|
|
eye_order_hierarchy_location |
Location of the XML file used to perform the matching between orders and procedures/protocols in the context of the Eyecare workflow profile |
|
|
order_hierarchy_location |
Location of the XML file used to perform the matching between orders and procedures/protocols in the context of the scheduled workflow profile |
|
|
pam_encounter_generation_url |
Patients and Encounters are generated by a called to the PatientManager application, this preference precises the REST endpoint |
http://gazelle.ihe.net/PatientManager/rest/GenerateRandomData |
|
wlmscpfs_host |
where to contact the worklist |
localhost |
|
wlmscpfs_port |
the port on which the worklist listens to |
12345 |
|
worklists_basedir |
where to store worklists for retrieve by dcmtk |
/opt/worklists |
|
SeHE_mode_enabled |
whether to configure the tool for the SeHE use case or for IHE (default) |
false |
HL7v2.x responders
From the Administration/HL7 Responders configuration page, you will be able to configure each actor of the tool playing the role of a responder in a HL7-based transaction. A configure consists in the receiving application and facility and the port on which it listens to incoming messages. You can also configure the encoding for receiving message (always ER7 for IHE) as weel as the transport protocol to be used (always MLLP for IHE). If you are using HL7 over HTTP, you will be asked to provide the URL of the endpoint instead of the IP address/port couple.
The IP address is not used by the server but must be set properly so that the users can configure their systems under test to communicate with the tool. DO NOT update the other parameters, it would prevent the tool from working correctly.
Note: When you update a configuration, do not forget to restart it.
Home page
The first time you access the application, you may notice that the home page of the tool is not configured. To set a title and a welcome message, log into the application with admin rights.
Note that you will have to set up this page for all the languages supported by the application.
[Deprecated] XDStarClient
Warning: This documentation is out-dated, newest version of the documentation is available at https://gazelle.ihe.net/gazelle-documentation
You can access to XDStarClient from this link : http://gazelle.ihe.net/XDStarClient/
Introduction to XDStarClient
XDStarClient is a tool developped by IHE-europe / gazelle team to simulate initiators on XD* profile. Some of implemented actors are already implemented on XDRSRCSimulator and XCAInitiatingGateway simulator. The aim of this simulator is to merge all transactions of XD* to the same tools, to simplify the work of tester and to improve the quality of service.
Merged transaction from XDRSRCSimulator and XCAInitGatewaySimulator are :
- for epSOS domain :
-
- XCA
- ITI-38 : Cross Gateway Query
- ITI-39 : Cross Gateway Retrieve
- XDR
- XDW (XDS.b)
- XCF
-
- DSUB
- ITI-52 [Document Metada Subscribe - Subscribe Request]
- ITI-52 [Document Metada Subscribe - UnSubscribe Request]
- ITI-53 [Document Metada Notify]
- ITI-54 [Document Metada Publish]
- PHARM-1
- IHE, RAD domain :
- RAD-68 : Provide and Register Imaging Document Set - MTOM/XOP
- RAD-69 : Retrieve Imaging Document Set
- RAD-75 : Cross Gateway Retrieve Imaging Document Set
- RAD-55 : WADO Retrieve
XDStarClient simulate also some responders :
XDStarClient validation services
XDStarClient offers three validation services :
We recommand to vendors of epSOS and IHE domain to use XDStar as a client to simulate XDRSRCSimulator, and XCAInitGatewaySimulator. These two old simulators are actually deprecated, all new corrections will be done on XDStarClient.
AuditMessage Validation
XDStarClient provides a validation service for AuditMessages.
The validation tool is based on schema validation and model based validation, which is different from the model based validation of XDS metadatas. The difference is, we do not define the contraints and the rules from a UML model, but from a GUI integrated into XDSarClient. This GUI describe the same table used by dicom and IHE to describe the elements that should be provided in an audit message. The edition of the constraint can be done from TLS application :
- first you have to login as an administrator
- then go to menu -> administration ->

For a simple user, to view the list of constraint related to a kind of audit message, the user shall go to menu -> documentation ->
To view the specific constraints related to an audit message, you hav to click on the message ID. Each audit message description has a unique permanent URL. Example : http://gazelle.ihe.net/tls/amview/auditMessage.seam?id=45

The wsdl has generally this format : http://ovh3.ihe-europe.net:8180/gazelle-atna-ejb/AuditMessageValidationWSService/AuditMessageValidationWS?wsdl and it is always provided by the administrator of the tool, it depends on the configuration of the server.

DSUB Validation
XDStarClient provides a validation service for DSUB messages.
The validation tool is based on schema and model based validation. The documentation of the constraint from the model of validation can be found on XDStarClient : menu -> Documentation ->

The endpoint of the validation service depend on the XDStarClient installation environment, it will be like this : http://131.254.209.20:8080/XDStarClient-XDStarClient-ejb/DSUBValidatorWS?wsdl

ITI-18 : Registry Stored Query
Tool description
The aim of this tool is to simulate an XDS consumer on the transaction Registry Stored Query (ITI-18), on IHE domain.
This module allow vendors to query registries using XDS metadatas.
To access to this simulator, you have to check the menu Simulators --> IHE --> ITI-18 [Registry Stored Query]
System Configuration
Configurations used on this transaction are registries configurations. To use this tool, you have to select a regstry configuration from the selector component :

If your system's configuration does not appear on the list of configuration to select, please go from the menu to SUT-Configurations --> Registries-configurations. Then you will see all available configurations for testing. To add your configuration you have to click on the button "Create Registry Configuration". If you don't see this button, that's means that you are not logged in. Only logged users are allowed to add a system configuration to the XDStarClient tool.
To log in this tools, you have to use the link "cas login" on the menu. The login and password are the same one of gazelle test management EU-CAT. If you don't have a login and a password on EU-CAT, please create an acount.
After login, you will be able to add a registry configuration, on the page:

When clicking on the button "Create Registry Configuration", you will be able to add your configuration to the tool :

- Log in to post comments
ITI-38 - Cross Gateway Query
Tool description
This tool provides the possibility to create a valid request according to the transaction ITI-38. The tool participate as an Initiating Gateway on the transaction.
If you are a Responding Gateway, and you want to test your tool with XDStarClient on the transaction ITI-38, you have to :
1. Login using the cas login.
It is a link on the top, right corner. You will go then to the page of the cas

The login and password are the same one of gazelle test management EU-CAT.
If you do not have a login and a password, you have to create on on http://gazelle.ihe.net/EU-CAT/
2. Add the configuration of your system
Once logged in, you have to go to the page menu --> System Configuration. Select then the System's configuration Type = Responding Gateway Configuration.
Here you have the list of all registred Responding Gateway to XDStarClient.

To add you configuration you have to click on the Button "Create Responding Gateway Configuration"

You have to specify the name of your configuration, the URL, the homeCommunityId, the repositoryUniqueId, and the affinityDomain, in our case it is IHE(XDA) => ITI-38. Then you have to click on the button save.
3. Test your system with XDStarClient
Go then to menu --> ITI-38 [Cross Gateway Query] .

You select then your configuration, your message type, and then you fulfil metadatas. Click then on the button Execute.

ITI-41 : Provide and Register Set-b
Simulator Description
You can access To the simulator here.
The aim of this module is to simulate a document source actor on the transaction ITI-41, IHE domain.
This module allow vendors to submit documents, folders and associations between documents, folders and submissionSet.
To access to this simulator, you have to check the menu Simulator --> IHE --> ITI-41

System configuration

If you your system's configuration doeas not appear on the list of configuration to select, please go from the menu to SUT-Configurations --> Repositories-configurations. Then you will see all avalable configuration for testing. To add your configuration you have to click on the button "Create Registry Configuration". If you don't see this button, that's means that you are not logged in. Only logged users are allowed to add a system configuration to the XDStarClient tool.
To log in this tools, you have to use the link "cas login" on the menu. The login and password are the same one of gazelle test management EU-CAT. If you don't have a login and a password on EU-CAT, please create an acount.
After login, you will be able to add a repository configuration, on the page http://gazelle.ihe.net/XDStarClient/configuration/repository/repConfigurations.seam :
conf")
Water clicking on the button "Create Repository Configuration", you will be able to add your configuration to the tool :

Metadatas edition and configuration
-
Initialization of the request
When going from the menu to simulators --> IHE --> ITI-41, and after selecting your configuration, a GUI for editing metadata and for configuring your submission request appear : 
This GUI contains two sides : a tree to represent folders and documents, and a side to represent metadata for each component on the submissionSet.
The patient Id will be used for all submitted documents, folders and for the submissionSet. The sourceId is by default the one of the XDStarClient, and the uniqueId is automatically generated from the XDStarClient.
If a metadata is present by default on the table of metadatas, that's mean that this metadata is required. For example, for submissionset, the XDSSubmissionSet.contentTypeCode is required. The value that you can select for this metadata are the displayName of codes that will be used for bern CAT. These codes can be token from http://hit-testing.nist.gov:12080/xdsref/codes/codes.xml, or from the SVS simulator as REST request. OID that I have defined for each code are :
| 1.3.6.1.4.1.12559.11.4.3.1 | contentTypeCode |
| 1.3.6.1.4.1.12559.11.4.3.2 |
classCode |
| 1.3.6.1.4.1.12559.11.4.3.3 | confidentialityCode |
| 1.3.6.1.4.1.12559.11.4.3.4 | formatCode |
| 1.3.6.1.4.1.12559.11.4.3.5 | healthcareFacilityTypeCode |
| 1.3.6.1.4.1.12559.11.4.3.6 | practiceSettingCode |
| 1.3.6.1.4.1.12559.11.4.3.7 | eventCodeList |
| 1.3.6.1.4.1.12559.11.4.3.8 | typeCode |
| 1.3.6.1.4.1.12559.11.4.3.9 | mimeType |
| 1.3.6.1.4.1.12559.11.4.3.10 | folderCodeList |
| 1.3.6.1.4.1.12559.11.4.3.11 | associationDocumentation |
Additional metadata can be added to the submissionSet, by clicking on the button "add optional metadata on the bottom of the table of metadata. A list of Optional metadata will appear, and you can then select the one you want. Aditional metadata can be deleted from the table after being added :

-
Attach XDSFolder to submissionSet
To Attach an XDSFolder to an XDSSubmissionSet, you have to click on the icon "add xdsfolder to the submissionSet", on the tree of list attached documents and folder :

When clicking on add folder, a new XDSFolder appear on the tree. On the right side, we can see list of required metadata related to the XDSFolder :
 For each XDSFolder, we can attach an XDSDocument by clicking on the icon "add XDSDocument to the folder.
-
Attach XDS Document Entry
 After uploading your file, you will see that a list of metadata has been rendered.This list contain the XDS metadatas required. To add optional metadata, you have to click on the button "Add optional Metadata", and then select your metadata to add, and finally add your data on the table of metadata :


List of Provide and Register Set-b Messages
We can get all messages sent by this tool from the menu : Messages --> Provide and Register Set-b Messages :

- Log in to post comments
ITI-43 [Retrieve Document Set]
This tool provides the possibility to create a valid request according to the transaction ITI-43
The request generated allow to retrieve a document (or a list of documents) from a repository or a document recipient.
To use this tool you have to :
- Select your responder configuration or add a new one on the page configurations.
- Fulfil metadatas of the request, for each document you are looking for.
- Click on the button 'execute' to retrieve document(s).

The result of the request soap sent is viewed on the table after you click on the button execute, on the panel execution summary.
 To view the content of the messages, you have to click on view image from the table. A popup will be displayed with the content of the messages sent and received.

You can download the file received from the table of the received attachments.
ITI-53 - Document Metada Recipient Endpoint
This tool implements an endpoint to receive metadatas notifications, acting as a Document Metadata Notification Recipient.

To go to the description of the transaction in XDStarClient, you have to go to : menu --> SIMU-Responders -> ITI-53 - Document Metada Recipient Endpoint

The wsdl used and acting as ITI-53 responder depend on the configuration of XDStarClient used, and is configured by the adminisatrator of the tool, and specified in the page of definition of the transaction in the tool :
To view the list of Notifications received by the simulator, you have to go from the menu --> Messages --> Simulator as Responder, and then you have to select the transaction ITI-53.

ITI-54 - Document Metadata Publish
This tool allows to simulate the transaction ITI-54 between a Document Metadata Publisher and a Document Metadata Notification broker. The tool plays the role o a Document Metadata Publisher.
To access to the tool you should go to XDStarClient > Simulators > IHE [ITI] > DSUB > ITI-54 [Document Metada Publish]
Then you have to select your system under test, the Document Metadata Notification broker.

The user is able to add even a submission set, a folder, or a document entry to the publish request using the buttons : ![]() ,
, ![]() or
or ![]()
After fulfilling the metadatas related to each entry, the user can send the webservice message using the button execute.

The result of the request is displayed even in a permanent link using the id shown in the table after the execution, or using the loop button in the action column, from the table shown below.

ITI-55 [Cross Gateway Patient Discovery]
Click here to access the ITI-55 Simulator
Introduction
The XCPD Initiating Gateway simulator is developed in conformance with the IHE Technical Framework and especially the epSOS extension to the profile. The GUI of this simulator lets users to generate PRPA_IN201305UV02 messages (XCPD requests), and to send this type of messages to a responder endpoint.
Tools
-
Generation of XCPD Request
This tool allows the generation of XCPD requests from many parameters, which are : family name, given name, birthdate, patient id (id.root and id.extension), gender, address (street, city, country, zipcode), and mother maiden name. These parameters let to generate the request for a patient, and there are two others parameters which are sender homeCommunityId and receiverHomeCommunityId, which let to identify the message's actors. The homeCommunityId used by the simulator is 2.16.17.710.812.1000.990.1 .

-
Communication with Responding Gateway
This tool allows sending XCPD request to the endpoint of an XCPD responding gateway. The endpoint of the IHE XCPD Responding Gateway Simulator is http://jumbo-2.irisa.fr:8080/XCPDRESPSimulator-XCPDRESPSimulator/RespondingGatewayPortTypeImpl?wsdl. This tool lets to generate request and send it to the endpoint, or copy directly the XCPD request message, and send it. You need so to click on the button ""

This page allows also to validate the generated or the uploaded message before sending it to the responder endpoint. The validation is done by communication with the EVSClient. The validation done is a schema validation and a schematron validation, using IHE and epSOS schematrons.

Messages Transaction
All messages sent via this simulator are saved on its database. This simulator can be used by two way : using gazelle driven from tests launched with this simulator, or using the GUI. On the two cases, all messages are saved, and can be viewed on https://gazelle.ihe.net/XDStarClient/messages/allMessages.seam

On this table, for each message sent, we can view it, we can validate it, we can view also the response of the responding gateway and validate its content. Also we can notice that we can choose to view web application messages or gazelle driven messages. We can also notice that for each couple of request/response, we have a permanent link, specified by a unique Id, the permanent link has this form : https://gazelle.ihe.net/XDStarClient//messages/message.seam?id=ID

This permanent link contains the content of the request and the response, the date of the transaction, the responder endpoint, the message type, the transaction type, and the context of the transaction (GUI or gazelle driven message). We can also validate the request and the response directly from the permanent link.
ITI-62 - Delete Document Set Responder
This tool implements an endpoint to receive delete document set messages, acting as a Document Registry Actor.

To go to the description of the transaction in XDStarClient, you have to go to : menu --> SIMU-Responders -> ITI-62 - Delete Document Set

The wsdl used and acting as ITI-62 responder depend on the configuration of XDStarClient used, and is configured by the adminisatrator of the tool, and specified in the page of definition of the transaction in the tool :

To view the list of request received by the simulator, you have to go from the menu --> Messages --> Simulator as Responder, and then you have to select the transaction ITI-62.
ITI-62 [Delete Document Set]
This tool allows to simulate the transaction ITI-62.
This transaction allows to delete document(s) from a repository.
To use this tool you have to
- Select your repository configuration or add a new one on the page Configurations.
- fulfil the request parameters, which are a list of ObjectRef ID.
- execute the request using the button 'execute'. You can preview your request SOAP by using the button 'preview'.
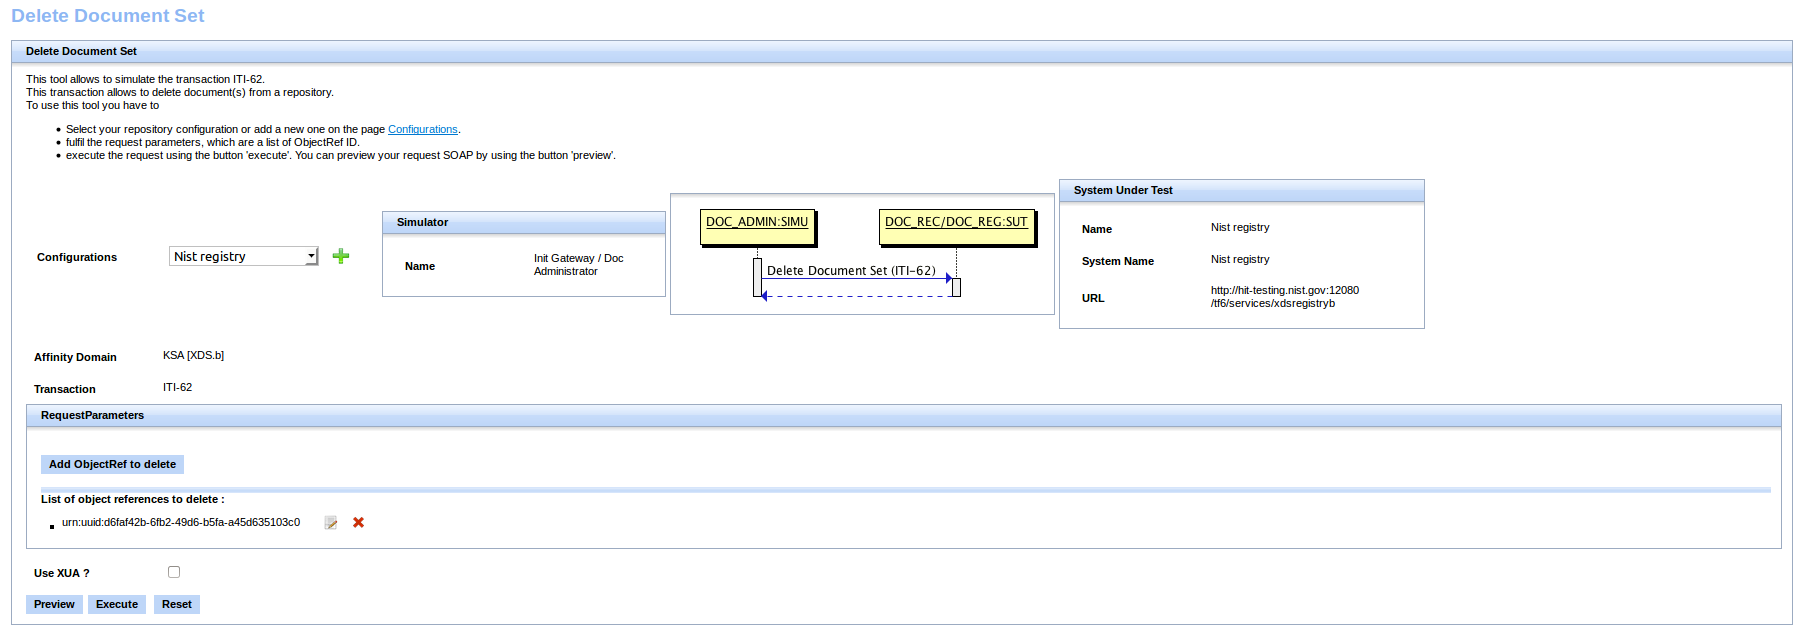
After clicking on execute button, a table will be displayed, containing the result of the execution.

RAD-55 [WADO Retrieve]
This tool provides the possibility to create a valid request according to the transaction RAD-55
To use this tool you have to :
- Select your responder configuration or add a new one on the page configurations.
- Fulfil metadatas of the request
- Click on the button 'execute' to retrieve the document requested

The attribute of the request are the same specified by dicom and restricted by IHE.
The validator of WADO request is integrated into XDStarClient. To validate a wado Request you have to refer to the validation of WADO request in EVSClient tool.
RAD-68 [Provide and Register Imaging Document Set - MTOM/XOP]
This tool provides the possibility to send documents to a repository or a document recipient using the transaction RAD-68
To use this tool you have to :
- Select your repository configuration or add a new one on the page configurations.
- Fulfil metadatas of the submissionSet. The patientId of the submissionSet is required.
- Upload the document(s) to submit, and fulfil IHE metadatas related to the document(s).Uploaded documents shall be dicom KOS Manifest or CDA documents.
- Click on execute button to send the document(s) to the selected configuration.
RAD-68 transaction is too similar to the ITI-41 transaction, with different metadatas.

For more documentation on how to fulfill the metadatas, please refer to the documentation of ITI-41 transaction.
RAD-69 [Retrieve Imaging Document Set]
This tool provides the possibility to create a valid request according to the transaction RAD-69
The request generated allow to retrieve a DICOM document (or a list of documents), based on informations provided by the KOS Manifest.
To use this tool you have to :
- Go to menu > > Simulators > IHE [RAD] > XDS-I.b > RAD-69 [Retrieve Imaging Document Set]
- Select your responder configuration or add a new one on the page configurations.
- Fulfil metadatas of the request, for each document you are looking for.
- Click on the button 'execute' to retrieve document(s).

This tool offer the possibility to upload a KOS manifest, and then generate the corresponding soap request to retrieve the DiCOM sop instances.

After clicking on execute button, the soap request is sent, and the result of the request can be seen in the table displayed.
XDS Metadata validation
XDStarClient provides a validation service for XDS metadatas.
The validation tool is based on schema and model based validation, and sometimes for some kind of validation we use also the nist validation services.
The endpoint of the validation service depend on the XDStarClient installation environment, locally it will be http://localhost:8080/XDStarClient-XDStarClient-ejb/XDSMetadataValidatorWS?wsdl.

The documentation of XDS metadatas constraints is available in XDStarClient GUI : menu -> Documentation ->

This guide will explain how to use the XDS Validator, to be able to list, create, edit and delete validators for the IHE XDS profile. Everything is configurable directly from this GUI, so you don’t have to type code to create a new XDS Validator on the Gazelle platform.
To access or configure a new XDS validator, go to XD*Client http://gazelle.ihe.net/XDStarClient/home.seam. The tabs related to the configuration of a validator are under the XDS-Metadata section.

1. Access to the validator list
Under the XDS-Metadata section, click on the Validator Pack association link.

You should arrive on the validator page list. For each validator, you can edit it, delete it, and export it in XML format with the actions buttons.

To add a new validator, click on the “Add new validator” button at the bottom of the page, or import one through the “XML Validator import” button.

2. Add a new Validator
When you click on the “Add new Validator” button or you try to edit a validator, you will arrive on this page, with many options which must be filled in.

-
From this page, you have to fill the validator name, which generally consists of the domain (epsos, IHE, KSA), the transaction name and the type of transaction (request or response). This can lead to a validator name like this : IHE XDS.b ITI-18 Registry Stored Query - request.
-
The version of the validator doesn’t have to be changed when you add a new validator. If you edit a validator, you must update the version. This way, it’s easiest to know on which validator version an XDS message is passed or failed.
-
The technical framework reference is a reference to the transaction concerned by the validator in the Technical Framework. For example, for the IHE XDS.b ITI-18 Registry Stored Query - request validator, you can find the reference to the ITI-18 transaction in the paragraph 3.18 of the Technical Framework. In this cas, you have to fill the field with “3.18”.
-
The namespace attribute depends on how the XML nodes of the tested files must be prefixed.
-
The extract node attribute is used to parse and select only the children of this XML node and ignore the others when validating a XDS message.
-
PackClass is an optional attribute, used if the validator calls validation methods inside a specific class (generated via OCL language). This attribute must only be used if your validator can’t be express by a composition of AdhocQuery metadata and RegistryObjectList metadata elements. For instance, all the “Response” transactions can only be expressed this way.
-
The files which must be tested in front of the validator you are currently configuring, are tested thanks to the AdhocQueryMetadata and RegistryObjectListMetadata selected. Each metadata defines the mandatory and optional elements, and different constraints expressed in the technical framework. If the metadata needed is not created, please report to the section 3. of this user guide to create a new one.
-
The usages attribute is used to select the usage context of a validator. New usages can be created under the “AffinityDomain-Transactions” tab under XDS-Metadata.
-
Has Nist Validation and the other attributes (Metadatacodes, isRegister, isPnR, isXca, isXdr) are only used if the validator currently added in Gazelle is supported by the NistValidator (an external XDS validation tool).
Once all the fields are filled in, just click on the Save button on top of the page.
3. Add a new XDS Metadata
By configuring a new validator, you may find that some metadata are missing. In this case, you can add new ones, in the same way you add a new validator. Under the XDS-Metadata section, click on the metadata you want to add.

For example, if you want to add a new AdhocQuery, click on the “add new AdhocQuery Metadata” button at the bottom of the AdhocQueries page. You will arrive on this page

If the metadata has itself some children (for example a Classification included in a RegistryPackage), they could be selected under the “Classification”, “Slot” or “External identifier” section. You can’t directly create a child metadata from this page (except for the Slot), it’s necessary to create the child in the first place, save it, and then select it from the parent.
-
UUID : Unique identifier of the metadata.
-
Name : name of the metadata
-
Display name : Used to create an alias for the “Name” field. Used only for display puposed
-
Value : Default Value of the metadata
-
Usages : Context of use
If there is a constraint that can’t be expressed directly from the fields or if this constraint concerns many entities, it’s possible to write an XPATH expression which will be evaluated on the tested document.

4. Add a SlotMetadata
As stated before, there is no dedicated page for SlotMetadata. They are directy editable from the other metadata pages.

-
Name : Slot name. It’s the identifier of a Slot
-
Multiple : If checked, the slot can have multiple values.
-
IsNumber : If checked, the String value of the slot must only be composed of figures
-
DefaultValue : If the slot has a default value, fill the field with it
-
Attribute : Alias for the Slot Name. Used only for display purposes.
-
Valueset : Code referencing a list of authorized values for the string value of the slot. Valueset can be found with SVS Simulator. If the value must not be restricted by a valueset, leave empty.
-
Regex : If the slot value must match a specific regex, the regex must be filled in here. Leave empty otherwise
- Cardinality : Number of times this slot is allowed to appear in the XDS message
[Deprecated] CDAGenerator - Installation & Configuration
Gazelle tools documentation is now maintained at https://gazelle.ihe.net/gazelle-documentation/
Here is a guide to help you installing CDAGenerator
Requirements
- Debian squeeze or ubuntu 12.04 64bits with an Internet access.
- Database : PostGresql 9.1
- Java virtual machine : JDK 1.6
- Application server : Jboss 5.1.0-GA
- It must be installed in: /usr/local/jboss
- A server named gazelle must be here: /usr/local/jboss/server/gazelle/
To install those requirements you can use run this as root:
wget http://gazelle.ihe.net/jenkins/job/gazelle-public-release/ws/gazelle-tm-ear/src/main/scripts/setup.sh
chmod +x setup.sh
./setup.sh
Quick start
CDAGenerator can be installed using gazelle user on your server:
- checkout the sources of CDAGenerator : svn checkout https://scm.gforge.inria.fr/anonscm/svn/gazelle/Maven/CDAGenerator/trunk CDAGenerator
- execute on the root of the project : mvn clean install
- create a database : cda-generator, in postgresql (createdb -U gazelle -EUTF8 cda-generator)
- copy the ear from CDAGenerator-ear/target/CDAGenerator.ear to /usr/local/jboss/server/gazelle/deploy
- start your jboss
Folder Creation
Per default the CDA generator is using the folder /opt/CDAGenerator in order to store files and to access XSD and XSL files. The tar file to be installed is located here.
mkdir /opt/CDAGenerator
cd /opt/CDAGenerator
tar zxvf cda-generator-init-files.tgz
Database creation and initialization
The names of the databases are defined in the pom.xml file. Use the following commands :
su postgresql
psql
postgres=# CREATE USER gazelle;
postgres=# ALTER USER gazelle WITH ENCRYPTED PASSWORD 'password';
postgres=# CREATE DATABASE "cda-generator" OWNER gazelle ENCODING UTF-8;
postgres=# \q
exit
Insert configuration values
To insert values you can connect to the database
psql -U gazelle cda-generator
Then copy paste the folowing script:
--
-- PostgreSQL database dump
--

SET statement_timeout = 0;
SET client_encoding = 'UTF8';
SET standard_conforming_strings = on;
SET check_function_bodies = false;
SET client_min_messages = warning;

SET search_path = public, pg_catalog;

--
-- Data for Name: cmn_application_preference; Type: TABLE DATA; Schema: public; Owner: gazelle
--

INSERT INTO cmn_application_preference VALUES (1, 'java.lang.Boolean', '', 'application_database_initialization_flag', 'true');
INSERT INTO cmn_application_preference VALUES (2, 'java.lang.String', '', 'application_name', 'CDAGenerator');
INSERT INTO cmn_application_preference VALUES (3, 'java.lang.String', '', 'application_admin_name', 'Eric Poiseau');
INSERT INTO cmn_application_preference VALUES (4, 'java.lang.String', '', 'application_admin_email', 'epoiseau@irisa.fr');
INSERT INTO cmn_application_preference VALUES (5, 'java.lang.String', '', 'application_email_account_for_history', 'epoiseau@irisa.Fr');
INSERT INTO cmn_application_preference VALUES (6, 'java.lang.String', '', 'application_issue_tracker_url', 'jira');
INSERT INTO cmn_application_preference VALUES (7, 'java.lang.String', '', 'application_gazelle_release_notes_url', 'http://gazelle.ihe.net/jira/browse/CDAGEN#selectedTab=com.atlassian.jira.plugin.system.project%3Achangelog-panel');
INSERT INTO cmn_application_preference VALUES (8, 'java.lang.String', '', 'time_zone', 'time_zone');
INSERT INTO cmn_application_preference VALUES (9, 'java.lang.String', '', 'application_zone', 'dd');
INSERT INTO cmn_application_preference VALUES (10, 'java.lang.String', '', 'application_profile', 'prod');
INSERT INTO cmn_application_preference VALUES (11, 'java.lang.String', '', 'application_admin_name', 'Eric Poiseau');
INSERT INTO cmn_application_preference VALUES (12, 'java.lang.String', '', 'dds_ws_endpoint', 'http://gazelle.ihe.net/DDSWS/DemographicDataServerBean?wsdl');
INSERT INTO cmn_application_preference VALUES (14, 'java.lang.String', '', 'schematron_validator', 'http://jumbo.irisa.fr:8080/SchematronValidator-SchematronValidator-ejb/GazelleObjectValidatorWS?wsdl');
INSERT INTO cmn_application_preference VALUES (15, 'java.lang.String', '', 'gazelle_bin', '/opt/gazelle/bin');
INSERT INTO cmn_application_preference VALUES (16, 'java.lang.String', '', 'cda_result_detail', 'http://gazelle.ihe.net/EVSClient/xsl/schematronResultStylesheet.xsl');
INSERT INTO cmn_application_preference VALUES (13, 'java.lang.String', '', 'xsl_path', 'http://gazelle.ihe.net/xsl/');
INSERT INTO cmn_application_preference VALUES (17, 'java.lang.String', '', 'sex_oid', '1.3.6.1.4.1.21367.101.101');
INSERT INTO cmn_application_preference VALUES (18, 'java.lang.String', '', 'religion_oid', '1.3.6.1.4.1.21367.101.122');
INSERT INTO cmn_application_preference VALUES (19, 'java.lang.String', '', 'race_oid', '1.3.6.1.4.1.21367.101.102');
INSERT INTO cmn_application_preference VALUES (21, 'java.lang.String', '', 'application_url', 'http://gazelle.ihe.net/CDAGenerator');
INSERT INTO cmn_application_preference VALUES (25, 'java.lang.String', '', 'evs_url', 'http://gazelle.ihe.net/EVSClient');
INSERT INTO cmn_application_preference VALUES (23, 'java.lang.String', '', 'cda_xsd', '/opt/CDAGenerator/xsd/ihe_lab/infrastructure/cda/LabCDA.xsd');
INSERT INTO cmn_application_preference VALUES (24, 'java.lang.String', '', 'cdaepsos_xsd', '/opt/CDAGenerator/xsd/cda_epsos/CDA_extended.xsd');
INSERT INTO cmn_application_preference VALUES (26, 'java.lang.String', '', 'doc_path', '/opt/CDAGenerator/doc/');
INSERT INTO cmn_application_preference VALUES (22, 'java.lang.String', '', 'svs_repository_url', 'http://gazelle.ihe.net');
INSERT INTO cmn_application_preference VALUES (27, 'java.lang.String ', '', 'app_documentation', 'http://gazelle.ihe.net');
INSERT INTO cmn_application_preference VALUES (31, 'java.lang.String', '', 'cdapharm_xsd', '/opt/CDAGenerator/xsd/xsd-pharm-tiani/extendedschemas/CDA_extended_pharmacy.xsd');
INSERT INTO cmn_application_preference VALUES (35, 'java.lang.Boolean', 'Enable or Disable http security headers', 'security-policies', 'false');
INSERT INTO cmn_application_preference VALUES (36, 'java.lang.String', 'Sites can use this to avoid clickjacking attacks, by ensuring that their content is not embedded into other sites', 'X-Frame-Options', 'SAMEORIGIN');
INSERT INTO cmn_application_preference VALUES (34, 'java.lang.String', '', 'svs_endpoint', 'http://gazelle.ihe.net/SVSSimulator/rest/RetrieveValueSetForSimulator');
INSERT INTO cmn_application_preference VALUES (37, 'java.lang.String', 'Application should return caching directives instructing browsers not to store local copies of any sensitive data.', 'Cache-Control', 'private, no-cache, no-store, must-revalidate, max-age=0');
INSERT INTO cmn_application_preference VALUES (38, 'java.lang.String', 'is a security feature that lets a web site tell browsers that it should only be communicated with using HTTPS, instead of using HTTP', 'Strict-Transport-Security', 'max-age=31536000 ; includeSubDomains');
INSERT INTO cmn_application_preference VALUES (39, 'java.lang.String', ' is an added layer of security that helps to detect and mitigate certain types of attacks, including Cross Site Scripting (XSS) and data injection attacks', 'X-Content-Security-Policy', '');
INSERT INTO cmn_application_preference VALUES (40, 'java.lang.String', 'Chrome flag, uses X-Content-Security-Policy values', 'X-WebKit-CSP', 'Use X-Content-Security-Policy values');
INSERT INTO cmn_application_preference VALUES (41, 'java.lang.String', 'Chrome flag, uses X-Content-Security-Policy-Report-Only values', 'X-WebKit-CSP-Report-Only', 'Use X-Content-Security-Policy-Report-Only values');
INSERT INTO cmn_application_preference VALUES (42, 'java.lang.String', 'Configuring Content Security Policy involves deciding what policies you want to enforce, and then configuring them and using X-Content-Security-Policy to establish your policy.', 'X-Content-Security-Policy-Report-Only', 'default-src ''self'' *.ihe.net www.epsos.eu; script-src ''self'' ''unsafe-eval'' ''unsafe-inline''; style-src ''self'' ''unsafe-inline'';');
INSERT INTO cmn_application_preference VALUES (43, 'java.lang.Boolean', 'Enable or Disable Sql Injection filter', 'sql_injection_filter_switch', 'false');
INSERT INTO cmn_application_preference VALUES (44, 'java.lang.String', '', 'assertion_manager_url', 'http://gazelle.ihe.net/AssertionManager');
INSERT INTO cmn_application_preference VALUES (45, 'java.lang.String', '', 'svs_simulator_restful_url', 'http://gazelle.ihe.net/SVSSimulator/rest/RetrieveValueSetForSimulator');
INSERT INTO cmn_application_preference VALUES (29, 'java.lang.String', '', 'ip_login_admin', '.*');
INSERT INTO cmn_application_preference VALUES (28, 'java.lang.Boolean', '', 'ip_login', 'f');
INSERT INTO cmn_application_preference VALUES (48, 'java.lang.Boolean', '', 'cas_enabled', 'true');
INSERT INTO cmn_application_preference VALUES (47, 'java.lang.String', '', 'application_works_without_cas', 'false');
INSERT INTO cmn_application_preference VALUES (46, 'java.lang.String', '', 'cas_url', 'https://gazelle.ihe.net/cas/');


--
-- PostgreSQL database dump complete
--
| variable | Description | type | default |
| app_documentation | link to documentation of the tool | java.lang.String | http://gazelle.ihe.net/content/cda-model-based-validation |
| application_admin_email | email of the admin | java.lang.String | epoiseau@irisa.fr |
| application_admin_name | name of the admin | java.lang.String | Eric Poiseau |
| application_database_initialization_flag | inserted by the application | java.lang.Boolean | true |
| application_email_account_for_history | email of the admin | java.lang.String | eric.poiseau@inria.fr |
| application_gazelle_release_notes_url | release notes' url | java.lang.String | http://gazelle.ihe.net/jira/browse/CDAGEN#selectedTab=com.atlassian.jira.plugin.system.project%3Achangelog-panel |
| application_issue_tracker_url | issue tracker url | java.lang.String | jira |
| application_name | application's name | java.lang.String | CDAGenerator |
| application_profile | application's profile (always prod) | java.lang.String | prod |
| application_url | application's URL | java.lang.String | https://k-project.ihe-europe.net/CDAGenerator |
| application_works_without_cas | cas configuration | java.lang.Boolean | false |
| application_zone | application zone | java.lang.String | GMT+1 |
| assertion_manager_url | link to assertion manager | java.lang.String | https://k-project.ihe-europe.net/AssertionManagerGui |
| Cache-Control | Application should return caching directives instructing browsers not to store local copies of any sensitive data. | java.lang.String | private, no-cache, no-store, must-revalidate, max-age=0 |
| cas_enabled | cas configuration | java.lang.Boolean | true |
| cas_url | cas url | java.lang.String | https://k-project.ihe-europe.net/cas |
| cda_result_detail | link to cda stylesheet result | java.lang.String | https://k-project.ihe-europe.net/EVSClient/xsl/schematronResultStylesheet.xsl |
| cda_xsd | path to schema | java.lang.String | /opt/CDAGenerator/xsd/ihe_lab/infrastructure/cda/LabCDA.xsd |
Compile
Before compiling, go to the directory CDAGenerator and edit the file pom.xml. Open this file and adapt the properties of profile prod to your case :
- jdbc.connection.url : jdbc:postgresql:cda-generator
- jdbc.connection.user / jdbc.connection.password : credentials for database access
Then, create the EAR archive with the command line:
cd CDAGenerator
mvn clean package
The archive (EAR) and the distribution file are created and placed into CDAGenerator /CDAGenerator-ear/target directory.
5. Deployment
Copy the CDAGenerator.ear into the "server/gazelle/deploy" directory of your JBoss server. Finally, start your server.
When the application is deployed, open a browser and go to http://yourserver/CDAGenerator.
If the deployment and the database initialization are successful you should see the home page.
[Deprecated] Configuration of the documentation of MBV
Gazelle tools documentation is now maintained at https://gazelle.ihe.net/gazelle-documentation/
The administrator is able to configure the documentation of XDS/DSUB constraints and rules
First the user shall be logged in as an administrator.
Then, go to administration ->

The user shall then upload the XML file generated from the model of constraints into the tool by using the add button from the previous page.
After the upload is ended, click on the button "Delete and Generate". This button will delete all the constraints related to packages that are mentioned into the uploaded XML file. If there are some constraints related to other packages, they won’t be deleted. The information into the XML document is inserted in the database of the tool.
[Deprecated] CDAGenerator
Gazelle tools documentation is now maintained at https://gazelle.ihe.net/gazelle-documentation/
Introduction
This application has multiple purposes.
- it can be used to generate sample CDA documents that can be used for testing purposes
- today it allows to generate a dispensation document based on a prescription in the context of the epSOS project.
- it will be extended to allow the generation of other kind of CDA documents.
- It hosts the models of the CDA documents and offers the documentation and the edition interface for those models.
- Documentation of the model based contraints
- Generation and Edition of basic CDA R2 documents
Please email questions to the IHE Europe Connectathon Manager (Eric Poiseau) for guidance through the process.

CDA Documentation
CDAGenerator offer a documentation of CDA templates, CDA constraints, and CDA structure.
CDA Structure
CDAGenerator offers a complete documentation of the structure of CDA standard. It is the same description that we find in the schema of CDA R2. The documentation is generated from the model UML that describes the CDA standard. To go to documentation you have to go to menu -> CDA Documentation ->

The html page that describe the Root element (ClinicalDocument) looks like this :

CDA Templates Documentation
All the templates described and validated by CDAGenerator are documented by the tool.
To go to the documentation you have to go to : menu -> Documentation ->

The documentation of the templates is generated automatically from the model UML, which describes the template and its constraints.
CDA constraints documentation
The CDA constraint documentation is a page that contains all the constraint validated by CDAGenerator. This page allows to do search of a constraint by its name, its dependency to a class or a package, or by keyword from the description, etc.
To go to the page of constraint documentation ou have to go to the menu -> Documentation ->

CDA Edition
CDAGenerator offers the possibility to edit and to create basic CDA documents. To do so, you have to go to menu -> CDA Generation ->

You can Generate an empty file, or you can uplaod a CDA file :

To use the module of edition, you have to click on the button edit.
A new page will be opened containg the possibility to edit element by element each sub element of the root ClinicalDocument.

The same page allows to download the modified CDA document, or to validate it, or to save it.
The editor of CDA document is generated also from the model of description of the structure of CDA document.
CDA Web service
CDAGenerator include a web service of validation, that could be used as a standalone without using EVSClient, to validate a CDA document
Disclaimer
The CDA Generator Application is an experimental system.
IHE-Europe assumes no responsibility whatsoever for its use by other parties, and makes no guarantees, expressed or implied, about its quality, reliability, or any other characteristic.
We would appreciate acknowledgement if the software is used.
[Deprecated] Gazelle HL7 Validator - Installation & Configuration
Warning: This documentation is out-dated, newest version of the documentation is available at https://gazelle.ihe.net/gazelle-documentation
Sources & binaries
To get the name of the latest release, visit the Gazelle HL7 Validator project in JIRA and consult the "Change log" section.
A maven artifact is published in our Nexus repository each time we release the application. You can use it, but be aware that the link to the database is hardly expressed within the artifact so you will have to use the same database name, hosted in the server running Jboss, and with the same owner (and password).
To get the artifact on Nexus browse: http://gazelle.ihe.net/nexus/index.html#nexus-search;gav~~GazelleHL7v2Validator-ear~~~ and download the latest version.
If you rather want to build the project by yourself, you must checkout the latest tag and package it. You may want to create a new profile to customize your build.
1. Checkout the latest tag available on Inria’s forge: svn co https://scm.gforge.inria.fr/svn/gazelle/Maven/GazelleHL7v2Validator/tags/GazelleHL7v2Validator-$versionName
2. [Optional] Edit the pom.xml file and create a new profile
3. Package the application: mvn [-P profile] clean package
4. The EAR is available at GazelleHL7v2Validator/GazelleHL7v2Validator-ear/target/GazelleHL7v2Validator.ear
Database configuration
If you use the artifact available on Nexus or if you have not change this parameter in the pom.xml file, create a database named gazelle-hl7-validator, owned by the user gazelle.
$> createdb -U gazelle -E UTF8 gazelle-hl7-validator
Get xsd files
//TODO
Deploy the application
Copy EAR to the deploy folder of JBoss (do not forget to change its name to GazelleHL7v2Validator.ear)
Start Jboss ⇒ sudo service jboss start
Wait until the application has been completly deployed and configure the database running the SQL script for set-up.
Initialize the application
You first need to initialize the database with some data available in a SQL script. If you have checked out the project, the script is available in GazelleHL7v2Validator-ear/src/main/sql/import.sql
Otherwise, download it from Inria’s forge (See Sources section)
Before executing the script, open the file and checked the various preferences to be inserted in the app_configuration table, especially the cas_url, application_url and other preferences relative to the user authentication (see Application configuration section). Context path for deployment is /GazelleHL7Validator.
Finally, execute the script:
$> >psql -U gazelle gazelle-hl7-validator < import.sql
To take those parameters into account, you need to restart either the whole Jboss ($>sudo service jboss restart), either only the application ($>touch GazelleHL7v2Validator.ear in the deploy folder of Jboss)
Application configuration
Use the Administration menu, you will find a sub-menu entitled "Configure application preferences". The following preferences must be updated according to the configuration of your system. The table below summarizes the variables used by the Gazelle HL7 Validator tool.
|
Variable |
Description |
Default value |
|
application_issue_tracker_url |
The URL of the bug tracking system where to post issues |
http://gazelle.ihe.net/jira/browse/HLVAL |
|
application_url |
The URL used by any user to access the tool. The application needs it to build permanent links inside the tool |
http://publicUrlOfJboss/GazelleHL7Validator |
|
cas_url |
If you intent to use a CAS, put its URL here |
https://gazelle.ihe.net/cas |
|
force_stylesheet |
HL7MessageProfiles and HL7 resources are XML files displayed with a stylesheet declared in the file and referenced on gazelle.ihe.net. To avoid cross-site references, most browsers do not follow those links and as a consequence do not display the XML file correctly. This property tells the tool to change the link to the stylesheet before sending the file to the client |
true |
|
gmm_hl7messageprofile_wsdl |
Access Hl7MessageProfile webservice exposed by GMM (or TM configured to work also as GMM) |
http://gazelle.ihe.net/gazelle-gmm-gazelle-tm-ejb/Hl7MessageProfile?wsdl |
|
gmm_iheconcepts_wsdl |
Access IHEConcepts web service exposed by GMM (or TM configured to work also as GMM) |
http://131.254.209.12:8080/gazelle-gmm-gazelle-tm-ejb/IHEConcepts?wsdl |
|
hl7_profiles_directory |
Directory where XML files are stored (used as a basis for updating the database, might be a folder sync with the forge) |
$PathToDataProject$/ProfilesPerOid |
|
hl7_profile_xsd |
Location of the schema for verifying the structure of the XML message profiles. |
path to HL7MessageProfileSchema.xsd |
|
hl7_resource_xsd |
Location of the schema for verifying the structure of the XML resources. |
path to HL7TableSchema.xsd |
|
hl7_table_directory |
Directory where XML fies are stored (used as a basis for updating the database, might be a folder sync with forge) |
$PathToDataProject$/TablesPerOid |
|
length_is_an_error |
how to behave when an error on length is encountered |
false |
|
NUMBER_OF_ITEMS_PER_PAGE |
how many items are displayed in a datatable element byd efault |
20 |
|
profile_xsl_url |
used if force_stylesheet = true |
link to the stylesheet (FDQN must be the same as for the application) |
|
report_xsl_location |
link to the stylesheet for displaying reports |
http://gazelle.ihe.net/xsl/hl7Validation/resultStylesheet.xsl |
|
resource_xsl_url |
used if force_stylesheet = true |
link to the stylesheet (FDQN must be the same as for the application) |
|
svs_repository_url |
URL to the Gazelle value set repository. Used to check codes in HL7v3 validation service |
http://gazelle.ihe.net |
|
time_zone |
Used to display date/time in the appropriate time zone |
Europe/Paris |
|
value_is_an_error |
how to behave when an error on data value is encountered |
false |
|
xsd_directory_location |
where to find the XSD files for HL7v3 validation service |
example : /home/gazelle/xsd/HL7V3/NE2008/multicacheschemas |
|
xcpd_plq_xsd_location |
where to find the XSD files for XCPD/PLQ validation service |
example : /home/gazelle/xsd/IHE/XCPD_PLQ.xsd |
Home page
The first time you access the application, you may notice that the home page of the tool is not configured. To set a title and a welcome message, log into the application with admin rights.
Note that you will have to set up this page for all the languages supported by the application.
Upload of the documentation of the model-based validation service (for HL7v3 messages)
see http://gazelle.ihe.net/content/configuration-documentation-mbv
[Deprecated] SVSSimulator - Installation & Configuration
Warning: This documentation is out-dated, newest version of the documentation is available at https://gazelle.ihe.net/gazelle-documentation
Sources & binaries
To get the name of the latest release, visit the SVS Simulator project in JIRA and consult the "Change log" section.
A maven artifact is published in our Nexus repository each time we release the application. You can use it, but be aware that the link to the database is hardly expressed within the artifact so you will have to use the same database name, hosted in the server running Jboss, and with the same owner (and password).
To get the artifact on Nexus browse: http://gazelle.ihe.net/nexus/index.html#nexus-search;gav~~SVSSimulator-ear~~~ and download the latest version.
If you rather want to build the project by yourself, you must checkout the latest tag and package it. You may want to create a new profile to customize your build.
1. Checkout the latest tag available on Inria’s forge: svn co https://scm.gforge.inria.fr/svn/gazelle/Maven/simulators/SVSSimulator/tags/SVSSimulator-$versionName
2. [Optional] Edit the pom.xml file and create a new profile
3. Package the application: mvn [-P profile] clean package
4. The EAR is available at SVSSimulator/SVSSimulator-ear/target/SVSSimulator.ear
Database configuration
If you use the artifact available on Nexus or if you have not change this parameter in the pom.xml file, create a database named svs-simulator, owned by the user gazelle.
$> createdb -U gazelle -E UTF8 svs-simulator
Deploy the application
Copy EAR to the deploy folder of JBoss (do not forget to change its name to SVSSimulator.ear)
Start Jboss ⇒ sudo service jboss start
Wait until the application has been completly deployed and configure the database running the SQL script for set-up.
Initialize the application
You first need to initialize the database with some data available in a SQL script. If you have checked out the project, the script is available in SVSSimulator-ear/src/main/sql/initial-import.sql
Otherwise, download it from Inria’s forge (See Sources section)
Before executing the script, open the file and checked the various preferences to be inserted in the app_configuration table, especially the cas_url, application_url and other preferences relative to the user authentication (see Application configuration section)
Finally, execute the script:
$> >psql -U gazelle svs-simulator < initial-import.sql
To take those parameters into account, you need to restart either the whole Jboss ($>sudo service jboss restart), either only the application ($>touch OrderManager.ear in the deploy folder of Jboss)
Application configuration
Use the Administration menu, you will find a sub-menu entitied "Configure application preferences". The following preferences must be updated according to the configuration of your system. The table below summarizes the variables used by the OrderManager tool.
|
Variable |
Description |
Default value |
|
application_issue_tracker_url |
The URL of the bug tracking system where to post issues |
http://gazelle.ihe.net/jira/browse/SVS |
|
application_url |
The URL used by any user to access the tool. The application needs it to build permanent links inside the tool |
http://publicUrlOfJboss/SVSSimulator |
|
cas_url |
If you intent to use a CAS, put its URL here |
https://gazelle.ihe.net/cas |
|
application_works_without_cas |
Tells the application how users are authenticated |
True: all users are granted as admin False: uses a CAS service to authenticate users |
|
documentation_url |
Where to find the user manual |
http://gazelle.ihe.net/content/svs-simulator |
|
esvs_xsd_location |
URL of XSD schema ESVS-20100726.xsd |
http://gazelle.ihe.net/xsd/svs/ESVS-20100726.xsd |
|
ignore_validation_in_import |
disable the XSD validation when importing value sets from XML files |
false |
|
ip_login |
if the application is not linked to a CAS, you can choose to restraint the access to the administration sections of the application to a subset of IP addresses |
true: only users whom IP address matches the regex set in ip_login_admin are granted as admin false: no IP address check |
|
ip_login_admin |
regex to be matched by IP address of the users granted as admin |
.* will grant every one as admin |
|
link_repository_http |
Endpoint to contact the SVS Repository - displayed to the user (HTTP binding) |
http://gazelle.ihe.net/ |
|
link_repository_soap |
Endpoint to contact the SVS Repository - displayed to the user (SOAP binding) |
https://gazelle.ihe.net/SVSSimulator-ejb/ValueSetRepository_Service/ValueSetRepository_PortType?wsdl |
|
message_permanent_link |
Page which displays message details |
https://gazelle.ihe.net/SVSSimulator/messages/messageDisplay.seam?id= |
|
result_xsl_location |
URL to access the XML stylesheet used to display HL7v2.x validation results |
|
|
svs_repository_url |
URL of the Sharing Value Set Repository actor of the SVSSimulator |
http://gazelle.ihe.net |
|
svs_xsd_location |
URL of XSD schema SVS.xsd |
http://gazelle.ihe.net/xsd/svs/SVS.xsd |
Home page
The first time you access the application, you may notice that the home page of the tool is not configured. To set a title and a welcome message, log into the application with admin rights.
Note that you will have to set up this page for all the languages supported by the application.
[Deprecated] Schematron-based Validator - Installation & Configuration
This version of the documentation is deprecated. Up-to-date version can be found at https://gazelle.ihe.net/gazelle-documentation
Installation and Documentation
Schematron-based Validator is a maven project. Sources are available on the INRIA Source Forge at the following URL:
If you'd like to checkout the sources on your system you might want to use the following svn command, provided subversion is installed on your system.
- svn checkout svn://scm.gforge.inria.fr/svn/gazelle/Maven/SchematronValidator/trunk
Note that the latest executable can be extracted from our nexus repository as well :
[Deprecated] Security Token Service (STS)
This documentation is deprecated. A new version of the Gazelle STS tool is available and its documentation is available at https://gazelle.ihe.net/gazelle-documentation/Gazelle-STS/user.html
Introduction
A Security Token Service (STS) is a Web service that issues security tokens according to the WS-Security protocol. It is a standard component of security network that enables actions like: authentication, identity validation or security token exchange.
The primary use of a STS is to acquire SAML tokens in order to request a service in a different security domain.
A SAML assertion in WS-Trust is the kind of security token that provides our STS.
The Web Service Description Language (WSDL) needed to contact our Web service with SOAP and XML Schema is linked below.
Service URL : https://gazelle.ihe.net/picketlink-sts?wsdl
An authentication is asked for this server. The password is connectathon and the username depends on the kind of assertion you are expecting (see table below). The default username is Xuagood.
The animation hereunder explains the different steps when a requestor need information from a service provider using a STS :
This STS is used as part of the Connectathons in NA and EU. Our X-Assertion Provider is configured with a Certificate signed by IHE Europe CA. It is available here https://gazelle.ihe.net/gss/certificate/view.seam?id=1120. It is only configured to help you perform all XUA tests, and hence does not provide token for a different context. As a user of the service you must trust that certificate.
ISSUE TRACKER
If you encounter any issue with this application, report it to our developer team !A development team works each day to improve this application and fix notified issues. It is very easy and fast to report an issue, and this is the best way to get it fixed as soon as possible. You just need to create an account on our Issue Tracker (link below) and to report it with its resolution priority. Click on that link to report a problem : http://gazelle.ihe.net/jira/projects/TLS and create an issue with the components "XUA simulation" or "XUA validation". |
Examples of common queries
/!\ In your web service application for service-oriented artchitecture (SOAP), for each request you have to configure the option that enable the line break. In the software SaopUI, the option is "Strip whitespaces = true". If not configured, following requests will not work. /!\
Here is a link to download a valid SoapUI 5.0.0 project with all following requests : Project SoapUI 5.0.0 - Examples queries
(Right-click the link, select “Save target as” or “Save link as.”)
1/ Requesting a Security Token
A requestor sends a request, and if the policy permits, the requestor receives a security token response. An authentication with a username and a password is needed to process the request. They can be changed in tags <wsse:Username> and <wsse:Password>. The password is "connectathon" and the username depends of the kind of assertion that you expect. In the following table, you will find all types of assertions needed for the connectathon with corresponding parameters (don't forget to scroll right to see all parameters). Use the NameID as username to get the desired assertion from the STS. For a default assertion, use the username : "Xuagood".

|
<soap:Envelope xmlns:soap="http://www.w3.org/2003/05/soap-envelope"> |
In the response from the web service, if everything worked fine, you should receive an assertion in the tag <saml:Assertion> ... </saml:Assertion> (the opening tag may looks like <saml:Assertion ID="ID_420d4acb-a582-44ab-bba5-52514857c62f" IssueInstant="2015-03-16T16:05:57.406Z" Version="2.0" xmlns:saml="urn:oasis:names:tc:SAML:2.0:assertion"> ).
The lifetime of a token is 3 hours.
2/ Renew a Security Token
If your previous token expired, you can renew it and get the same token with new expiration semantics. An authentication with an username and a password is needed to proceed the request. They can be changed in tags <wsse:Username> and <wsse:Password> (currently "Xuagood" as username and "connectathon" as password). Copy/paste your assertion achieved from the response of a requesting security token (Part 1 in this tutorial) in the indicated area on the following code. Don't forget to copy information from the opening tag <saml:Assertion ... >.
|
<soap:Envelope xmlns:soap="http://www.w3.org/2003/05/soap-envelope">
|
In the response from the web service, if everything worked fine, you should receive a new assertion in the tag <saml:Assertion> ... </saml:Assertion> (the opening tag may looks like <saml:Assertion ID="ID_420d4acb-a582-44ab-bba5-52514857c62f" IssueInstant="2015-03-16T16:05:57.406Z" Version="2.0" xmlns:saml="urn:oasis:names:tc:SAML:2.0:assertion"> ).
The lifetime of a new token is 3 hours.
3/ Cancel a Security Token
If your previous token is no longer needed, you can cancel it in order to terminate its use. Once an assertion is canceled, you cannot renew it. An authentication with a username and a password is needed to proceed the request. They can be changed in tags <wsse:Username> and <wsse:Password> (currently "Xuagood" as username and "connectathon" as password). Copy/paste your assertion received from the response of a requesting security token (Part 1 or Part 2 in this tutorial) in the indicated area on the following code. Don't forget to copy information from the opening tag <saml:Assertion ... >.
|
<soap:Envelope xmlns:soap="http://www.w3.org/2003/05/soap-envelope">
|
In the response from the web service, if everything worked fine, you should receive a tag <wst:RequestedTokenCandelled/>.
4/ Validate a Security Token
When you get a security token from a requestor, you may have to validate the assertion. No authentication is needed in this part. Copy/paste the assertion from the request in the indicated area on the following code. Don't forget to copy information from the opening tag <saml:Assertion ... >.
|
<soap:Envelope xmlns:soap="http://www.w3.org/2003/05/soap-envelope">
|
In the response from the web service, you should receive a reply with the approval or the rejection of the request.
| Attachment | Size |
|---|---|
| 186.11 KB |
[Deprecated] XDStarClient - Installation & Configuration
Warning: This documentation is out-dated, newest version of the documentation is available at https://gazelle.ihe.net/gazelle-documentation
Here is a guide to help you installing XDStarClient.
Requirements
- Debian squeeze or ubuntu 12.04 64bits with an Internet access.
- Database : PostGresql 9.1
- Java virtual machine : JDK 1.7
- Application server : Jboss 7.2.0.Final
- It must be installed in: /usr/local/jboss7
- A server named gazelle must be here: /usr/local/jboss7/standalone/
- you can get a preconfigured jboss7 from Gazelle team
To install those requirements you need to follow instructions of installation of jboss7 : https://gazelle.ihe.net/content/general-considerations-jboss-7
Quick start
XDStarClient can be installed using gazelle user on your server:
wget https://gazelle.ihe.net/jenkins/job/XDStarClient/ws/install_xdstar_client.sh
wget https://gazelle.ihe.net/jenkins/job/Installer_script/ws/jboss7/common.sh
sudo chmod +x install_xdstar_client.sh
sudo chmod +x common.sh
sudo ./install_xdstar_client.sh $HOSTANDPORT
$HOSTANDPORT are the host and the port number to which your application will deployed, you may use the value localhost:8380 if you are testing locally and you have not changed the configuration of your jboss7 installed.
It will:
- Backup the previous EAR
- Get the latest released version of XDStarClient and deploy it in your jboss.
- Create the database if it doesn't exists.
- Create /opt/XDStarClient folder (used for validation, samples storage) if this folder is not already there
All these steps are done by the script. The next paragraph are only details of how these steps are done (for developper who need more details).
2. Compile Sources
XDStarClient is an open source project under Apache2 licence. The sources are available on the INRIA's Forge:
svn checkout https://scm.gforge.inria.fr/svn/gazelle/Maven/simulators/XDStar-modules/trunk XDStar-modules
svn checkout https://scm.gforge.inria.fr/svn/gazelle/Maven/simulators/XDStarClient/trunk XDStarClient
cd XDStar-modules
mvn clean install
cd ../XDStarClient
mvn clean package -U -Pproduction
If maven cannot download dependencies checkout the maven configuration guide: http://gazelle.ihe.net/content/development-support-tools
3. Database creation and initialization
The names of the databases are defined in the pom.xml file. Use the following commands :
su postgresql
psql
postgres=# CREATE USER gazelle;
postgres=# ALTER USER gazelle WITH ENCRYPTED PASSWORD 'password';
postgres=# CREATE DATABASE "xdstar-client" OWNER gazelle ENCODING UTF-8;
postgres=# \q
exit
Insert configuration values
To insert values you can connect to the database
psql -U gazelle xdstar-client
Then copy paste the folowing script:
SET statement_timeout = 0;
SET lock_timeout = 0;
SET client_encoding = 'UTF8';
SET standard_conforming_strings = on;
SET check_function_bodies = false;
SET client_min_messages = warning;

SET search_path = public, pg_catalog;

SET default_tablespace = '';

SET default_with_oids = false;

--
-- Name: app_configuration; Type: TABLE; Schema: public; Owner: gazelle; Tablespace:
--

CREATE TABLE app_configuration (
  id integer NOT NULL,
  value character varying(255),
  variable character varying(255)
);


ALTER TABLE public.app_configuration OWNER TO gazelle;

--
-- Name: app_configuration_pkey; Type: CONSTRAINT; Schema: public; Owner: gazelle; Tablespace:
--

ALTER TABLE ONLY app_configuration
ADD CONSTRAINT app_configuration_pkey PRIMARY KEY (id);


--
-- Name: variable_unique; Type: CONSTRAINT; Schema: public; Owner: gazelle; Tablespace:
--

ALTER TABLE ONLY app_configuration
ADD CONSTRAINT variable_unique UNIQUE (variable);

--
-- Data for Name: app_configuration; Type: TABLE DATA; Schema: public; Owner: gazelle
--
INSERT INTO app_configuration VALUES (7, 'cda.xsl', 'cda_xsl_path');
INSERT INTO app_configuration VALUES (8, 'XDR Test Pratician', 'default_pratician_id');
INSERT INTO app_configuration VALUES (13, 'UTC+01', 'application_time_zone');
INSERT INTO app_configuration VALUES (10, 'http://gazelle.ihe.net/jira/browse/XDSTAR', 'application_issue_tracker_url');
INSERT INTO app_configuration VALUES (11, 'XDStarClient', 'application_name');
INSERT INTO app_configuration VALUES (12, 'http://gazelle.ihe.net/jira/browse/XDSTAR#selectedTab=com.atlassian.jira.plugin.system.project%3Achangelog-panel', 'application_release_notes_url');
INSERT INTO app_configuration VALUES (29, 'http://gazelle.ihe.net/content/xdstarclient', 'app_documentation');
INSERT INTO app_configuration VALUES (27, 'http://gazelle.ihe.net/xsl/xdsDetailedResult.xsl', 'validation_result_xslt');
INSERT INTO app_configuration VALUES (32, 'NOVAK', 'family');
INSERT INTO app_configuration VALUES (33, 'JAN', 'given');
INSERT INTO app_configuration VALUES (34, '19501201', 'birthdate');
INSERT INTO app_configuration VALUES (35, '', 'root');
INSERT INTO app_configuration VALUES (36, '', 'gender');
INSERT INTO app_configuration VALUES (37, '', 'extension');
INSERT INTO app_configuration VALUES (38, '', 'street');
INSERT INTO app_configuration VALUES (39, '', 'city');
INSERT INTO app_configuration VALUES (40, '', 'country');
INSERT INTO app_configuration VALUES (41, '', 'postalcode');
INSERT INTO app_configuration VALUES (42, '', 'maidenname');
INSERT INTO app_configuration VALUES (19, '50000', 'connection_timeout');
INSERT INTO app_configuration VALUES (47, 'http://gazelle.ihe.net/xsl/mbcdaDetailedResult.xsl', 'cda_mbv_xslt');
INSERT INTO app_configuration VALUES (49, 'http://gazelle.ihe.net/xsl/mbcdaDetailedResult.xsl', 'cda_mbv_xslt');
INSERT INTO app_configuration VALUES (45, '/usr/bin/', 'dicom3tools_validator');
INSERT INTO app_configuration VALUES (26, '/opt/XDStarClient/xsd/IHE/XDSI.b_ImagingDocumentSource.xsd', 'xds_xsd');
INSERT INTO app_configuration VALUES (51, '/opt/XDStarClient/xsd/DSUB/soap-envelope.xsd', 'dsub_xsd');
INSERT INTO app_configuration VALUES (53, '/opt/XDStarClient/', 'server_local_path');
INSERT INTO app_configuration VALUES (9, 'abderrazek.boufahja@ihe-europe.net', 'application_admin_email');
INSERT INTO app_configuration VALUES (21, 'N/A', 'consent_template_path');
INSERT INTO app_configuration VALUES (50, 'N/A', 'dds_web_service');
INSERT INTO app_configuration VALUES (20, 'N/A', 'dispensation_template_path');
INSERT INTO app_configuration VALUES (1, 'N/A', 'epsosFolder');
INSERT INTO app_configuration VALUES (16, '/opt/XDStarClient/uploadedFiles', 'registered_files_directory');
INSERT INTO app_configuration VALUES (2, '/opt/XDStarClient/tmp', 'uploadFolder');
INSERT INTO app_configuration VALUES (54, 'N/A', 'xdstool_xca_query_wsdl');
INSERT INTO app_configuration VALUES (56, 'SAMEORIGIN', 'X-Frame-Options');
INSERT INTO app_configuration VALUES (57, 'private, no-cache, no-store, must-revalidate, max-age=0', 'Cache-Control');
INSERT INTO app_configuration VALUES (58, 'max-age=31536000 ; includeSubDomains', 'Strict-Transport-Security');
INSERT INTO app_configuration VALUES (59, '', 'X-Content-Security-Policy');
INSERT INTO app_configuration VALUES (60, 'Use X-Content-Security-Policy values', 'X-WebKit-CSP');
INSERT INTO app_configuration VALUES (61, 'Use X-Content-Security-Policy-Report-Only values', 'X-WebKit-CSP-Report-Only');
INSERT INTO app_configuration VALUES (63, 'false', 'sql_injection_filter_switch');
INSERT INTO app_configuration VALUES (55, 'true', 'security-policies');
INSERT INTO app_configuration VALUES (15, '/opt/china.jks', 'simu_jks_path');
INSERT INTO app_configuration VALUES (5, 'tomcat', 'key_alias');
INSERT INTO app_configuration VALUES (6, 'password', 'key_pass');
INSERT INTO app_configuration VALUES (4, 'password', 'keystore_pass');
INSERT INTO app_configuration VALUES (64, 'true', 'avoid_nist_validation_ihe');
INSERT INTO app_configuration VALUES (44, 'http://gazelle.ihe.net/SchematronValidator-SchematronValidator-ejb/GazelleObjectValidatorWS?wsdl', 'schematron_validator');
INSERT INTO app_configuration VALUES (62, 'default-src ''self'' *.ihe.net *.ihe-europe.net *.ihe-c.org; script-src ''self'' ''unsafe-eval'' ''unsafe-inline''; style-src ''self'' ''unsafe-inline'';', 'X-Content-Security-Policy-Report-Only');
INSERT INTO app_configuration VALUES (17, '1.3.6.1.4.1.12559.11.13.2.1.', 'document_root_oid');
INSERT INTO app_configuration VALUES (3, '1.3.6.1.4.1.12559.11.13.2.2', 'epsos_source_root_oid');
INSERT INTO app_configuration VALUES (43, '1.3.6.1.4.1.12559.11.13.2.3', 'homeCommunityID');
INSERT INTO app_configuration VALUES (23, '1.3.6.1.4.1.12559.11.13.2.4', 'home_root_oid');
INSERT INTO app_configuration VALUES (25, '1.3.6.1.4.1.12559.11.13.2.5', 'ihe_source_root_oid');
INSERT INTO app_configuration VALUES (18, '1.3.6.1.4.1.12559.11.13.2.6.', 'submission_set_root_oid');
INSERT INTO app_configuration VALUES (14, 'Abderrazek Boufahja', 'application_admin_name');
INSERT INTO app_configuration VALUES (65, 'http://gazelle.ihe.net/AssertionManagerGui', 'assertion_manager_url');
INSERT INTO app_configuration VALUES (66, 'true', 'display_KSA_menu');
INSERT INTO app_configuration VALUES (67, '/opt/XDStarClient/attachments/', 'attachement_files_directory');
INSERT INTO app_configuration VALUES (46, 'http://gazelle.ihe.net/CDAGenerator-CDAGenerator-ejb/CDAValidatorWS?wsdl', 'cda_mbv_wsdl');
INSERT INTO app_configuration VALUES (48, 'http://gazelle.ihe.net/CDAGenerator-CDAGenerator-ejb/CDAValidatorWS?wsdl', 'cda_mbv_wsdl');
INSERT INTO app_configuration VALUES (68, 'http://127.0.0.1:8180/XDStarClient-XDStarClient-ejb/DSUBRecipientWS?wsdl', 'xdstar_dsub_recipient_endpoint');
INSERT INTO app_configuration VALUES (72, '/opt/XDStarClient/', 'gazelle_home_path');
INSERT INTO app_configuration VALUES (70, '2.16.840.1.113883.3.3731.1.1.100.1', 'ksa_aa_oid');
INSERT INTO app_configuration VALUES (73, 'http://127.0.0.1:8180/XDStarClient-XDStarClient-ejb/XDSDeletetWS?wsdl', 'xdstar_delete_doc_endpoint');
INSERT INTO app_configuration VALUES (74, '/home/aboufahj/Téléchargements/36667D66.dcm', 'ksa_manifest_file');
INSERT INTO app_configuration VALUES (24, 'http://gazelle.ihe.net:8180/SVSSimulator/rest/RetrieveValueSetForSimulator', 'svs_repository_url');
INSERT INTO app_configuration VALUES (22, 'https://gazelle.ihe.net/XDStarClient/', 'application_url');
INSERT INTO app_configuration VALUES (52, 'https://gazelle.ihe.net/EVSClient/', 'evs_client_url');
INSERT INTO app_configuration VALUES (71, 'https://gazelle.ihe.net/xdstools2/', 'ksa_xdstools_url');
INSERT INTO app_configuration VALUES (75, 'false', 'display_IHE_RAD_menu');
INSERT INTO app_configuration VALUES (69, 'false', 'display_IHE_ITI_menu');
INSERT INTO app_configuration VALUES (28, 'http://gazelle.ihe.net/cas', 'cas_url');
INSERT INTO app_configuration VALUES (76, 'true', 'ip_login');
INSERT INTO app_configuration VALUES (77, '.*', 'ip_login_admin')
| Properties | Description | Default |
| app_documentation | official documentation | http://gazelle.ihe.net/content/xdstarclient |
| application_admin_email | email of the admin | abderrazek.boufahja@ihe-europe.net |
| application_admin_name | Admin name | Abderrazek Boufahja |
| application_issue_tracker_url | issues tracker's url | http://gazelle.ihe.net/jira/browse/XDSTAR |
| application_name | application name | XDStarClient |
| application_release_notes_url | release notes' url | http://gazelle.ihe.net/jira/browse/XDSTAR#selectedTab=com.atlassian.jira.plugin.system.project%3Achangelog-panel |
| application_time_zone | time zone | UTC+01 |
| application_url | the url of XDStarClient (too important as it is used by permanent links) | https://gazelle.ihe.net/XDStarClient/ |
| assertion_manager_url | URL to the assertion manager used | http://gazelle.ihe.net/AssertionManagerGui |
| attachement_files_directory | file directory on the server, where documnent uploaded and downloaded will be saved | /opt/XDStarClient/attachments/ |
| avoid_nist_validation_ihe | set to false when validation using the nist validator is performed |
true |
| birthdate | used for initialization for XCPD request | 19501201 |
| Cache-Control | security parameter | private, no-cache, no-store, must-revalidate, max-age=0 |
| cas_url | link to the SSO cas | http://gazelle.ihe.net/cas |
| cda_mbv_wsdl | link to the CDA MBV tool ws | http://gazelle.ihe.net/CDAGenerator-CDAGenerator-ejb/CDAValidatorWS?wsdl |
| cda_mbv_xslt | link to the stylesheet to render the result of validation of a CDA document | http://gazelle.ihe.net/xsl/mbcdaDetailedResult.xsl |
| cda_xsl_path | link to the stylesheet to render a cda document | cda.xsl |
| city | used for initialization for XCPD request | Valeur de la préférence |
| connection_timeout | When the client want to rich a responder, this represent the time in millisecond, that the client shall wait before closing the connection | 50000 |
| country | used for initialization for XCPD request | Valeur de la préférence |
| default_pratician_id | used for epSOS purpose | XDR Test Pratician |
| dicom3tools_validator | path where the dicom3tools is installed | /usr/bin/ |
| dispensation_template_path | used for epSOS purpose | N/A |
| display_IHE_ITI_menu | display, or not, the IHE ITI transactions | false |
| display_IHE_RAD_menu | display, or not, the IHE RAD transactions | false |
| document_root_oid | unique identifier of documents | 1.3.6.1.4.1.12559.11.13.2.1. |
| dsub_xsd | path to the schema of DSUB | /opt/XDStarClient/xsd/DSUB/soap-envelope.xsd |
| epsosFolder | used for epSOS purpose | N/A |
| epsos_source_root_oid | used for epSOS purpose | 1.3.6.1.4.1.12559.11.13.2.2 |
| evs_client_url | link to evs client tool | https://gazelle.ihe.net/EVSClient/ |
| extension | used for initialization for XCPD request | Valeur de la préférence |
| family | used for initialization for XCPD request | NOVAK |
| gazelle_home_path | path to a folder used by the tool | /opt/XDStarClient/ |
| gender | used for initialization for XCPD request | Valeur de la préférence |
| given | used for initialization for XCPD request | JAN |
| homeCommunityID | used by the XSD.b requests | 1.3.6.1.4.1.12559.11.13.2.3 |
| home_root_oid | used by the XSD.b requests | 1.3.6.1.4.1.12559.11.13.2.4 |
| ihe_source_root_oid | used by the XSD.b requests | 1.3.6.1.4.1.12559.11.13.2.5 |
| ip_login | used to confirm if the connexion is done using a cas or an ip authentification | true |
| ip_login_admin | list of accepted ip address | .* |
| key_alias | the alias of the keystore used for ssh connexion with responders | tomcat |
| key_pass | password of the key | password |
| keystore_pass | password of the keystore | password |
| ksa_aa_oid | assigning authority OID, for patients | 2.16.840.1.113883.3.3731.1.1.100.1 |
| ksa_manifest_file | Manifest used in test plan, only related to k-project | /../36667D66.dcm |
| ksa_xdstools_url | link to xdstools2 (only related to k-project) | https://gazelle.ihe.net/xdstools2/ |
| maidenname | used for initialization of XCPD request | Valeur de la préférence |
| postalcode | used for initialization of XCPD request | Valeur de la préférence |
| registered_files_directory | used by the ITI-41 transaction | /opt/XDStarClient/uploadedFiles |
| root | used for initialization of XCPD request | Valeur de la préférence |
| schematron_validator | path to the ws of schematronValidator | http://gazelle.ihe.net/SchematronValidator-SchematronValidator-ejb/GazelleObjectValidatorWS?wsdl |
| security-policies | confirm if security is used | true |
| server_local_path | path to a folder on the server | /opt/XDStarClient/ |
| simu_jks_path | path to the keystore | /opt/china.jks |
| sql_injection_filter_switch | security parameter | false |
| street | used for initialization of XCPD request | Valeur de la préférence |
| Strict-Transport-Security | security parameter | max-age=31536000 ; includeSubDomains |
| submission_set_root_oid | used by ITI-41 transaction | 1.3.6.1.4.1.12559.11.13.2.6. |
| svs_repository_url | link to SVS rest service | http://gazelle.ihe.net:8180/SVSSimulator/rest/RetrieveValueSetForSimulator |
| uploadFolder | path to folder for uploading file | /opt/XDStarClient/tmp |
| validation_result_xslt | path to xds transformer of validation result | http://gazelle.ihe.net/xsl/xdsDetailedResult.xsl |
| X-Content-Security-Policy | security parameter | Valeur de la préférence |
| X-Content-Security-Policy-Report-Only | security parameter | default-src 'self' *.ihe.net *.ihe-europe.net *.ihe-c.org; script-src 'self' 'unsafe-eval' 'unsafe-inline'; style-src 'self' 'unsafe-inline'; |
| xdstar_delete_doc_endpoint | endpoint link to the delete webservice | http://127.0.0.1:8180/XDStarClient-XDStarClient-ejb/XDSDeletetWS?wsdl |
| xdstar_dsub_recipient_endpoint | endpoint link to the dsub recipient webservice | http://127.0.0.1:8180/XDStarClient-XDStarClient-ejb/DSUBRecipientWS?wsdl |
| xds_xsd | link to the schema of XDS-I.b | /opt/XDStarClient/xsd/IHE/XDSI.b_ImagingDocumentSource.xsd |
| X-Frame-Options | security parameter | SAMEORIGIN |
| X-WebKit-CSP | security parameter | Use X-Content-Security-Policy values |
| X-WebKit-CSP-Report-Only | security parameter | Use X-Content-Security-Policy-Report-Only values |
Compile
Before compiling, go to the directory XDStarClient and edit the file pom.xml. Open this file and adapt the properties of profile prod to your case :
- jdbc.connection.url : jdbc:postgresql:xdstar-client
- jdbc.connection.user / jdbc.connection.password : credentials for database access
Then, create the EAR archive with the command line:
cd XDStar-modules
mvn install
cd ..
cd XDStarClient
mvn clean package -Pproduction
The archive (EAR) and the distribution file are created and placed into XDStarClient /XDStarClient-ear/target directory.
5. Deployment
Copy the XDStarClient.ear into the "server/gazelle/deploy" directory of your JBoss server. Finally, start your server.
When the application is deployed, open a browser and go to http://yourserver/XDStarClient.
If the deployment and the database initialization are successful you should see the home page.