
[Deprecated] Patient Manager - PIX/PIXV3 Identity Cross-Reference Consumer
Warning: This documentation is out-dated, newest version of the documentation is available at https://gazelle.ihe.net/gazelle-documentation
The PatientManager tool integrates the Patient Identifier Cross-Reference Consumer actor defined by the Patient Identifier Cross-Referencing (PIX) and Patient Identifier Cross-Referencing (PIXV3) integration profiles.
That means that it can
- send Q23 events in the context of the PIX Query (ITI-9) transaction
- receive A31 events in the context of the PIX Update Notification (ITI-10) transaction
- send PRPA_IN201309UV02 messages in the context of the PIXV3 Query (ITI-45) transaction
- receive PRPA_IN201302UV02 messages in the context of the PIXV3 Update Notification (ITI-46) transaction
PIX Update Notification
For this transaction, the Patient Identifier Cross-Reference Consumer actor plays the role of a responder. In this configuration we are not interested in testing the behaviour of the consumer but rather the conformance of the messages sent by the PIX Manager. As a consequence, the PIX Consumer will simply acknowledge the ADT^A31^ADT_A05 and PRPA_IN201302UV02 messages but no other action will be taken.
To send PIX Update Notification messages to our Patient Identifier Cross-Reference Consumer actor, review the configuration of this part of the tool.
This page is reachable from the following menus
- PIX/PIXV3 --> Patient Identity Consumer --> HL7V2 Configuration (for ITI-10/PIX)
- PIX/PIXV3 --> Patient Identity Consumer --> HL7V3 Configuration (for ITI-46/PIXV3)
PIX Query
The Patient Identifier Cross-Reference Consumer actor plays the role of the initiator in the PIX Query (ITI-9) and PIXV3 Query (ITI-45). In this configuration, the tool needs some information concerning your system under test in order to be able to send messages to it. If it is your first time in this application, do not forget to register your system under test as a PIX Manager or PIXV3 Manager, respectively under the SUT Configurations-->HL7 responders or SUT Configurations --> HL7V3 Responders menu.
Step by Step
1. Start your test
From menu
- PIX/PIXV3 --> Patient Identity Consumer --> [ITI-9] PIX Query
- PIX/PIXV3 --> Patient Identity Consumer --> [ITI-45] PIXV3 Query
2. Select your system under test
Select the system under test to query from the drop-down menu entitled "System under test". Look at the connection information displayed at right of the sequence diagram and make sure they meet your system configuration.
3. Configure the query parameters
PIX and PIXV3 screens slightly differs because of the format of the patient identifiers in HL7V2 and HL7V3 but the main purpose is similar.
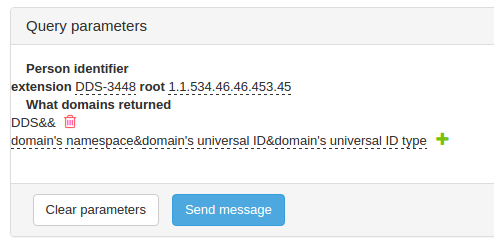
Fill out the person identifier you want to query your system for. Optionally add one or more domains to be returned in the response.
Finally hit the send message button.
4. Response
The received response is parsed to extract the identifiers returned by your system (if some).
5. Validate the messages
Finally, in the test report section, the messages exchanged for the test are logged and you can ask the tool to validate them; the Gazelle HL7 Validator will be called to do so.